Android 减小 APK 大小
Android 应用程序打包之后生成的 apk 文件包含了运行 Android 所需要的所有资源,APK 文件大小影响用户下载应用的时间,在早先流量非常珍贵的时候非常重要,如今虽然 wifi 速度大大的提升了,但是 APK 文件的大小也依然很重要。
了解 APK 结构
通常一个 APK 包括以下目录:
META-INF/包括 CERT.SF 和 CERT.RSA 证书文件, MANIFEST.MFassets/包含 App 的资源文件,可以通过 AssetManager 获取res/包括 App 图片等等资源文件,不会被编译进 resources.arsclib/包括编译的库文件,该目录包括一系列为不同平台打包的子目录,比如 armeabi, armeabi-v7a, arm64-v8a, x86, x86_64, 和 mips
APK 还包括以下文件,AndroidManifest.xml 是强制必须的:
resources.arsc包括编译过的资源文件。这个文件包含了 /res/values/ 目录下定义好的所有的 XML 内容。Packaging Tool 提取 XML 内容,并压缩到二进制。该文件包含了不同语言的字符串,样式,还有不包含在 resources.arsc 文件中的资源路径,比如 layout 文件和图片。class.dex包含编译过后的代码文件,可以被 Dalvik/ART 识别。如果开发者使用 multidex 来避免 the 65536 method limit 那么包中可能存在多个 Dex 文件。AndroidManifest.xml包含 Android 的 manifest 文件。该文件包含了应用的名字,版本,权限申请和引用的库文件。
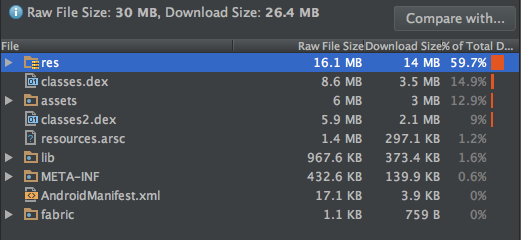
在谈到具体缩减 APK 大小步骤之前,可以使用 Android Studio 内置的 APK 分析工具来分析现有 APK 内容文件。入口位置在:Build -> Analyze Apk ,然后选择 APK 即可,然后会显示:
减少 APK 大小
APK 文件的大小影响着应用的加载,内存的使用,消耗多少电力。减小 APK 大小的最简单的方法就是减少资源文件数量和大小。比如,可以移除程序内不再使用的资源图片,或者可以使用可变大小的 Drawable 来代替现有的图片文件。下面是一些常用做法。
ProGuard
使用 ProGuard 来缩减代码大小,ProGuard 还有其他一些优化,混淆等等的功能,可以参考 sourceforge 或者参考之前整理的文章。具体优化配置如下:
-
在 buildTypes 下开启 minifyEnabled 和 shrinkResources
 buildTypes {
     debug {
         minifyEnabled false
     }
     release {
         minifyEnabled true
         shrinkResources true
         proguardFiles getDefaultProguardFile('proguard-android.txt'), 'proguard-project.txt'
     }
 }
在开启 shrinkResources 之后效果还是挺明显,经过我的尝试,30M 的 App,能够缩减 1M~3M 大小,而只需要增加一行代码,何乐不为。而在平时开发中,如果遇到删减代码的时候,最好将资源文件一同删去,免去在打包时无用文件占用资源。
具体参照 https://developer.android.com/studio/build/shrink-code.html
-
关闭 png cruncher 在下面 PNG 手动压缩之后,关闭该压缩选项
 aaptOptions {
     cruncherEnabled = false
 }
移除无用资源文件
可以使用上面提到的 shrinkResources 来在发布 release 版本时让 Gradle 自动剔除没有使用的资源文件,也可以通过 android-resource-remover 这个脚本来移除无用资源文件,这个脚本基于 Android Lint 工具 。通过 Gradle 在打包时并没有从本地磁盘上删去文件,而使用后一种方法可以从根本上删除无用文件。
在 Android Studio 2.0 以后,使用菜单中 Refactor -> Remove Unused Resources .. 可以用来在项目中移除不在引用的资源。实际操作感觉 Android Studio 会列出不正确的无用资源,在使用时需要特别注意。对于不再需要的图片一定要及时删除,例如因功能更新老的图片不再使用等情形。
在 build.gradle 中定义
android {
    defaultConfig {
        ...
        resConfigs "en", "fr"
    }
}
可以只打包指定语言的资源文件。
缩减 PNG 图片大小
而缩减 PNG 图片大小的方法又可以细分为以下几类:
- 通过代码来实现图片,对于图片资源,能不用图片就不用图片,如果图片的效果可以通过代码来实现,例如用画布来画等方式,这样可以极大限度的降低因为图片的使用而造成的 APK 尺寸增大。能用矢量图就用矢量图,只支持 Android 4.1 以上的程序,
-
尽量多使用 WebP 格式,能用 JPEG 图片的就用 JPEG 图片
- JPEG 图片使用了量化编码压缩的方式,可以极大程度减少图片的尺寸,但它有如下缺点:JPEG 图片无法支持 alpha 通道,如果需要透明效果就无法使用了;不同的压缩比(量化参数)会导致图片的质量非常不同,对于内容丰富、纹理较多的图片,由于分块压缩会导致 JPEG 压缩之后图片出现一些斑块
- 对于 WebP 格式图片来说目前还有一些值得注意:1. Web 文件格式只支持 4+ 以上 Android 设备 2. WebP 文件相较于 PNG 图片需要消耗更多的系统额外时间去 decode 图片。并且 Google Play 只支持包含 PNG 格式图标的 APK,如果需要使用 Google Play 来发布应用,则不要使用 WebP 来制作应用图标。
- 在不影响效果的前提下可以尽量压缩图片资源,图片一定不要放到非 drawable 目录下,除非你有足够的理由,不放在 drawable 下的图片没有 png crunch
-
减少帧动画中图片帧,帧动画会明显的增加包大小,一般在 App 中使用一张 PNG 来表示动画的一帧。如果动画只有 15 FPS,那么在设计导出图片时尽量减少图片的数量,而不是使用 30 张图片来做 15 帧的动画,比如在程序中有个动画是用了 60 帧,后来使用 bash,删去一般图片,并调整代码,而效果几乎看不出区别。
for((a=1;a<62;a=a+2)) do rm "filename"$a".png" done - 还有方法就是使用 VectorDrawable 更多的内容可以参考官方文档。
- 尽量压缩 PNG 图片,可以使用如下的压缩工具
基本原理就是讲 24-bit 的图片压缩到 8-bit ,对于程序中小 icon 或者 低分辨率的图片几乎无法看出区别。
When you upload a PNG (Portable Network Graphics) file, similar colours in your image are combined. This technique is called “quantisation”. Because the number of colours is reduced,24-bit PNG files can be converted to much smaller 8-bit indexed colour images. All unnecessary metadata is stripped too. The result: tiny 8-bit PNG files with 100% support for transparency. Have your cake and eat it too! It turns 24-bit RGB files into palettized 8-bit ones. You lose some color depth, but for small images it’s often imperceptible.
网上有很多压缩工具,比如 tinypng ,pngquant ,Pngcrush ,OptiPNG ,zopflipng from Google 。下面分别简单介绍下。
- TinyPNG uses smart lossy compression techniques to reduce the file size of your PNG files. By selectively decreasing the number of colors in the image, fewer bytes are required to store the data. The effect is nearly invisible but it makes a very large difference in file size!
- pngquant is a command-line utility and a library for lossy compression of PNG images.
- Pngcrush Pngcrush is an optimizer for PNG (Portable Network Graphics) files. It can be run from a commandline in an MSDOS window, or from a UNIX or LINUX commandline.
- OptiPNG OptiPNG is a PNG optimizer that recompresses image files to a smaller size, without losing any information. This program also converts external formats (BMP, GIF, PNM and TIFF) to optimized PNG, and performs PNG integrity checks and corrections.
- Zopfli Compression Algorithm is a compression library programmed in C to perform very good, but slow, deflate or zlib compression.
对于 tinypng 网上有人编写了脚本 在他们的开发者网站上 申请 API key 就能够使用,不过免费的版本每个月只能压缩 500 张图片,对于小程序可能已经足够使用了,但是对于稍微大一些的 App,可能需要付费或者用其他的 API key。
对于 JPG 的图片可以使用 Paint.NET 或者 官方建议的 packJPG
避免重复
可以从以下方面避免程序使用重复内容:
- 不要包含重复代码
- 不要包含重复 assets,strings, bitmap 等等
- 使用 Drawable 对象来重复使用图片资源文件,比如需要一个向左,一个向右的箭头,则可以使用同一张资源图片,而定义 Drawable 来在运行时构建图片
避免资源重复是最显而易见可以减少 APK 大小的方法,而如果产生了重复代码,则一定要考虑是否代码抽象不够,重复的内容是否能够抽象出单独的方法,然后重构产生重复的地方。
广泛地使用 Lint 工具
ProGuard 可以对 Java 进行优化,但是对于 Android 资源文件无能为力。因此,如果图片在 res/drawable 下, Proguard 可以从 R class 中移除引用,但是图片文件依然还在原地方。
Lint 是一个静态代码分析工具,帮助检测无用资源文件。使用命令 ./gradlew 来生成 Lint 报告,在 UnusedResources: Unused resources section 下就能查到所有没有被引用的资源文件。
Lint 工具分析 resources 比如 /res 下的文件,但是会跳过 assets 目录下的文件。事实上, assets 文件可以通过他们的名字而不是 Java 或者 XML 引用来在代码中使用,所以 Lint 工具不能决定 asset 目录下的文件是否被引用。所以在 assets 目录下的文件则需要开发者自己维护,保持干净和整洁。
在 Android Studio 中配置 Android Lint ,使用 Lint 工具检测在菜单 Analyze -> Inspect Code… ,点击之后等待分析完成即可查看分析报告。配置 Lint 工具检查内容可以在 Android Studio –> Preferences –> Editor –> Inspections (currently on Android Studio) 下配置。比如想要关闭 “Image without contentDescription” 检查,可以直接搜索并且关闭即可。
缩减 resource.arsc 文件大小
之前说过 resource.arsc 文件包含了 res/value/ 目录下定义的资源,还有 layout 和 string 等资源的路径。因此随着 App 的不断更新,该文件会越来越大。
资源混淆压缩以及 resource.arsc 文件,工具可以使用 andresguard https://github.com/shwenzhang/AndResGuard/blob/master/README.zh-cn.md ,但因为风险较大,目前并没有集成。
通过混淆资源,将 r/drawable/login_background.png 混淆为 r/d/a.png 这样就可以减少 resource.arsc 文件的大小极限压缩 jpg、png、resource.arsc 等文件,采用 7z 来对这类文件进行进一步的压缩,极大的降低包尺寸使用 andresguard 时清楚自己 app 哪些是不能混淆的,例如 facebook_id、crashlytics key 这些对应的 string 就不能混淆了,必须加入白名单;利用 getIdentifier 来获取的资源也必须加入白名单
asset 等资源
- 音频文件:尽可能可以使用 AAC,mp3 等压缩格式,如果 midi 格式可以就用 midi 格式的,不要使用 wav 等无损格式
- 视频文件:尽可能使用 H264 AVC 文件格式
- JSON、数据库类的配置文件:要想办法节制,可以考虑放置一部分基础配置,其它从网络下载,做好“大而全”和“小而做出一些效果上的折中”两种决定间的权衡与选择
- 字体:尽可能控制程序中使用的字体、字形数目,确定需要额外引入字体的,如果显示的字符数目有限(比如只有数字或只有英文字母),使用 fontforge 等工具对字体进行裁剪后再放入程序,具体剪裁方法参考 这里
Images: PNG or JPEG. Use PNGs; since it is a lossless format it is very suitable for textures and artwork as there will be no visual artefacts from the compression. If there are space constraints, use JPEGs or a combination of PNGs and JPEGs. A high quality JPEG image may work fine for large photo-realistic images, which the JPEG compression scheme is optimised for.
Audio: AAC Audio is recommended for all audio resources. AAC achieves better compression at a given quality, compared to mp3 or Ogg Vorbis. Raw formats such as WAV should never be used. The common rational for using the WAV format is that decoding compressed audio streams usually means high latency at playback. However, Android provides the Sound Pool API which enables applications to use compressed audio streams without the penalty of high latency.
Video: Use H264 AVC. Encode the video to a resolution no larger than the screen resolution of the target device (if known).
使用 FFmpeg 缩减音频
AAC-LC is the default for all of the AAC encoders supported by ffmpeg.
可以使用如下 ffmpeg 转码:
ffmpeg -i input.wav -codec:a aac output.aac
使用 FFmpeg 缩减视频大小
Calculate the bitrate you need by dividing 1 GB by the video length in seconds. So, for a video of length 16:40 (1000 seconds), use a bitrate of 1000000 bytes/sec:
ffmpeg -i input.mp4 -b 1000000 output.mp4
Additional options that might be worth considering is setting the Constant Rate Factor, which lowers the average bit rate, but retains better quality. Vary the CRF between around 18 and 24 — the lower, the higher the bitrate.
ffmpeg -i input.mp4 -vcodec libx264 -crf 20 output.mp4
缩减 Dex 文件大小
决定 dex 文件尺寸主要有两个方面(归根结底都是代码文件)
依赖的库文件,包括 gradle 依赖、引用的 jar 包、aar 包等自己的代码
针对 Google Play Service,在依赖时尽量分开,使用到某一部分时尽量只依赖使用到的部分,而不是把整个库都 pull 下来。比如在项目中只需要使用到 GCM,和 Ads,那么在申明依赖时只引用两个即可。各个部分的依赖在 developers.google.com 上可以查到。
compile 'com.google.android.gms:play-services-gcm:8.4.0'
compile 'com.google.android.gms:play-services-ads:8.4.0'
总结
在总结完以上方法之后,我才发现这一系列文章,这系列的文章非常值得一看,几乎完全覆盖了上面提到的方法。
- #SmallerAPK, Part 1: Anatomy of an APK
- #SmallerAPK, Part 2: Minifying code
- #SmallerAPK, Part 3: Removing unused resources
- #SmallerAPK, Part 4: Multi-APK through ABI and density splits
- #SmallerAPK, Part 5: Multi-APK through product flavors
- #SmallerAPK, Part 6: Image optimization, Zopfli & WebP
- #SmallerAPK, Part 7: Image optimization, Shape and VectorDrawables
- #SmallerAPK, Part 8: Native libraries, open from APK
reference
Android Gradle 学习笔记
Gradle 是 Android 新的编译环境。随着 Android Studio 的发布,编译 Android 的环境逐渐转移到了 Gradle。
an advanced build toolkit, to automate and manage the build process, while allowing you to define flexible custom build configurations
根据 Android 官网 的介绍,Gradle 是一个进阶的编译工具包,能够自动管理编译过程,并且允许用户配置编译过程。并且在后序的学习中可以通过大量的配置来对 Android 进行多渠道打包,自动打包持续集成。
Gradle 和它响应的 Android 插件可以独立于 Android Studio 运行,这也就意味着开发者可以在 Android Studio 内部编译生成应用,也可以通过命令行来打包 APK。
对于新建的 Android 工程,一般会产生多个 gradle 文件,下面依次介绍。
根目录下 build.gradle
Android 项目最顶层,在项目根目录下的 build.gradle 如下:
buildscript {
   repositories {
       jcenter()
   }
   dependencies {
       classpath 'com.android.tools.build:gradle:1.0.0'
   }
}
apply plugin: 'android'
allprojects {
   repositories {
      jcenter()
   }
}
各个字段含义:
- buildscript :用于设置驱动构建过程的代码。
-
jcenter():声明使用 maven 仓库。在老版本中,此处为 mavenCentral(),远端仓库地址。
- mavenCentral() :表示依赖从 Central Maven 2 仓库中获取。
- jcenter() :表示依赖从 Bintary’s JCenter Maven 仓库中获取。
- mavenLocal() :表示依赖从本地的 Maven 仓库中获取。
- dependencies :声明了使用 Android Studio gradle 插件版本。一般升级 Android Studio 或者导入从 Eclipse 中生成的项目时需要修改下面 gradle 版本。具体的版本对应关系,请点击。
- allprojects:设置每一个 module 的构建过程。在此例中,设置了每一个 module 使用 maven 仓库依赖。
settings.gradle
项目根目录下的 settings.gradle 中配置当前项目的 module
默认为:
include ':app'
如果 module 不在 project 根目录下,可以设置:
include ':app2'

project(':app2').projectDir = new File('path/to/app2')
如果有多个 module ,可以依次在 include 后加入,比如 include ':app', ':module1', ':module2' 这样。
(module)/build.gradle
在 module 下的 build.gradle 默认内容:
apply plugin: 'com.android.application'
android {

    compileSdkVersion 21
    buildToolsVersion "21.1.2"
    defaultConfig {
        applicationId "cc.bb.aa.myapplication"
        minSdkVersion 10
        targetSdkVersion 21
        versionCode 1
        versionName "1.0"
    }
    buildTypes {
        release {
            minifyEnabled true
            proguardFiles getDefaultProguardFile('proguard-android.txt'), 'proguard-rules.pro'
        }
    }
}
dependencies {
    compile fileTree(dir: 'libs', include: ['*.jar'])
    compile 'com.android.support:appcompat-v7:21.0.3'
}
-
apply plugin: ‘com.android.application’: 表示使用 com.android.application 插件。也就是表示,这是一个 android application module 。 注:如果 Module 本身是一个依赖库,那么此时的 apply plugin 为 ‘com.android.library’ 相应的,若是一个 Java project,apply plugin 为 ‘java’。对于库项目,与普通项目仅仅是 app plugin 不同,其他完全相同。
-
android: 配置所有 Android 构建过程需要的参数。
-
defaultConfig: Android 项目默认设置。
-
buildTypes: 编译类型。默认有两个: release 和 debug 。我们可以在此处添加自己的 buildTypes ,可在 Build Variants 面板看到。Android 项目规定必须至少定义一个 buildTypes。
-
minifyEnabled: 是否使用混淆。在老版本中为 runProguard ,新版本之所换名称,是因为新版本支持去掉没使用到的资源文件,而 runProguard 这个名称已不合适了。
-
proguardFiles: 使用的混淆文件,可以使用多个混淆文件。此例中,使用了 SDK 中的 proguard-android.txt 文件以及当前 module 目录下的 proguard-rules.pro 文件。更多关于代码混淆的以及 ProGuard 的内容可以参看我的另外一篇文章。
-
dependencies: 用于配制引用的依赖。
-
compile fileTree(dir: ‘libs’, include: [‘*.jar’]) : 引用当前 module 目录下的 libs 文件夹中的所有 .jar 文件。
-
compile ‘com.android.support:appcompat-v7:21.0.3’: 引用 21.0.3 版本的 appcompat-v7 (也就是常用的 v7 library 项目)。
在 Eclipse 中,使用 android support ,需要在 SDK 中下载 Android Support Library 。在 Android Studio 中,使用 android support ,需要在 SDK 中下载 Android Support Repository ,且项目中使用的版本不能大于 SDK 中的版本。
buildTypes
默认情况,Android Studio 会给项目设置 debug 和 release 两个 buildTypes,当然开发者也可以定义自己的 buildTypes。
buildTypes 在 Gradle 中有如下作用:
动态增加或修改 ApplicationId
可以使用 buildTypes 来给 application id 增加后缀,比如
buildTypes {
    release {
        debuggable false
    }
    development {
        debuggable true
        applicationIdSuffix ".dev"
    }
    testing {
        debuggable true
        applicationIdSuffix ".qa"
    }
}
最后得到的 applicationId 会是这样:
com.package.androidfor releasecom.package.android.devfor developmentcom.package.android.qafor testing
Signing Configuration 打包签名
如果想要使用 Gradle 来自动签名打包,可以使用这样的配置,避免在版本控制中提交密码。
在 ~/.gradle/gradle.properties 中配置:
RELEASE_STORE_FILE={path to your keystore}
RELEASE_STORE_PASSWORD=*****
RELEASE_KEY_ALIAS=*****
RELEASE_KEY_PASSWORD=*****
并修改 build.gradle 文件:
android {
...
signingConfigs {

   release {
       storeFile file(RELEASE_STORE_FILE)
       storePassword RELEASE_STORE_PASSWORD
       keyAlias RELEASE_KEY_ALIAS
       keyPassword RELEASE_KEY_PASSWORD
   }
}

buildTypes {
        release {
            signingConfig signingConfigs.release
        }
}
....
}
之后就可以使用命令或者 Gradle 面板中的 gradle assembleRelease 来生成签名的 apk 文件
混淆
关于 ProGuard 的内容可以参考这篇文章
buildTypes {
    debug {
        minifyEnabled false
        proguardFile('proguard.cfg')
    }
    release {
        minifyEnabled true
        proguardFile('proguard.cfg')
    }
}
其他基本配置
以下是一些 buildTypes 的基本配置,举例:
release {
    minifyEnabled false
    proguardFiles getDefaultProguardFile('proguard-android.txt'), 'proguard-rules.txt'
    signingConfig  signingConfigs.myConfig
    debuggable false
    jniDebuggable false
    versionNameSuffix ".suffix"
    zipAlignEnabled true
    pseudoLocalesEnabled true
    renderscriptDebuggable true
}
buildTypes 支持的配置:
| 配置名称 | 作用 |
|---|---|
| minifyEnabled | 是否开启 Minify ,包括混淆和压缩代码 |
| debuggable | 是否编译出可调试的 apk |
| applicationIdSuffix | 添加 application id 后缀 |
| proguardFiles | 添加 ProGuard 配置文件 |
| jniDebuggable | Whether this build type is configured to generate an APK with debuggable native code. |
| renderscriptDebuggable | Whether the build type is configured to generate an apk with debuggable RenderScript code. |
| renderscriptOptimLevel | Optimization level to use by the renderscript compiler |
| versionNameSuffix | Version name suffix. |
| zipAlignEnabled | Whether zipalign is enabled for this build type. |
| testCoverageEnabled | Whether test coverage is enabled for this build type. |
| pseudoLocalesEnabled | Whether to generate pseudo locale in the APK. |
| embedMicroApp | Whether a linked Android Wear app should be embedded in variant using this build type. |
外部依赖 compile
引用一个外部依赖需要使用 group, name 和 version 属性。根据你想要使用的库,group 和 version 可能会有所差别。
有一种简写形式,只使用一串字符串 "group:name:version" .
在 build.gradle 中,如下方式引入依赖:
dependencies {
    compile fileTree(dir: 'libs', include: ['*.jar'])
    compile 'com.android.support:appcompat-v7:22.2.1'
    compile files('libs/liba-3.4.5.jar')
    compile project(':libraryName')
}
代码解析:
compile fileTree(dir: 'libs', include: '*.jar'),可以将 libs 目录下所有 jar 文件进行编译打包。也可以使用compile fileTree(dir: 'libs', include: ['*.jar'], exclude: ['xx.jar'])中 exclude 这样的语法来排除某些指定的 jar- 默认从远端 repository 中下载依赖并编译打包
- 第二个是从本地 libs 目录下寻找 jar 文件,并进行编译打包
- 将本地另一个 module 进行编译打包,被引用的 module 需要在 projectName/settings.gradle 中注册。
compile file、compile project、compile fileTree 都可以看成是 compile 的子命令,
dependencies {
    provided files('libs/libb.jar')
    provided 'com.squareup.dagger:dagger-compiler:1.2.1'
    // 在测试环境下引用依赖。
    // 引用 jar 文件。
    androidTestCompile files('libs/xx.jar')
    // 引用 Maven。
    androidTestCompile 'junit:junit:4.11'

    // 在 release buildTypes 分支下引用依赖。
    // 引用 jar 文件。
    releaseCompile files('libs/xx.jar')
    // 引用 Maven。
    releaseCompile 'aaa:bbb:x.x.x'
}
如果使用的是 provided 则表示该依赖只在编译时使用,不在最后打包时使用。
Product Flavors
Product Flavors 用来管理不同的 release 版本,比如免费版和收费版。可以通过自定义 product flavors 来使用为不同的发行版设置不同的资源文件和代码,同时共享相同部分的资源和代码。 Product Flavor 设置是可选的,具体步骤可参考官网。
reference
Android ProGuard
根据官网的注解:
ProGuard is a free Java class file shrinker, optimizer, obfuscator, and preverifier.
原文非常简洁,翻译过来也很容易明白,ProGuard 能对 Java 字节码文件进行压缩、优化、混淆和预验证。ProGuard 几个典型的用法就是:1. 缩减应用的大小;2. 移动设备优化代码; 3. 防止恶意反编译或者篡改程序。
ProGuard 相较于其他 Java 混淆器优势的地方在于
- compact template-based configuration
- fast
- command-line tool with an optional graphical user interface
ProGuard 可以删除 Java 代码中无用的类、字段、方法和属性,并混淆代码 ,从而减小 APK 的大小,打包 apk 上线时,代码是一定要混淆的,有些情况下,部分代码是不能混淆的,否则就会导致程序功能不能正常运行
配置 ProGuard
ProGuard 四大功能的工作顺序是压缩->优化—>混淆—>预验证。
压缩:检测和删除项目中没有使用的类、字段、方法和属性。如果存在两个类互相调用,但项目实际上并没有使用到这两个类,这两个类也会被删除。
优化:优化代码的复杂调用,使代码运行顺序更为合理。
混淆:依据用户的配置,将代码的包名、类名、方法名和变量名等改成 a,b,c 等无意义的名称。Java 源代码编译后产生二进制 class 文件,这个 class 文件可以反编译成 Java 代码。反编译后生成的 Java 代码除了原来的注释外,其他代码比如变量名、类名和方法名等基本都能看到,和 Java 源代码几乎没有区别。为了防止项目代码被泄露,我们需要把项目代码中的包、类、方法和变量名等 Java 元素的名称改成无意义的名称。这个过程就是混淆。混淆之后的代码只是在一些名称上有修改,对代码的结构没有影响,所以混淆后的代码依然可以运行。项目经混淆后并不是说代码就不能被反编译了,只是反编译混淆后的项目后看到的代码将不是源码,变量名变得不再能一眼看懂其意思,此时想弄懂原有的项目代码架构很难。在混淆的过程中,不影响正常工作的信息将永久删除,使得反编译之后的代码变得更加难以理解。
预验证:在 Java 平台对处理后的代码进行预检,保证代码能够正常运行。这一步在 Android 项目中不需要。
Android Studio 已经集成了 ProGuard 工具。对 Android 项目进行混淆时,我们只需修改一些配置即可。 随便打开一个 Android 项目,在 app 目录下的 build.grade 文件中可以看到如下代码
buildTypes {
    debug {
        minifyEnabled false
    }
    release {
        minifyEnabled true
        proguardFiles getDefaultProguardFile('proguard-android.txt'), 'proguard-project.txt'
    }
}
以上述代码为例,minifyEnabled 置为 true 表示在 release 环境下启用 ProGuard 工具。在打包程序时,这一项必须置为 true, 否则 release 打出的包将没有压缩、优化、混淆。
proguardFiles 命令后面的两个文件是 ProGuard 的配置文件,启用 ProGuard 后, ProGuard 对项目的处理将遵循这两个文件的配置。proguard-android.txt 是 Android Studio 集成 ProGuard 工具时自带的 ProGuard 配置文件,该文件在 Android SDK tools/proguard/ 目录下,proguard-rules.pro 是开发项目时由程序员添加的配置文件。
官网建议,为了更好地压缩代码,Android 还在SDK同目录中提供了 proguard-android-optimize.txt 文件,它包含了相同的规则,但是提供了额外针对 bytecode 的分析优化。而与此同时 proguard-android.txt 是不提供代码优化的。
proguard-rules.pro 文件可以在当前 Android 项目 app 目录下找到。初始时此文件是空白的,开发者可以在这个文件中添加自己项目的 ProGuard 配置,不要也不能在 proguard-android.txt 和 proguard-android-optimize.txt 中添加自定义规则。proguardFiles 后面可以加入多个文件名,意味着 ProGuard 工作会遵循多个文件的配置。
当在项目中配置了 minifyEnabled 为 true 时,如果不配置 ProGuard 文件,ProGuard 会混淆所有代码。而有些情况下,有些代码是不能混淆的,否则就会导致程序出错。常用的不能混淆的代码如下:
- 使用反射的地方
- JNI 方法
- 系统接口(Framework 层下所有的类),Manifest 中声明的所有类,四大组件,Application 子类不混淆
- xml 中声明的所有资源名
- 使用第三方开源库或者引用其他第三方的SDK包时,需要在混淆文件中加入对应的混淆规则
- Parcelable的子类和Creator静态成员变量不混淆,否则会产生 Android.os.BadParcelableException 异常
- 使用GSON、fastjson等框架时,所写的JSON对象类不混淆,否则无法将JSON解析成对应的对象
- 有用到WebView 的 JS 调用也需要保证写的接口方法不混淆
Android Studio 启用 ProGuard 工具后,会默认不混淆系统接口、Manifest 中声明的所有类和 xml 中声明的所有资源名,因此这些情况下不需要手动配置 ProGuard 文件。而其他情况下不应该混淆的代码就需要对 ProGuard 文件进行配置。
常用的 ProGuard 配置语法
从给定的文件中读取配置参数
-include {filename}
保护给定的可选属性,例如 Exceptions,InnerClasses,Signature,Deprecated,SourceFile,LineNumberTable,Annotation,EnclosingMethod
-keepattributes Exceptions,InnerClasses,Signature,Deprecated,
            SourceFile,LineNumberTable,*Annotation*,EnclosingMethod
例如,在代码中使用了反射,加入以下混淆规则:
-keepattributes Signature,EnclosingMethod
保护指定的类文件和类的成员(类中的方法和成员变量都是类的成员,下同)
-keep {Modifier} {class_specification}
例如,保护指定包下面的类:
-keep class info.einverne.jsonobject.** { *; }  // 不混淆 info.einverne.jsonobject 包下面类和所有类成员变量
-keep class info.einverne.jsonobject.personinfo        // 不混淆具体类
保护指定类的成员
-keepclassmembers {modifier} {class_specification}
例如,保护继承了 Serializable 接口的类:
-keepclassmembers class * implements java.io.Serializable {
    static final long serialVersionUID;
    private static final java.io.ObjectStreamField[] serialPersistentFields;
    private void writeObject(java.io.ObjectOutputStream);
    private void readObject(java.io.ObjectInputStream);
    java.lang.Object writeReplace();
    java.lang.Object readResolve();
}
或者,不混淆 enum 类:
-keepclassmembers enum * {
    public static **[] values();
    public static ** valueOf(Java.lang.String);
}
保护指定的类和类的成员,但条件是所有指定的类和类成员是要存在。
-keepclasseswithmembers {class\_specification}
例如,不混淆 native 方法:
  -keepclasseswithmembernames class * {
      native <methods>;
  }
如果不在压缩步骤中删除,则保护指定的类和类的成员的名称
-keepnames {class\_specification}
如果不在压缩步骤中删除,保护指定的类的成员的名称
-keepclassmembernames {class\_specification}
如果不在压缩步骤中删除,保护指定的类和类的成员的名称
-keepclasseswithmembernames {class\_specification}
忽略警告,避免打包时某些警告出现
-ignorewarnings
是否使用大小写混合
-dontusemixedcaseclassnames
其他选项
-dontshrink    不压缩(不配的话默认是使用 ProGuard 的压缩功能)
-dontoptimize    不优化(不配的话默认是使用 ProGuard 的优化功能)
-dontobfuscate    不混淆(不配的话默认是使用 ProGuard 的混淆功能),需要注意 release 版本不要启用此选线
-dontusemixedcaseclassnames    混淆时不会产生形形色色的类名
ProGuard 配置通配符
? 匹配除包分隔符外的任意单个字符
*  匹配除包分隔符外的所有符号
** 匹配多个字符(任意)
%  匹配所有基本类型(不包含 void)
***  匹配任何类型
!  不匹配
<init>   匹配所有构造函数
<fields>  匹配所有字段
<methods> 匹配所有方法
reference
Android Http 调试及抓包
Android 开发中可能需要对网络请求进行调试,这时刻需要对程序发出的请求进行抓包。下面记录一下之前调试使用过的工具和使用方法,以便于未来快速查询。
Charles
Charles 是 Mac/Linux 下非常好用的抓包工具,不仅是对 Android,而 iOS,或者其他局域网能够使用本机http代理的任何设备都能够进行抓包的操作。
Charles实现对 Https 进行抓包,使用的原理就是中间人技术(man-in-the-middle)。Charles会动态生成一个使用自己根证书签名的证书,Charles接收web服务器的证书,而客户端浏览器/客户端 接收Charles生成的证书,以此客户端和Charles之间建立Https连接,Charles和Web服务器之间建立Https连接,实现对Https传输信息的抓包。
具体原理就是,通过 HTTP 代理,将手机的流量转到 Charles ,在通过 Charles 分析。Charles是一个抓包工具,支持抓取 HTTP、HTTPS 协议的请求。
优缺点
优点:
- 实时抓包
- 纯界面,简单
- 设置一次,终生受益
- 手机不需要Root
缺点:
- 授权很贵
配置
- 安装包
官网地址: http://www.charlesproxy.com/
安装完成之后需要配置
- 菜单 Proxy > Proxy Settings, 选择端口 8888, 勾选 “ Enable transparent HTTP proxying”
- 菜单 Proxy > SSL Proxy Settings… ,选择 “Enable SSL Proxying”, 然后添加,在 HOST 中填入
*.*, Port 中填 443 - 在 Help 菜单中,选择 ” SSL Proxying”,分别安装 Mac 端证书,Mobile 端证书,需要在 KeyChain 钥匙串访问中始终信任 Charles 证书,而手机端也要通过 Charles 给出的网络地址来下载证书并安装,Android 相对容易,iOS 比较麻烦。
安装完桌面证书之后,在手机端配置
- 在 WIFI 面板中,长按 WIFI,打开高级设置,然后设置 HTTP 代理
- 选择 Manual, 代理地址为,本机局域网 IP,端口 8888
Configure your device to use Charles as its HTTP proxy on ip:8888, then browse to chls.pro/ssl to download and install the certificate.
然后在 Charles 中就能够检测到手机上的请求,在 Charles 界面中会有对话框弹出“A connection attempt to Charles has been made from the host xx.xx.xx.xx. You should allow …. “ 等等,选择允许即可,Charles 会自动分析请求参数及返回。
界面
左侧为所有请求列表,右侧为具体请求数据,可以点击 Request 和 Response 来查看请求和回复的数据。
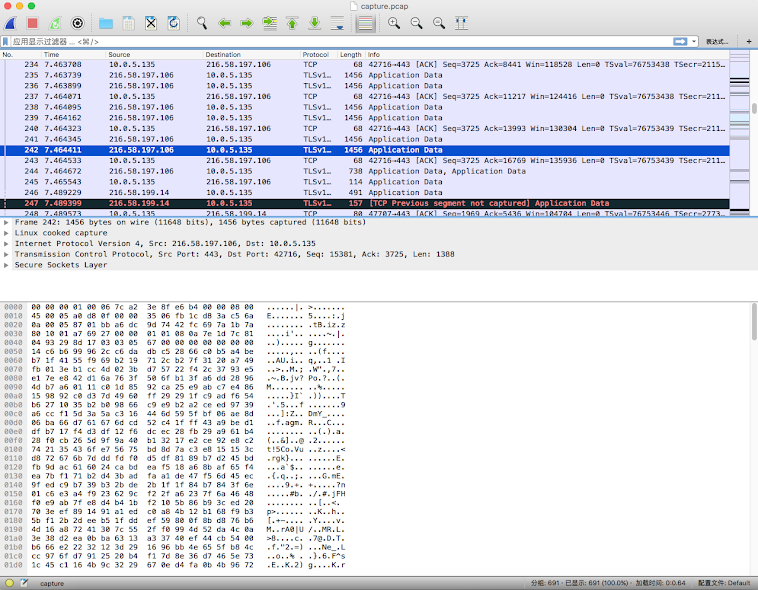
tcpdump
使用 tcpdump 工具,需要准备:
- 手机 root
- tcpdump 二进制文件 可在 http://www.androidtcpdump.com/ 下载
优缺点
- 操作简单,但是需要熟悉 adb 命令
- 手机数据包完整抓取
缺点:
- 只能针对 Android 手机
- 不能实时抓取
- 电脑端需要安装 Wireshark
步骤
检查手机连接
adb devices
将 tcpdump 推到 Android 设备
adb push /path/to/tcpdump /sdcard/
进入手机,将 tcpdum 移动位置
adb shell

su

mv /sdcard/tcpdump /data/local/
修改权限
chmod 777 /data/local/tcpdump
执行抓包
/data/local/tcpdump -i any -p -s 0 -w /sdcard/capture.pcap
# "-i any": listen on any network interface
# "-p": disable promiscuous mode (doesn't work anyway)
# "-s 0": capture the entire packet
# "-w": write packets to a file (rather than printing to stdout)   ... do whatever you want to capture, then ^C to stop it ...
使用 Ctrl + C 停止,然后将 pcap 文件拉取到本地
adb pull /sdcard/capture.pcap ~/wiresharp/
然后使用本地安装的 wiresharp 应用来分析
Linux 下可以使用
sudo apt-get install wireshark
然后使用
wireshark capture.pcap
图片展示
更加详细的参数及使用可以参考1
其他抓包工具
可以实现抓包的方式有很多,正如上面所讲可以直接在 设备中运行 tcpdump,也可以将流量通过 HTTP 代理转到Charles 抓包,当然如果有条件甚至可以在网卡上实时抓包。
| 工具名字 | 支持平台 | 授权 | 官方地址 |
|---|---|---|---|
| Fiddler | 只支持Windows | https://www.telerik.com/download/fiddler | |
| Charles | Win/Mac/Linux 三大平台 | 单用户授权$50, 免费使用30天 | https://www.charlesproxy.com/download/ |
| Wireshark | Win/Mac/Linux | https://www.wireshark.org/download.html | |
| mitmproxy | Mac/Linux 命令行工具 | free | https://mitmproxy.org/ |
reference
文件夹和标签的区别使用
文件夹和标签最直观的一个特点就是,一件物品只能属于一个文件夹,但是可以有很多标签Tag。这件物品可以是一封邮件,一个文件,或者是一篇文档。如果为了更加直观的看,可以做个比喻,当收到一件快递时,打开包装看完内容,可以选择放到一个抽屉里,也可以贴上各种颜色的标签纸。而这里的的“放入一个抽屉”就是放入一个文件夹,而标签就是各种标签纸。文件夹是设置方便我们分类保存使用,而标签是为了便于我们检索和记忆。因此文件夹分类的方式,物品的位置移动了,而标签可以在物品原地加上。
标签的历史
Gmail 最早在邮件系统中使用标签 label,而我也是初次在 Gmail 中体会到标签的好用。而此后接触的大大小小的工具都有着类似的概念,笔记类软件 Evernote 和 Wiznote 他们都有完整的文件夹和标签系统,更甚至最近 Google Photos 的更新让相册对应了文件夹,而其中的人物,地理等等信息对应了标签。而网络中每一篇 Blog 都有对应的 Category 和很多的 Tag。Flickr 中的每一张照片都只能属于一个相册,但是可以有很多的标签。
如何使用文件夹和标签
至于如何使用这两者,网上 有句话说的很明白,“文件夹是给自己看的,而便签是给搜索引擎看的。” 因此
- 文件夹应当用来分类消息,并使得分类数尽量降低,并且使得每个分类中的信息尽量均衡,如果有子分类,尽量有清晰的父子关系
- 而对于标签系统,每个物品的标签应当尽量的丰富,标签数应当尽可能多。但是,同义的标签应该尽量少。
而就我自己的对于标签的使用来看,对于每个标签的使用也应当尽量的考虑,尤其现在全文检索能力的增强,标签一定程度上已经弱化为文件夹的作用。并且是增强型文件夹,原始的文件夹因为分类的排他性,只能产生一对一的映射,而标签可以产生一对多的映射。
瞎想
写到这里,突然想到 Google 对于 Google+ 所做的尝试,最早 Google+ 推出的时候, Circle 这个概念广受好评,而圈子这一功能不也是对联系人的扩充嘛? 原本一个联系人只能属于我自己的一个分组,比如家人,好友,同学,而这也是我一直对我联系人进行的分类,而 Google+ 做所的圈子功能让一个人可以同时从属与不同圈子,作为现实的抽象同样也很好理解,我的同学,可能成为好友,或许也可能成为家人。而圈子的功能就完美的解决了从属的问题,而细想,圈子的功能不就是标签的功能嘛?更甚至在网页版 Contact 上,联系人侧边栏的设计和 Gmail 中文件夹和标签的设计相似。至于最后逐渐弱化对圈子功能的支持,可能也是用户的妥协,只有对整个系统熟悉的人才会不惜花费时间去分类标签,因为建立起这一套分类标准之后对整个交流和生活都能节省很多时间,而对于新人用户这本身便是一件非常耗时和复杂的事情。
reference
离线文档查看工具
在离线状态下看文档利器,速度非常迅速。最早知道是 Mac 下的 Dash,但是后来转 Linux,就想着要一个同类型的工具,没想到真的发现了更加好用的 Zeal。但就离线看文档而言,Zeal 不仅轻量而且快速。
Mac 下 Dash
去除快速查看文档之外,还有另一个非常实用的功能就是 Code snippets,并且和一些 IDE,编辑器结合,能够通过少量的快捷键到达非常快速的输入。从另外一方面想,作为本地代码片段管理似乎也是不错的选择。
Dash 比较突出的几大功能:
- 自动保存状态,每次关闭都会记录状态,下次打开时会自动定位
- 设备间同步,包括安装的文档,个人信息及收藏代码片段
- 开发人员可以给公开的或者私有的文档或者例子添加评论
- 对市面上常见的 IDE 都有插件支持
Linux 下 Zeal
Zeal 有如下几个功能:
- 生成自己的技术文档
- 免费并且开源,文档内容源自 Dash
- 有 Vim,Emacs,Sublime Text 等插件
Linux 下安装
详情可以查看官方文档。 推荐使用 PPA 安装,官方更新比较及时
$ sudo add-apt-repository ppa:zeal-developers/ppa
$ sudo apt-get update
$ sudo apt-get install zeal
遇到 Bug 或者任何问题都可以到 GitHub 提出 issue:https://github.com/zealdocs/zeal/issues
Zeal 安安稳稳的做好文档查看就已经很好了。
配置
Linux 下默认配置地址在:~/.config/Zeal/Zeal.conf 。
离线文档地址:~/.local/share/Zeal/Zeal/docsets
Chrome 下离线文档
在搜索过程中又发现了一个查看文档的网站 http://devdocs.io/ , 也同样可以使用 Chrome 插件达到离线查看文档的效果,但是看了一眼似乎没有 Android 的文档,但是其他似乎挺全的。并且整个网站还是开源的。
reference
Android 过渡动画框架
为了帮助视图层次内部和视图之间的过渡更加容易实现动画效果,Android 提供了 Transition 框架。这一套框架能够在视图之间提供一种或者多种动画过渡效果。过渡动画要解决的另一个主要问题就是对同一场景中的多个 View 做动画,弥补了之前Android 在动画方面的缺失。
这一套框架提供如下功能:
-
Group-level 动画 在同一视图层次中一种或者多种动画效果
-
Transition-based 动画 在初始场景和终止场景之间动画
-
Built-in 动画 内置普通效果动画,包括 fade out 和 movement
-
Resource 文件支持 从 layout 资源文件中加载视图以及内置动画资源
-
Lifecycle callbacks 随心所欲的控制动画的过程
Transition API 在 Android 5.0 及以上被引入,但是在 4.4 Kitkat 时就引入了 Scenes 和 Transitions 的概念。在 Android 4.0 API level 14 及以上,可以使用 android.support.transition 包中内容
创建场景
Scene 保存视图状态及层次结构,包括所有的视图及其属性。 Transition 框架能够从场景到场景进行过渡动画。初始场景(Staring scene)经常是当前的视图层次,而结束场景(ending scene)通常由用户从 layout 创建或者用代码从一组视图中创建。
从 Layout 创建 Scene
利用静态方法 Scene.getSceneForLayout()
// Create the scene root for the scenes in this app
mSceneRoot = (ViewGroup) findViewById(R.id.scene_root);

// Create the scenes
mAScene = Scene.getSceneForLayout(mSceneRoot, R.layout.a_scene, this);
mAnotherScene =
    Scene.getSceneForLayout(mSceneRoot, R.layout.another_scene, this);
或者使用构造函数构造:
Scene mScene;

// Obtain the scene root element
mSceneRoot = (ViewGroup) mSomeLayoutElement;

// Obtain the view hierarchy to add as a child of
// the scene root when this scene is entered
mViewHierarchy = (ViewGroup) someOtherLayoutElement;

// Create a scene
mScene = new Scene(mSceneRoot, mViewHierarchy);
场景间动画
一般情况下 Android 系统会自动在场景间动画,自定义动画可省略,但是如果想自定义动画,可以在场景退出或者进入的时候自定义动画,需要注意以下两点:
- 动画视图不在同一个视图层次
- Transition 框架不能给 Listview 自动创建动画,Transition 框架的限制
可以使用 Scene.setExitAction(Runnable action) 或者 Scene.setEnterAction(Runnable action) 来自定义进入或者退出的动作。
Scene 总结
Scene 类中几个重要的方法:
- 构造方法,
Scene(ViewGroup sceneRoot, View layout)。 从 Layout 中创建 Scene,当调用enter()方法时将 sceneRoot 下子view 全部移除并将新 Layout 中内容填充。 - 静态方法,创建新 Scene
getSceneForLayout(ViewGroup sceneRoot, int layoutId, Context context) - enter() 方法 exit() 方法
- setEnterAction(Runnable action) 和 setExitAction(Runnable action)
Transition
在 Transition 框架中,动画在开始和结束场景间创建了一系列动画帧。
创建 Transition
系统提供的内置 transition 有如下:
| Class | Tag | Attributes | Effect |
|---|---|---|---|
| AutoTransition | - | 默认过渡动画,Fade out 渐隐, move 位移 和 resize 大小缩放,fade in 渐显 ,按顺序 | |
| Fade | android:fadingMode=”[fade_in fade_out fade_in_out]” | fade_in_out (default) 渐隐之后跟随者 渐显 | |
| ChangeBounds | - | 位移和缩放 |
通过资源文件创建
也通过资源文件即可修改过渡效果,避免大幅度修改 Activity 中代码。并且通过资源文件方式创建有效地将复杂的动画和代码文件分离。
通过如下步骤添加过渡动画资源:
- 添加
res/transition/目录 - 在该目录下创建 XML 资源
- 在 XML 文件中添加内置的过渡动画子节点
例如如下资源文件则指定了渐隐渐显动画, res/transition/fade_transition.xml :
<fade xmlns:android="http://schemas.android.com/apk/res/android" />
利用如下代码片段从资源文件中创建 Transition:
Transition mFadeTransition =
        TransitionInflater.from(this).
        inflateTransition(R.transition.fade_transition);
通过代码创建 Transition
可以在代码中动态地创建过渡效果,可以通过非常少的代码创建。通过直接调用 Transition 的子类构造函数直接创建,例如:
Transition mFadeTransition = new Fade();
执行 Transition
直接调用 TransitionManager.go() 静态方法,并提供一个终止场景:
TransitionManager.go(mEndingScene, mFadeTransition);
如果不指定 transition ,则系统自动套用默认的转场动画。
选择特定目标
转场动画默认对所有的Views进行动画,如果只希望某一些特定的 Views 动画,或者某一些不做动画。 在 transition 中,每一个视图都被称作一个 target,但是得注意,只有在Scene 中的views 才被称作 target。
可以使用 removeTarget() 来从 transition 中移除某一个 view,或者使用 addTarget() 来给 Transition 添加一个 view。
使用多重动画
如下定义的 transitionSet 和 AutoTransition 表现一致:
<transitionSet xmlns:android="http://schemas.android.com/apk/res/android"
    android:transitionOrdering="sequential">
    <fade android:fadingMode="fade_out" />
    <changeBounds />
    <fade android:fadingMode="fade_in" />
</transitionSet>
代码中可以使用 TransitionInflater.from() 来加载 TransitionSet ,因为 TransitionSet 继承自 Transition,因此可以像使用 Transition 一样使用 TransitionSet。
不使用 Scene 来使用 Transition
改变视图层次并不是唯一改变UI的方式,同样也可以通过添加、修改、移除子view来对当前的视图作出修改。或者当两个场景非常相似,为了避免维护两份近乎一致的视图层次,可以只维护一份,并做一些微小的调整。
此时可以使用 delayed transition 来在两个状态之间进行转换。Transition 系统自动选择当前的视图层次作为初始状态,并记录用户对视图的修改,然后应用为终止状态,并在之后进行动态地变化。
在单一视图中使用 delay transition :
- 调用 ` TransitionManager.beginDelayedTransition()` 来提供提供一个父view包括所有的待变化的view,此时系统自动保存当前传入的所有 views 的状态及属性
- 修改子views ,系统会记录该views 的变化
- 当系统重绘时系统自动在原始及新状态间做动画
创建自定义 Transitions
自定义过渡动画(custom transition)可以实现区别于内置转场动画的效果。比如,你可以定义一个动画来将文字和输入框的前景颜色变成灰色来表示当前禁止输入。
继承 Transition 类
继承 Transition 类,并实现如下方法:
public class CustomTransition extends Transition {

    @Override
    public void captureStartValues(TransitionValues values) {}

    @Override
    public void captureEndValues(TransitionValues values) {}

    @Override
    public Animator createAnimator(ViewGroup sceneRoot,
                                   TransitionValues startValues,
                                   TransitionValues endValues) {}
}
Transition 动画使用 property 动画系统,属性动画动态地修改视图的属性,因此得知道初始和终止的值。
captureStartValues
系统会对初始场景中的每一个view调用 captureStartValues(transitionValues) ,参数 TransitionValues 对象包含了一个指向 view 的引用和一个保存view状态的 Map 实例。在自己的实现中,获取这些属性,并将这些属性传回给map。
为了避免key 值和已经拥有的key值矛盾,可以使用如下的 TransitionValues 键的形式:
package_name:transition_name:property_name
例如下面的例子:
public class CustomTransition extends Transition {

    // Define a key for storing a property value in
    // TransitionValues.values with the syntax
    // package_name:transition_class:property_name to avoid collisions
    private static final String PROPNAME_BACKGROUND =
            "com.example.android.customtransition:CustomTransition:background";

    @Override
    public void captureStartValues(TransitionValues transitionValues) {
        // Call the convenience method captureValues
        captureValues(transitionValues);
    }


    // For the view in transitionValues.view, get the values you
    // want and put them in transitionValues.values
    private void captureValues(TransitionValues transitionValues) {
        // Get a reference to the view
        View view = transitionValues.view;
        // Store its background property in the values map
        transitionValues.values.put(PROPNAME_BACKGROUND, view.getBackground());
    }
    ...
}
captureEndValues
系统会给终止场景中的每一个target view自动调用 ` captureEndValues(TransitionValues) ,其他方面,captureEndValues() 和 captureStartValues()` 表现一致。
animator
在初始和终止视图层次间进行动画,提供一个 animator ,通过复写 createAnimator() ,当系统调用此方法时,他将 root view 和开始和结束 TransitionValues 传入。系统调用 createAnimator() 方法的次数由开始和终止场景之间的变化决定。
Android 系统自带 Transition
虽然教程上只罗列了一些 Transition ,但是看文档,还是能发现不少 Transition 的直接子类。
Transition
Transition 在 XML 定义时有如下属性:
- android:duration 动画时长毫秒
- android:interpolator 动画使用的 interpolator
- android:matchOrder 过渡动画执行顺序
- android:startDelay 在过渡动画之前延迟时间 毫秒
TransitionSet
TransitionSet 在 XML 中有如下属性:
- android:transitionOrdering 过渡动画执行顺序,有两种值, together 和 sequential
以下转场动画中原生提供的包括 Fade,Slide,Explode,但场景之间存在共享元素时,有如下的转场动画 changeBound,changeClipBounds,changeImageTransform,ChangeTransform,ChangeScroll。
Fade
渐隐渐显动画
Fade 在 XML 中有如下属性:
- android:fadingMode 渐变模式,
fade_in,fade_out,fade_in_out,默认为fade_in_out
Slide
元素从四个方向滑动进入
Slide 属性:
- android:slideEdge 从那边滑动出,有 left, top, right, bottom, start, end 模式
Explode
屏幕中间上下移走
ChangeBounds
通过获取前后Scene 中 target view 的边界,并对这些 view 做动画,改变 View 的大小
ChangeClipBounds
获取前后 Scene 中 getClipBounds() 的边界,并做动画,有如下属性:
android:resizeClip通过改变 clipBounds 来改变 view,而不是改变view 自身的大小
ChangeImageTransform
通过获取开始和结束时 Scene 中 ImageView 的 matrix ,并对他们做动画。 和 ChangeBounds 一起使用,来对 ImageView 改变大小,形状,和 ScaleType 来使动画更加流畅。
ChangeTransform
获取 Scene 中的尺寸和旋转角度,并做动画,有如下属性:
android:reparent追踪父view 的变化android:reparentWithOverlayA parent change should use an overlay or affect the transform of the transitionining View.
ChangeScroll
改变滑动位置
下面分享一个 transitionSet 的 XML 语法:
<transitionSet xmlns:android="http://schemas.android.com/apk/res/android"
     android:transitionOrdering="sequential">
    <changeBounds/>
    <fade android:fadingMode="fade_out" >
        <targets>
            <target android:targetId="@id/grayscaleContainer" />
        </targets>
    </fade>
</transitionSet>
以上就是文档中对 Transition 的解释,关于自定义 Transition 还可以具体展开细讲,但是因为 Transition API 要求的 API 版本比较高,基本 Android 5.0 及以上才可以很好的支持,所以目前使用并不广,但是相信不久以后就能看到越来越多的转场动画了。
reference
Podcast 托管
Podcast 近两年又突然火起来,一度认为 Podcast 是最近才流行起来的媒体,后来才发现这种媒介早在上世纪 80 年代就诞生 。近两年被再一次提起可能 iOS 系统内置播客系统是个契机,一时间让 Podcast 进入大众的视听,而国内近些年也陆陆续续出现了很多播客平台,喜马拉雅,荔枝等等, 播客这种形式在播客,视频播客新奇之后似乎很难找到自己的定位,但是在日常生活中还是有很多情况适用播客,在开车等双手双眼需要时刻准备着的时候,播客系统可以可以代替收音机,而在长途跋涉需要闭目养神时,播客也可以成为音乐的代替。
但是经过这么多年的演进, Podcast 还是依赖于 RSS 2.0 标准,不论是 iTunes 还是 Play Music ,虽然 Google 已经用关闭 Google Reader 来表明对 RSS 的态度,却还是依然无法将 Podcast 从 RSS 剥离。其实这也很矛盾,就像之前看到的一则评论,Google 托管了最大的视频播客 YouTube,却连小小的音频文件都懒得托管。所以无奈才有了此篇文章。
Podcast Hosting
有几种免费靠谱的托管方式,这里就不讲收费的方案了,因为免费的可以做到很好。个人使用完全没有问题。
- Dropbox, Dropbox 导出直链自行 Google
- Google Drive,如何导出直链自行 Google
- SoundCloud,有高级版
- Internet Archive
- 最后 Cloudup 我使用的方案,支持 1000 个文件托管,具体可参看之前总结的一篇文章
其实苹果官网也给了一个 Podcast Hosting 的列表 可以查看。
Generate RSS feed
iTunes 和 Google Play Music 都需要不同格式的 RSS,需要特别考虑。另外音频最好带封面 14001400 px 到 20482048 px 大小,这个是 iTunes Store 需要的。
-你觉得到大理,如果要推荐一个必吃的美食,你会推荐什么?
iTunes 需要的标签
iTunes 中关于 Podcast 的介绍 。 每一个 Podcast 叫做 Episode,所有独立的可下载的音频,视屏,PDF,ePub,都属于 Episode。 iTunes 支持的文件格式包括: M4A,MP3,MOV,MP4,M4V,PDF,ePub 等等。通过 Feed Validation Service 验证 Feed 有效性。以下例子可以在帮助文档 中查看到。
iTunes 中需要的 Feed 文件格式:
<?xml version="1.0" encoding="UTF-8"?>
<rss version="2.0" xmlns:itunes="http://www.itunes.com/dtds/podcast-1.0.dtd">
<channel>
<title>All About Everything</title>
<link>http://www.example.com/podcasts/everything/index.html</link>
<language>en-us</language>
<copyright>℗ & © 2014 John Doe & Family</copyright>
<itunes:subtitle>A show about everything</itunes:subtitle>
<itunes:author>John Doe</itunes:author>
<itunes:summary>All About Everything is a show about everything. Each week we dive into any subject known to man and talk about it as much as we can. Look for our podcast in the Podcasts app or in the iTunes Store</itunes:summary>
<description>All About Everything is a show about everything. Each week we dive into any subject known to man and talk about it as much as we can. Look for our podcast in the Podcasts app or in the iTunes Store</description>
<itunes:owner>
<itunes:name>John Doe</itunes:name>
<itunes:email>john.doe@example.com</itunes:email>
</itunes:owner>
<itunes:image href="http://example.com/podcasts/everything/AllAboutEverything.jpg"/>
<itunes:category text="Technology">
<itunes:category text="Gadgets"/>
</itunes:category>
<itunes:category text="TV & Film"/>
<itunes:category text="Arts">
<itunes:category text="Food"/>
</itunes:category>
<itunes:explicit>no</itunes:explicit>
<item>
<title>Shake Shake Shake Your Spices</title>
<itunes:author>John Doe</itunes:author>
<itunes:subtitle>A short primer on table spices</itunes:subtitle>
<itunes:summary><![CDATA[This week we talk about <a href="https://itunes/apple.com/us/book/antique-trader-salt-pepper/id429691295?mt=11">salt and pepper shakers</a>, comparing and contrasting pour rates, construction materials, and overall aesthetics. Come and join the party!]] ></itunes:summary>
<itunes:image href="http://example.com/podcasts/everything/AllAboutEverything/Episode1.jpg"/>
<enclosure length="8727310" type="audio/x-m4a" url="http://example.com/podcasts/everything/AllAboutEverythingEpisode3.m4a"/>
<guid>http://example.com/podcasts/archive/aae20140615.m4a</guid>
<pubDate>Tue, 08 Mar 2016 12:00:00 GMT</pubDate>
<itunes:duration>07:04</itunes:duration>
<itunes:explicit>no</itunes:explicit>
</item>
<item>
<title>Socket Wrench Shootout</title>
<itunes:author>Jane Doe</itunes:author>
<itunes:subtitle>Comparing socket wrenches is fun!</itunes:subtitle>
<itunes:summary>This week we talk about metric vs. Old English socket wrenches. Which one is better? Do you really need both? Get all of your answers here.</itunes:summary>
<itunes:image href="http://example.com/podcasts/everything/AllAboutEverything/Episode2.jpg"/>
<enclosure length="5650889" type="video/mp4" url="http://example.com/podcasts/everything/AllAboutEverythingEpisode2.mp4"/>
<guid>http://example.com/podcasts/archive/aae20140608.mp4</guid>
<pubDate>Wed, 09 Mar 2016 13:00:00 EST</pubDate>
<itunes:duration>04:34</itunes:duration>
<itunes:explicit>no</itunes:explicit>
</item>
<item>
<title>The Best Chili</title>
<itunes:author>Jane Doe</itunes:author>
<itunes:subtitle>Jane and Eric</itunes:subtitle>
<itunes:summary>This week we talk about the best Chili in the world. Which chili is better?</itunes:summary>
<itunes:image href="http://example.com/podcasts/everything/AllAboutEverything/Episode3.jpg"/>
<enclosure length="5650889" type="video/x-m4v" url="http://example.com/podcasts/everything/AllAboutEverythingEpisode2.m4v"/>
<guid>http://example.com/podcasts/archive/aae20140697.m4v</guid>
<pubDate>Thu, 10 Mar 2016 02:00:00 -0700</pubDate>
<itunes:duration>04:34</itunes:duration>
<itunes:explicit>no</itunes:explicit>
<itunes:isClosedCaptioned>Yes</itunes:isClosedCaptioned>
</item>
<item>
<title>Red,Whine, & Blue</title>
<itunes:author>Various</itunes:author>
<itunes:subtitle>Red + Blue != Purple</itunes:subtitle>
<itunes:summary>This week we talk about surviving in a Red state if you are a Blue person. Or vice versa.</itunes:summary>
<itunes:image href="http://example.com/podcasts/everything/AllAboutEverything/Episode4.jpg"/>
<enclosure length="498537" type="audio/mpeg" url="http://example.com/podcasts/everything/AllAboutEverythingEpisode4.mp3"/>
<guid>http://example.com/podcasts/archive/aae20140601.mp3</guid>
<pubDate>Fri, 11 Mar 2016 01:15:00 +3000</pubDate>
<itunes:duration>03:59</itunes:duration>
<itunes:explicit>no</itunes:explicit>
</item>
</channel>
</rss>
Play Music 需要的标签
完整的字段及解释可以参考官方文档,里面有非常详细的字段解释。Play Music 要求的大多数内容和 iTunes 类似,只有一些字段要求有些变化,Google 要求图片为方形,最小为 600*600 ,并且建议大小在 1200*1200 到 7000*7000 px 之间,支持 JPEG 和 PNG。
<?xml version="1.0" encoding="UTF-8"?>
<rss xmlns:googleplay="http://www.google.com/schemas/play-podcasts/1.0" version="2.0">
<channel>
    <title>The Unknown Podcast</title>
    <link>http://sample.com/podcasts/unknown/index.html</link>
    <language>en-us</language>
    <copyright>℗ 2025 Unknown Podcaster Corp</copyright>
    <googleplay:author>Unannounced Podcaster</googleplay:author>
    <googleplay:description>The Unknown Podcast will look at all the things that are unknown or unknowable. Find us on Google Play Music!</googleplay:description>
    <description>The Unknown Podcast will look at all the things that are unknown or unknowable.</description>
    <googleplay:email>unknown-podcast@sample.com</googleplay:email>
    <googleplay:image href="http://sample.com/podcasts/unknown/UnknownLargeImage.jpg" />
    <googleplay:category text="Technology"/>
    <item>
        <title>What's out there?</title>
        <googleplay:author>Engima</googleplay:author>
        <googleplay:description>We look at all the things that are out there that we'd like to know.</googleplay:description>
        <googleplay:image href="http://sample.com/podcasts/unknown/Episode1.jpg" />
        <enclosure url="http://sample.com/podcasts/UnknownPodcastEpisode1.mp3" length="2320111" type="audio/mpeg" />
        <guid>http://sample.com/podcasts/UnknownPodcastEpisode1.mp3</guid>
        <pubDate>Mon, 29 Jun 2015 19:00:00 GMT</pubDate>
    </item>
    <item>
        <title>What can we know, really?</title>
        <googleplay:author>The everyman</googleplay:author>
        <googleplay:description>And then we follow up on last week's podcast to examine what can and cannot be known.</googleplay:description>
        <googleplay:image href="http://sample.com/podcasts/unknown/Episode2.jpg" />
        <enclosure url="http://sample.com/podcasts/UnknownPodcastEpisode2.m4a" length="6421543" type="audio/x-m4a" />
        <guid>http://sample.com/podcasts/UnknownPodcastEpisode2.m4a</guid>
        <pubDate>Mon, 6 Jul 2015 19:00:00 GMT</pubDate>
    </item>
</channel>
</rss>
提交认证
可以向以下两个网址提交申请认证
- Podcasts Connect :https://podcastsconnect.apple.com/ 需要 Apple ID
- Google Play Music : https://play.google.com/music/podcasts/publish 需要 Google 账号
最后可以从这里访问到网站 https://einverne.github.io/podcast ,网站源代码在 https://github.com/einverne/podcast 。
Demo 的 Play Music 地址在 这里
reference
- http://scateu.me/2015/10/28/podcast.html
- RSS 2.0 标准 https://cyber.harvard.edu/rss/rss.html
- 一个开源的 Podcast Rss 管理 PHP 编写 https://github.com/JJYing/Podcast-RSS-Editor
Head First Design Patterns
Some of the Head First learning principles:
- make it visual.
- use a conversational and personalized style.
- think more deeply.
- keep attention.
- touch emotions.
To bend your brain into submission
- Slow down, the more you understand, the less you have to memorize.
- Do the exercises, write your own notes.
- Make this the last thing you read before bed.
- Talk about it. Out loud.
- Pay attention to whether your brain is getting overloaded. Take a break if necessary.
- Feel something, make up your own captions for the photos. Even bad jokes better then feeling nothing at all
- Design something new. Apply new knowledeg in your new desigin or refactor an old project.
Principle
Identify the aspects of your application that vary and separate them from what stays the same.
The what varies and “encapsulate” it so it won’t affect the rest of your code.
Program to an interface really means “Program to a supertype”
The Open-Closed Principle
开闭原则
Classes should be open for extension, but close for modification.
第一次听到开闭原则的时候可能会有些疑惑,但是这个原则其实是让架构容易扩展的同时不影响到原来的代码。比如观察者模式,我们可以轻松的在不修改被观察者代码的情况下,通过增加观察者来实现对系统的扩展。
开闭原则下的模式:
- Observer 模式
- 工厂模式
xiaomi router samba password
ssh to xiaomi router
smbpasswd -a root
then enter your password two times.
vi /etc/config/samba
Edit
option 'guest_ok'       no
option 'force_user'     'root'
And
vi /var/etc/smb.conf
Edit
guest ok = yes
valid users = root
Then restart samba service:
/etc/init.d/samba restart
文章分类
最近文章
- Dinox 又一款 AI 语音实时转录工具 前两天介绍过 [[Voicenotes]],也是一款 AI 转录文字的笔记软件,之前在调查 Voicenotes 的时候就留意到了 Dinox,因为是在小红书留意到的,所以猜测应该是国内的某位独立开发者的作品,整个应用使用起来也比较舒服,但相较于 Voicenotes,Dinox 更偏向于一个手机端的笔记软件,因为他整体的设计中没有将语音作为首选,用户也可以添加文字的笔记,反而在 Voicenotes 中,语音作为了所有笔记的首选,当然 Voicenotes 也可以自己编辑笔记,但是语音是它的核心。
- 音流:一款支持 Navidrom 兼容 Subsonic 的跨平台音乐播放器 之前一篇文章介绍了Navidrome,搭建了一个自己在线音乐流媒体库,把我本地通过 [[Syncthing]] 同步的 80 G 音乐导入了。自己也尝试了 Navidrome 官网列出的 Subsonic 兼容客户端 [[substreamer]],以及 macOS 上面的 [[Sonixd]],体验都还不错。但是在了解的过程中又发现了一款中文名叫做「音流」(英文 Stream Music)的应用,初步体验了一下感觉还不错,所以分享出来。
- 泰国 DTV 数字游民签证 泰国一直是 [[Digital Nomad]] 数字游民青睐的选择地,尤其是清迈以其优美的自然环境、低廉的生活成本和友好的社区氛围而闻名。许多数字游民选择在泰国清迈定居,可以在清迈租用廉价的公寓或民宿,享受美食和文化,并与其他数字游民分享经验和资源。
- VoceChat 一款可以自托管的在线聊天室 VoceChat 是一款使用 Rust(后端),React(前端),Flutter(移动端)开发的,开源,支持独立部署的在线聊天服务。VoceChat 非常轻量,后端服务只有 15MB 的大小,打包的 Docker 镜像文件也只有 61 MB,VoceChat 可部署在任何的服务器上。
- 结合了 Google 和 AI 的对话搜索引擎:Perplexity AI 在日本,因为 SoftBank 和 Perplexity AI 开展了合作 ,所以最近大量的使用 Perplexity ,这一篇文章就总结一下 Perplexity 的优势和使用技巧。