每天学习一个命令:fd find entries in the filesystem
Linux 下的 find 命令自身就比较复杂,想要查找本地文件时通常需要敲一系列的命令,这时候 fd 就出来解决这个问题了。
最简单的 fd 命令就只需要:
fd [pattern] [path...]
但如果需要使用 find 命令,那么需要:
find ./ -name '*test*' -type f
并且 fd 命令要比 find 命令快很多。
fd 由 Rust 实现。
GitHub: https://github.com/sharkdp/fd
Use case
List all files
fd 可以直接不添加任何参数执行,当想要快速查看目录下所有内容时非常有用,类似于 ls -R。
如果想要递归的显示目录下,包括子目录所有的内容,可以使用:
fd . /path/to/dir
查看包含关键字的文件
比如查看本地包含 mysql 的文件:
fd "mysql"
对于 ag 命令则需要
ag -g "mysql" .
而 find 则更加复杂
find ./ -name '*mysql*' -type f
搜索特定的文件后缀
使用 -e 选项来搜索目录下所有的 Markdown 文件(.md):
fd -e md
使用准确的搜索 PATTERN 搜索
使用 -g 选项:
fd -g libc.so /usr
找出目录下文件并删除
首先使用 fd 找出文件名,使用 xargs 发送给 rm(注意小心执行该该命令):
fd "keyword" -x rm -v
在很多情况下,我们不仅要找出搜索结果,还需要对搜索结果执行一些操作,上面提到的删除就是比较常见的,fd 提供了两种方式来对结果执行命令:
-x/--exec并行地对每一个结果执行额外的命令-X/--exec-batch只执行额外的命令一次,将所有的结果作为参数
比如更复杂一些的,递归地找到所有的 zip 文件,然后解压:
fd -e zip -x unzip
如果目录下有两个文件 file1.zip 和 backup/file2.zip ,那么这一行命令之后会并行执行 unzip file1.zip 和 unzip backup/file2.zip。
再比如将目录下所有的 *.jpg 转换成 *.png:
fd -e jpg -x convert {} {.}.png
这里,{} 是搜索结果的一个占位符,{.} 类似,表示文件名无后缀。
还有一个常见,比如要搜索目录下所有的 test_*.py 然后用 vim 打开:
fd -g 'test_*.py' -X vim
或者查看文件的权限、所有者、大小等等:
fd ... -X ls -lhd
-X 命令结合 rg 命令一起使用的时候也非常方便:
fd -e cpp -e cxx -e h -e hpp -X rg 'std::cout'
上面这句话的意思就是找到这些文件后缀的文件中包含 std::cout 的内容。
区分查找的类别
使用 -t 命令来区别要查找的内容
f, file  		普通文件
d, directories 		目录
l, symlink 			symbolic links
x, executable 		可执行文件
e 					空文件或者目录
在 Vim 中使用
installation
安装及配置参考官方:
reference
每天学习一个命令:fzf 使用笔记
今天在闲逛博客 的时候偶然发现 crispgm 所写的文章,其中推荐了 fzf 这款模糊搜寻工具,所以立马上手体验了一下。
fzf 是一个通用的命令行模糊搜索工具,用 golang 编写,大家的评价都是目前最快的 fuzzy finder,配合 ag 的使用,依靠模糊的关键词,可以快速定位文件。配合一些脚本,可以完全颠覆以前使用命令行的工作方式。
Installation
git clone --depth 1 https://github.com/junegunn/fzf.git ~/.fzf
~/.fzf/install
or upgrade
cd ~/.fzf && git pull && ./install
Demo
最直接的使用方式就是在终端输入:
fzf
或者 fzf 可以接受 stdin,比如使用命令
find * -type f | fzf
此时会进入 fzf 的交互窗口,在交互窗口中可以使用 Ctrl + n 或者 Ctrl + p 来上下移动光标。使用 Enter 选中条目
其他常用:
- Ctrl-j Ctrl-n 都能往下,不过 Ctrl-j 在我的配置中是切换到下 pane 所以我只用 Ctrl-n
- Ctrl-k Ctrl-p 都能往上,不过 Ctrl-k 在我的配置中是切换到上 pane 所以我只用 Ctrl-p
- Ctrl-c 或者 Ctrl-g 或者 Ctrl-q 或者 Esc 用来退出 abort
- Ctrl-h 退格键 backspace,不过这个键和 tmux vim 有冲突所以一般不用
- Ctrl-a 光标跳转到开头 Ctrl-e 跳转到行结尾
- Ctrl-w 向前删以 word
- Ctrl-u 删除所有输入
其实看到后面就发现很多快捷键其实是和 Bash/Shell 下一致的,其他更多的交互命令,可以参考 man fzf
Configuration
FZF_DEFAULT_COMMAND
fzf 默认查找文件使用的是系统的 find 命令,你可以通过自定义该环境变量来更改使用其他命令比如 ag 或者 fd
# 这行配置开启 ag 查找隐藏文件 及忽略 .git 文件
export FZF_DEFAULT_COMMAND='ag --hidden --ignore .git -l -g ""'
# or
export FZF_DEFAULT_COMMAND="fd --exclude={.git,.idea,.sass-cache,node_modules,build} --type f"
FZF_DEFAULT_OPTS
该环境变量定义了 fzf 的参数:
export FZF_DEFAULT_OPTS="--height 40% --layout=reverse --preview '(highlight -O ansi {} || cat {}) 2> /dev/null | head -500'"
常见的一些操作
fzf 最最常用的快捷键应该就是 Ctrl + r 和 Ctrl + t 了。Ctrl-r 用来在历史中搜索,Ctrl-t 用来搜索当前文件夹下的内容。
历史记录搜索
在没有使用 fzf 之前都是 Ctrl + r 来快速输入历史命令,用起来倒也没有太大的问题,fzf 使得 Ctrl-r 变得更加好用,按下 Ctrl-r 之后立即就能够显示之前的历史命令,通过模糊搜索能够展示一个列表,从列表中选择即可。
历史命令 Ctrl-r
在终端命令行下按下 Ctrl-r 会列出 history 命令目录,选中 Enter 离开 fzf 后,该条目会拷贝到命令行中。
搜索当前文件夹 Ctrl-t
在命令行中按下 Ctrl-t 会打开 fzf 窗口,此时如果找到某文件,并选择 Enter,那么该文件名会被拷贝到命令行中。比如说想要打开某文件但是忘记了名字,那么可以先输入 vi 然后按下 Ctrl-t 那么会出现 fzf 的搜索窗口,在窗口中可以模糊搜索文件,然后将文件路径及文件拷贝到命令行中。
同样的方式,如果要 mv 一个文件,同样先输入 mv 然后再 Ctrl-t 找到文件,继续输入目的地址即可。
如果想要更简单 fzf GitHub wiki 中展示了非常多的 Bash Shell 的配置 1,比如可以定义命令 fe
fe() {
  local files
  IFS=$'\n' files=($(fzf-tmux --query="$1" --multi --select-1 --exit-0))
  [[ -n "$files" ]] && ${EDITOR:-vim} "${files[@]}"
}
那么在 shell 中直接输入 fe 然后回车会自动出现当前目录的 fzf,选择文件之后回车即可用默认 $EDITOR 打开文件。
多选
假如在 fzf 选择窗口中想要选择多个文件,那么可以使用 tab 来进行多选,使用 Ctrl-n, Ctrl-p 上下切换的时候,可以使用 Tab 来选中期望的文件进行多选操作。
比如移动,删除,或者编辑多个文件时可以使用。
更改路径
在 fzf 之前最原始的方法就是 cd 然后输入一个词,不断的按 Tab 直到完整的输入 Path,回车。但假如 path 比较长,那么可能需要费一些时间找到真正想要去的目录,而如果用 fzf 配置
fd() {
  local dir
  dir=$(find ${1:-.} -path '*/\.*' -prune \
				  -o -type d -print 2> /dev/null | fzf +m) &&
  cd "$dir"
}
在终端输入 fd 然后搜索一下目录回车就能直接到该目录下,效率提升 x 倍。
Kill Process
再比如说 fkill 用来 kill process
# fkill - kill process
fkill() {
  local pid
  pid=$(ps -ef | sed 1d | fzf -m | awk '{print $2}')

  if [ "x$pid" != "x" ]
  then
	echo $pid | xargs kill -${1:-9}
  fi
}
Tmux
再比如创建 Tmux session 一般都是 tmux new -s new-session 创建,如果使用 tmuxinator 则可能 mux name 比较快,但是如果在 fzf 这里只需要 tm new-session
# tm - create new tmux session, or switch to existing one. Works from within tmux too. (@bag-man)
# `tm` will allow you to select your tmux session via fzf.
# `tm irc` will attach to the irc session (if it exists), else it will create it.

tm() {
  [[ -n "$TMUX" ]] && change="switch-client" || change="attach-session"
  if [ $1 ]; then
	tmux $change -t "$1" 2>/dev/null || (tmux new-session -d -s $1 && tmux $change -t "$1"); return
  fi
  session=$(tmux list-sessions -F "#{session_name}" 2>/dev/null | fzf --exit-0) &&  tmux $change -t "$session" || echo "No sessions found."
}
如果 session 不存在则会自动创建,使用 fs 可以快速选择目前可用的 session.
# fs [FUZZY PATTERN] - Select selected tmux session
#   - Bypass fuzzy finder if there's only one match (--select-1)
#   - Exit if there's no match (--exit-0)
fs() {
  local session
  session=$(tmux list-sessions -F "#{session_name}" | \
    fzf --query="$1" --select-1 --exit-0) &&
  tmux switch-client -t "$session"
}
Alt-c
命令行中按下 Alt-c,会列出当前文件夹下的目录,选择后会直接进入该文件夹。
搜索语法
在上面一系列的基础操作后,对 fzf 应该有了一定的了解,那么知道 fzf 的搜索语法其实非常强大,在熟悉正则的基础上,用 fzf 搜索语法可以实现很多的组合,比如使用 ! 来表示不包含,比如 !word 不包含 word 的结果。
比如:
^music以 music 开头mp3$以 mp3 结尾'word严格匹配!word不包含 word!.mp3$不以.mp3结尾
等等,可以在官方网站上看到。
扩展阅读
一些比较高效的搜索工具
reference
禁用 fcitx 额外键切换输入法
之前有提到过在 Linux 下全面切换成了 Rime 输入法,用的是 fcitx-rime 版本的,但是 fcitx 默认自己有一个设置是 Extra key for trigger input method,而这个设置默认的是 Shift both,也就是两边的 Shift 键默认都是切换输入法,那么这就和我的习惯非常不一致。
我习惯于左 Shift 将输入的内容非候选词上屏,也就是当我输入一个英文,但是忘记切换中文输入法时,我可以快速按下左 Shift 来上屏,或者我可以直接 Enter 来上屏,但是如果 fcitx 的话可能机会造成切换输入法,而导致所有输入的内容都丢失。
所以可以安装 fcitx config 工具,在 GUI 中修改,或者可以直接修改配置文件
vi ~/.config/fcitx/config
找到如下一行
SwitchKey=SHIFT Both
然后替换成
SwitchKey=Disabled
然后查看这个配置能看到其他很多有趣的配置,自行调整即可。如果发现这一行配置经常在重启之后又恢复到了默认状态那么可以给这个文件设置一个权限
sudo chmod 444 ~/.config/fcitx/config
另外 fcitx 的扩展配置也在同一级别的目录中,可以查看
ls ~/.config/fcitx/conf
Ubuntu 系网络配置文件解析及说明
今天遇到一个奇怪的网络问题,记录一下研究过程和一些配置情况,顺便学习一下 Linux 下网络环境配置。
网络配置文件
该文件配置网卡信息 vi /etc/network/interfaces
auto lo
iface lo inet loopback
# 配置 eth0 dhcp 获取 IP 地址
auto eth0
iface eth0 inet dhcp
配置的作用
在 /etc/network/interfaces 这个配置中可能原本就有一些配置,比如
auto lo
iface lo inet loopback
这两行表示的是 auto lo 系统启动时自动配置 lo 接口,然后对于 lo 接口配置一个本地回环(loopback) 地址。
如果要给网卡配置静态地址
auto eth0
iface eth0 inet static
    address 192.168.2.100
    network 192.168.2.0
    netmask 255.255.255.0
    broadcast 192.168.0.255
    gateway 192.168.0.1
下面几行分别表示 eth0 接口的 IP,网络号,掩码,广播地址和网关。
如果要配置自动获取 IP 地址 DHCP
auto eth0
iface eth0 inet dhcp
更多的配置内容可以查看 man interfaces
到 /etc/network 目录下一看会发现很多有趣的目录
if-down.d网络关闭前if-post-down.d网络关闭后if-pre-up.d网络建立前if-up.d网络建立后
这些目录都是属于 Debian 实现的网络配置,当发生 if-up 时就会执行放在 if-up.d 目录下的脚本,这样就可以用来实现一些很有意思的事情,比如如果写了一个签到脚本,那么可以在笔记本联网时自动完成签到这样,或者联网之后启动 VPN 这样的事情。
添加执行权限
chmod 755 /etc/network/if-up.d/YOUR_SCRIPT
注意的是脚本执行顺序是 lexicographic 字母序。
另外一种方式就是在 /etc/NetworkManager/dispatcher.d/ 这里定义脚本,也可以做到一样的事情,不过这就需要依赖 NetworkManager 了。
配置 DNS
DNS 配置文件在 /etc/resolv.conf 文件中,一般为
search domain
nameserver 127.0.0.53
重启网卡
sudo ifup eth0
sudo ifdown eth0
# or
sudo ifconfig eth0 down
sudo ifconfig eth0 up
重启网络
sudo /etc/init.d/networking restart
sudo /etc/init.d/network-manager restart
PostgreSQL 数据库支持的数据类型
在之前一篇 PostgreSQL 初识 中就简单的总结了几个常见的数据类型,但是这几个常见的数据类型并不能显示 PostgreSQL 数据库的强大,所以这里再详细学习一下。
数值类型
对于数值类型,之前的内容 也已经提到过,整型有
- smallint
- integer
- bigint
这三个类型分别占用 2,4,8 个字节,可表示范围逐渐扩大。
对应着三个自增类型
- smallserial
- serial
- bigserial
分别是 2,4, 8 字节,从 1 开始,不能表示负值,自增属性。
定长的浮点数有
- real, 4 字节
- double precision , 双精度,8 字节
这两种精度是不精确的,如果需要指定精度,那么可以使用
- decimal,存储空间不定,需要指定精度
- numeric,等同于 decimal,二者在 PostgreSQL 中几乎可以等价
字符类型
PostgreSQL 支持的字符类型比较简单直白
- varchar(n) 变长,有长度限制
- char(n) 固定长度,不足补空白
- text 可变长度,无长度限制
布尔值
PostgreSQL 支持布尔,true/false/null,1 字节长,
日期和时间
表示日期和时间,用 date 来表示日期,用 time 来表示一日内时间。date 占用 4 字节。精度为 天。
如果要表示日期加上时间,则需要使用到 timestamp。
PostgreSQL 中有两个 timestamp, 带时区和不带时区的,都是占用 8 个字节。精确到毫秒,14 位。
PostgreSQL 还支持时间间隔 interval,可以表示的时间间隔可以从 -178000000 年到 178000000 年。
inerval 占用 12 字节,精度为毫秒。
几何类型
从下面开始就是发挥 PostgreSQL 巨大潜能的地方了。
PostgreSQL 支持定义几何的点,线,面,图形。
| 类型 | 占用空间 | 说明 | 表现 |
|---|---|---|---|
| point | 16 字节 | 平面点 | (x,y) |
| line | 32 字节 | 直线 | ((x1,y1).(x2,y2)) |
| lseg | 32 字节 | 线段 | ((x1,y1).(x2,y2)) |
| box | 32 字节 | Box 矩形 | ((x1,y1).(x2,y2)) |
| path | 16n + 16n 字节 | 闭合路径,多边形 | ((x1,y1),…) |
| path | 16n + 16n 字节 | 开放路径 | [(x1,y1),…] |
| polygon | 40+16n 字节 | 多边形 | ((x1,y1)…) |
| circle | 24 字节 | 圆 | <(x,y),r> |
网络地址
神奇地原生支持网络上常用的 IP 或者 Mac 地址类型
- cider, IPv4 或者 IPv6 地址
- Inet, IPv4 地址
- macaddr, MAC 地址
枚举类型
枚举类型不同于其他类型,需要事先定义
CREATE TYPE hair_color AS ENUM
('brown','black','red','grey','blond')
UUID 类型
uuid 数据类型用来存储 RFC 4122,ISO/IEF 9834-8:2005 以及相关标准定义的通用唯一标识符(UUID)。由算法产生的 128 位标识符,使它不可能在已知使用相同算法的模块中和其他方式产生的标识符相同。对分布式系统而言,UUID 标识符比序列能更好的提供唯一性保证,因为序列只能在单一数据库中保证唯一。
UUID 被写成一个小写十六进制数字的序列,由短横线分字符分成几组, 8 位数字 +3 组 4 位数字 + 一组 12 位数字,总共 32 个 16 进制数字代表 128 位, 一个这种标准的 UUID 例子如下:
b03e4c89-9a0b-5eb8-ba7d-6ac6bd340b21
XML 类型
XML 类型是 text 类型的扩展,不过 XML 类型相较于 text,增加了 XML 合法性校验。
JSON 类型
PostgreSQL 提供两种类型的 JSON 类型。
- JSON
- JSONB
二者的区别
| json | jsonb |
|---|---|
| text 类型扩展,增加 JSON 格式校验 | JSON 数据二进制表示 |
| 插入快,但是查询慢 | 插入慢,查询快 |
| 保存时原样保存,可能包含空白 | 支持索引,可能优化空白以优化查询 |
| 会在查询时重新解析 | 在查询时不需要解析 |
大部分的使用场景都会使用 JSONB 类型,除非你明确知道为什么要使用 JSON 类型。
CREATE TABLE employee (
  id serial NOT NULL PRIMARY KEY,
  age integer NOT NULL,
  data jsonb
);
在 JSONB 上新建索引
CREATE INDEX idx_name ON user_info((data->>'name'));
插入
INSERT INTO employee VALUES (1, 35, '{"name": "Tom Price", "tags": ["Motivated", "SelfLearner"], "items": {"phone": "iphone7", "camera": "canon"}, "onboareded": true}');
INSERT INTO employee VALUES (2, 35, '{"name": "Alex Watt", "tags": ["Physicist", "Photographer"], "items": {"phone": "Pixel", "camera": "sony a7m3"}, "onboareded": true}');
可以使用 -> 来通过 key 获取 json 内容对应 key 的值:
select data -> 'name' AS name from employee;
通过
select data->'items'->>'phone' as items from employee;
-> 和 ->> 的区别在于, -> 获取的结果是 JSON Object,而 ->> 会将结果转为 text。在 where 语句中使用
select * from employee where data->'items'->>'phone' = 'iphone7';
# or
select * from employee where data@>'{"name":"Alex Watt"}';
操作符 @> 用来表示包含。
获取数组中的第一个
select data->'tags'->>0 from employee;
注意这里的 ->>0 两个 >> 都是表示最后取出来的值为 text.
JSON 还支持一种复杂语法 #> 和 #>>
select data#>>'{tags,0}' from employee;
等效于上面的获取数组中第一个元素。
如果结果是 List,PostgreSQL 支持展开数组中的内容。
select jsonb_array_elements_text(data->'tags') from employee where id = 1;
这个结果就是 List 内容。
当然使用 JSONB 也还有缺点,比如上面提到的插入慢,因为需要解析存储,聚合查询也会比较慢。最好的解决办法就是把经常需要聚合操作的列设计到普通列中。 更多的文章可以参考这篇,何时避免使用 JSONB
最佳实践
在 guru99 上给出了一些建议,还是值得提一下:
- 除非想要限制输入长度,否则所有情况优先选择 text
- 不要使用 char
- 除非要存储超大整型,否则使用 int 即可
- 总是选择使用 numeric
- 只有当存在 IEEE 754 data source 数据时再使用 float 类型
reference
初学者指南:如何安装和配置 NeoVim
什么是 NeoVim?
[[NeoVim]] 是 Vim 编辑器的一个重构和扩展版本,旨在修复长期存在的问题,提供更好的插件接口,并简化了脚本配置。对于开发者来说,NeoVim 是一个强大的文本编辑器,支持多种编程语言,并且具有高度的可定制性。
安装 NeoVim
1. 使用包管理器安装
对于大多数操作系统,可以使用包管理器来安装 NeoVim。以下是一些常见的操作系统的安装方法:
- Ubuntu / Debian
sudo apt update
sudo apt install neovim
- Fedora
sudo dnf install neovim
- Arch Linux
sudo pacman -S neovim
- macOS(使用 Homebrew)
brew install neovim
2. 手动安装
如果你希望手动安装 NeoVim,可以从官方 GitHub 仓库 下载源代码,并按照以下步骤编译安装:
git clone https://github.com/neovim/neovim.git
cd neovim
make CMAKE_BUILD_TYPE=Release
sudo make install
配置 NeoVim
NeoVim 的配置文件是 init.vim,默认位于 ~/.config/nvim/ 目录下。你可以使用以下命令创建并打开配置文件:
mkdir -p ~/.config/nvim
nvim ~/.config/nvim/init.vim
1. 基本配置
在 init.vim 中添加一些基本配置来优化你的编辑体验:
" 启用行号
set number

" 启用语法高亮
syntax on

" 设置缩进
set tabstop=4
set shiftwidth=4
set expandtab

" 启用鼠标
set mouse=a

" 启用剪贴板
set clipboard=unnamedplus

" 搜索时忽略大小写
set ignorecase
set smartcase
2. 安装插件管理器
推荐使用 vim-plug 作为插件管理器。首先,下载并安装 vim-plug:
curl -fLo ~/.local/share/nvim/site/autoload/plug.vim --create-dirs \
    https://raw.githubusercontent.com/junegunn/vim-plug/master/plug.vim
在 init.vim 文件的顶部添加以下内容,以便使用 vim-plug:
call plug#begin('~/.local/share/nvim/plugged')

" 在这里添加插件

call plug#end()
常用插件推荐
1. 文件树插件:NERDTree
NERDTree 是一个流行的文件浏览插件,方便你在项目中快速导航。
Plug 'preservim/nerdtree'

" NERDTree 配置
nmap <C-n> :NERDTreeToggle<CR>
2. 自动补全插件:coc.nvim
coc.nvim 是一个强大的自动补全插件,支持多种编程语言的智能提示。
Plug 'neoclide/coc.nvim', {'branch': 'release'}

" coc.nvim 配置
" 在 'init.vim' 中添加以下内容来启用 coc.nvim
autocmd BufEnter * silent! call CocActionAsync('highlight')
inoremap <silent><expr> <TAB> pumvisible() ? "\<C-n>" : "\<TAB>"
inoremap <silent><expr> <S-TAB> pumvisible() ? "\<C-p>" : "\<S-TAB>"
3. 语法高亮插件:nvim-treesitter
nvim-treesitter 提供更强大和精准的语法高亮支持。
Plug 'nvim-treesitter/nvim-treesitter', {'do': ':TSUpdate'}

" nvim-treesitter 配置
lua <<EOF
require'nvim-treesitter.configs'.setup {
  highlight = {
    enable = true,
  },
}
EOF
4. 模糊搜索插件:fzf.vim
fzf.vim 是一个基于命令行的模糊搜索插件,可以快速查找文件。
Plug 'junegunn/fzf', { 'do': { -> fzf#install() } }
Plug 'junegunn/fzf.vim'

" fzf 配置
nmap <C-p> :Files<CR>
插件
- https://github.com/folke/flash.nvim 快速跳转
git pull hangs rekey after blocks 拉代码时卡住
今天一天连续遇到奇怪的事情,先是早上电脑突然无法联网,各种问题排查一遍,重启电脑,拔网线,最后发现可能是 /etc/network/interfaces 配置问题.
然后中午就遇到了这个诡异的错误,那就是在使用 git pull 拉取代码的时候,突然就 hangs 挂住了。什么都没有反应,所以用
ssh -vvvT git@github.com
来查看了一下发现
debug1: rekey after 134217728 blocks
debug1: SSH2_MSG_NEWKEYS sent
debug1: expecting SSH2_MSG_NEWKEYS
debug1: SSH2_MSG_NEWKEYS received
debug1: rekey after 134217728 blocks
日志卡在了这几行,后面就不动了。经过一番搜索之后发现可能是和 ssh-agent 有关系,git 无法连接到 SSH Agent , 然后导致了卡住。
解决方案:
SSH_AUTH_SOCK= ssh git@github.com
reference
Rime 配置使用韩语及日语输入法
总结一些 Rime 下韩语输入方案。
如果你想要 Rime 下的日语输入法,可以点击这里。
韩语输入方案
韩文字母输入键盘布局有 Dubeolsik(두벌식, 2-set), Sebeolsik Final (세벌식 최종, 3-set) , Sebeolsik 390, Sebeolsik Noshift
두벌식
简称 2-set, 这可能是使用最为广泛的一种键盘布局了,南韩从 1969 年起就开始使用。该键盘布局非常有特点,辅音 Consonants 在左边,元音 vowels 在右边。所以能非常轻松地做到左右开工。

标准的 2-set 键盘布局已经成为了主流标准,在如今的移动设备中这个键盘布局也已经称为了事实标准。
对于这个键盘布局,突出的特点就是左右子音和母音的划分。具体的使用可以参考这篇文档.
而对于这个键盘布局 Rime 的方案可以参考这里
韩文键盘布局:A=ㅁ,B=ㅠ,C=ㅊ,D=ㅇ,E=ㄷㄸ,F=ㄹ,G=ㅎ,H=ㅗ,I=ㅑ,J=ㅓ,K=ㅏ,L=ㅣ,M=ㅡ,N=ㅜ,O=ㅐㅒ,P=ㅔㅖ,Q=ㅂㅃ,R=ㄱ ㄲ,S=ㄴ,T=ㅅㅆ,U=ㅕ,V=ㅍ,W=ㅈㅉ,X=ㅌ,Y=ㅛ,Z=ㅋ 要打出紧音只需要按住 shift 在按相应的松音键就可以了,比如按 Q 键显示ㅂ,按住 shift 再按 Q 就会打出ㅃ。
左手辅音、右手元音
紧音指的是ㄲ/ㄸ/ㅃ/ㅆ/ㅉ 五个音
ㄲ :shift + ㄱ ㄸ: shift +ㄷ ㅃ: shift +ㅂ ㅆ: shift +ㅅ ㅉ: shift +ㅈ
세벌식 390
Sebeolsik 390 (세벌식 390; 3-set 390) 发布于 1990 年,它基于 Dr. Kong Byung Woo 早期的工作,这个键盘布局充分利用了 QWERTY 键盘的空间,四行键盘都布满了韩文元音与辅音,所以数字被挤压到右手边三行。按照音节划分,Syllable-initial(起始音节)部分在右边绿色部分,syllable-final(结束音节)部分在左边红色部分。 Wiki 上称该布局更加 ergonomic (符合人体工程学)但是这个键盘布局并没有广为接受。

세벌식 최종
Sebeolsik Final (세벌식 최종; 3-set Final) 这是上一个布局的最终成果,和上一布局的区别在于数字布局变成了两行,并且所有的音节都在键盘中,不需要额外按键既可以输入所有音节。和 390 布局一样,起始音节在右边,结束音节在左边。虽然该布局经过了精心设计不过依然没有被广泛接受。

Sebeolsik Noshift
最后还有中 Noshift 布局,设计的目的就是不需要 Shift 使用,对一些无法同时按住两个键的残疾人该键盘有一定优势。

当然如果要了解其他布局,韩语的键盘布局还有这么这么多
GongjinCheong Romaja 输入法
这是遵循韩文罗马化标准 GongjinCheong 的输入法。
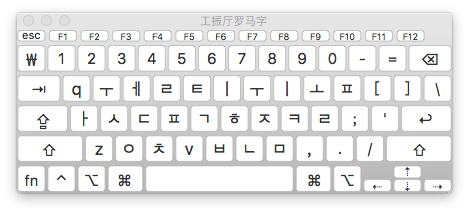
GongjinCheong 和下方的 HNC 有些许的差异。
HNC Romaji 输入法
这一套输入法其实遵循着 McCune-Reischauer Romanization 罗马化方案,是西方世界最早将韩文罗马化的方案。也是目前非常流行的韩文转写方案。12
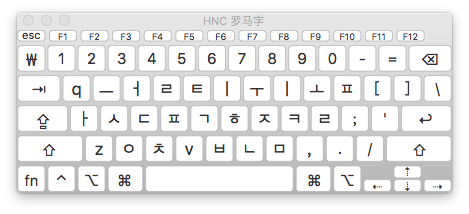
单母音 모은
ㅣ i	ㅡ w
ㅏ a	ㅜ u	ㅓ e	ㅗ o
ㅑ ya	ㅠ yu	ㅕ ye	ㅛ yo
双母音
		ㅐ ai	ㅔ ei
		ㅒ yai	ㅖ yei
ㅘ oa	ㅙ oai	ㅚ oi
ㅝ uo	ㅞ uei	ㅟ ui
			ㅢ wi
单子音 자은
ㄱ g	ㅋ k	ㄴ n
ㄷ d	ㅌ t	ㄹ r/l
ㅂ b	ㅍ p	ㅁ m
ㅅ s	ㅈ j	ㅊ c
ㅇ x	ㅎ h
双子音
ㄲ gg ㄸ dd ㅃ bb ㅆ ss ㅉ jj
Rime hangyl
Rime 的韩语转写方案非以上提交的任何标准,不过最像后面两种罗马化方案,有一些微小的差别,但是却非常的好用。
和 HNC 的主要差别在于 w 和 y 的差异,在 HNC 键盘中 w 是 ㅡ 而 Rime 方案中则是 ㅜ ,而另外一个 y ,HNC 是 ㅣ , Rime 的方案则是 ㅡ,实际使用上来看 ,而二者区别几乎可以忽略不计。

Rime 解决方案: https://github.com/einverne/rime-hangul
韩语打字练习
韩语打字练习推荐
- https://www.koreanji.com/study/korean-language/hangeul/how-to-type-hangeul/
- https://10fastfingers.com/typing-test/korean
- http://play.typeracer.com/?universe=lang_ko
- 韩语 https://github.com/lotem/rime-aca-archives
- 古韩语 https://github.com/biopolyhedron/rime-qyeyshanglr-hanja
日语输入方案
reference
- https://github.com/einverne/rime-hangul
- https://support.apple.com/en-in/guide/korean-input-method/welcome/mac
- https://guides.mtholyoke.edu/c.php?g=102012&p=663147
- http://blog.klerelo.com/2014/08/mac-comment-ecrire-en-coreen-avec-son.html
- http://deltazone.pixnet.net/blog/post/341170670-rime%e8%a8%ad%e5%ae%9a%e6%aa%94-%e9%9f%93%e8%aa%9e
- 陈辉:韩语罗马字表记法的历史与现状
PostgreSQL 初识
要介绍 PostgreSQL 通过几个关键词就可以,开源,对象关系型数据库。本文主要是学习过程中的一些笔记,都是基础内容,大部分都是看得基础入门书籍和官方的文档内容,老手请直接跳过。
History
PostgreSQL 发展历程可以追溯到 1986 年,加州伯克利分校开发了一个名叫 Postgres 的关系型数据库服务器,这份代码被 Illustra 公司发展成为了一个商业化产品。到 1994 年, Andrew Yu 和 Jolly Chen 向 Postgres 中增加了 SQL 语言解释器 —- Postgres95,随后公布了其源码,成为一个开放源码数据库。
到 1996 年,Postgres95 被改名 PostgreSQL,支持查询语言标准,同时版本号从 6.0 开始迭代。
2011 年 9 月 12 日,PostgreSQL 9.1 发布,提供了强大的更新,同步复制,最近相邻索引,外部数据封装等功能。
这张图 充分的可以说明 PostgreSQL 的发展及流行程度。
Installation
在 Linux Mint 19,或者其他 Debian/Ubuntu 系列上安装:
sudo apt install postgresql postgresql-contrib
Mac
brew install postgresql

To migrate existing data from a previous major version of PostgreSQL run:
  brew postgresql-upgrade-database

This formula has created a default database cluster with:
  initdb --locale=C -E UTF-8 /usr/local/var/postgres
For more details, read:
  https://www.postgresql.org/docs/12/app-initdb.html

To have launchd start postgresql now and restart at login:
  brew services start postgresql
Or, if you don't want/need a background service you can just run:
  pg_ctl -D /usr/local/var/postgres start
PostgreSQL 安装之后会在系统上新增一个 postgres 用户,通过该用户来运行服务。
检查版本
sudo -u postgres psql -c "SELECT version();"
会输出 PostgreSQL 的版本
PostgreSQL 10.10 (Ubuntu 10.10-0ubuntu0.18.04.1) on x86_64-pc-linux-gnu, compiled by gcc (Ubuntu 7.4.0-1ubuntu1~18.04.1) 7.4.0, 64-bit
PostgreSQL 默认端口是 5432,可以通过 sudo netstat -tupln 来查看服务是否启动。
PostgreSQL 默认用户名是 postgres,默认数据库也是 postgres,没有默认密码。
Configuration
PostgreSQL 的配置文件在 /etc/postgresql/10/main/postgresql.conf
允许远程访问 PostgreSQL 服务
打开配置文件 sudo vi /etc/postgresql/10/main/postgresql.conf , 然后找到如下一行,并配置
listen_addresses = '*'
然后重启服务
sudo systemctl restart postgresql
检查服务启动
ss -nlt | grep 5432
然后修改 sudo vi /etc/postgresql/10/main/pg_hba.conf 文件
# TYPE  DATABASE        USER            ADDRESS                 METHOD
# The user test_user will be able access all databases from all locations using a md5 password
host    all             test_user            0.0.0.0/0                md5

# The user test_user will be able access only the test_db from all locations using a md5 password
host    test_db          test_user            0.0.0.0/0                md5

# The user test_user will be able access all databases from a trusted location (192.168.43.106) without a password
host    all             test_user            192.168.1.134            trust
登录和管理服务器
管理 PostgreSQL 可以通过命令行,也可以通过 GUI 工具,市场上现在 GUI 工具已经非常成熟,有开源方案,也有商业方案。这里就介绍一下 pgAdmin,其他工具可以自行了解。
GUI 管理工具 pgAdmin
详情见官网: https://www.pgadmin.org/download/
安装方式也都特别简单,略过。
命令行方式
PostgreSQL 只能在 postgres 用户下管理,所以可以切换到该用户操作
sudo su - postgres
然后使用 psql 命令登录 PostgreSQL 控制台
psql
此时相当于用 postgres 用户以同名身份登录了数据库,默认没有密码,系统提示符会变成 postgres=#.
为用户设置密码 \password .
\password postgres
然后输入密码。
创建其他用户,并为这些用户设定密码
CREATE USER your_username WITH PASSWORD 'your_password';
创建用户数据库
CREATE DATABASE sample_db OWNER your_username;
赋予用户所有权限,读写操作
GRANT ALL PRIVILEGES ON DATABASE sample_db to your_username;
退出控制台
\q
如果不想在控制台也可以直接从 shell 中设定
sudo -u postgres createuser --superuser your_username
sudo -u postgres psql
\password your_username
\q
sudo -u postgres createdb -O your_username sample_db


/usr/lib/postgresql/10/bin/pg_ctl -D /var/lib/postgresql/10/main -l logfile start
在 PostgreSQL 中,超级用户角色连接到数据库允许绕过所有数据库权限检查,登录权限除外。因此不要轻易使用超级用户权限,PostgreSQL 文档建议将大多数数据库作为非超级用户角色管理。
Usage
登录数据库
上面演示了如何创建用户及数据库,那么在 shell 中可以以如下方式来登录数据库
psql -U your_username -d sample_db -h 127.0.0.1 -p 5432
然后输入 your_username 的密码即可登录控制台。注意这里的 -d 参数是必须的。
修改数据库
对数据库的基本操作,和 MySQL 类似,只要懂得 SQL 基本就可以略过下面大部分的内容。
创建
CREATE DATABASE sample_db;
CREATE DATABASE sample_db OWNER username;
修改数据库
ALTER DATABASE sample_db RENAME TO new_sample_db;
ALTER DATABASE new_sample_db OWNER TO postgres;
ALTER DATABASE new_sample_db WITH CONNECTION LIMIT = 10;
删除数据库
DROP DATABASE sample_db[, ...n];
表相关操作
大部分都是 SQL 相关的内容,这里就做过引子,具体还是去学习 SQL
创建表
create table tb_demo1 (
	id int PRIMARY KEY,
	name varchar(25),
	age int,
	salary float
);

create table tb_demo2 (
	id int,
	name varchar(25) NOT NULL,
	age int,
	salary float,
	PRIMARY KEY(id, name)
);

CREATE TABLE dep (
	id INT,
	name VARCHAR(25)
)
创建外键关联,在表 demo5 中添加外键约束 fk_dep 将表 depId 列关联到 dep 表 id。
CREATE TABLE demo5 (
	id INT PRIMARY KEY,
	name VARCHAR(25) NOT NULL,
	age int,
	depId INT,
	CONSTRAINT fk_dep FOREIGN KEY(depId) REFERENCES dep(id)
)
修改表结构
ALTER TABLE old_table_name RENAME TO new_table_name;
ALTER TABLE table_name ALTER COLUMN column_name TYPE VARCHAR(30);
ALTER TABLE table_name RENAME old_column_name TO new_column_name new_type;
ALTER TABLE table_name ADD COLUMN new_column new_type;
ALTER TABLE table_name ADD COLUMN new_column new_type NOT NULL;
ALTER TABLE table_name DROP column_name;
ALTER TABLE table_name DROP CONSTRAINT constraint_name;
删除表
DROP TABLE [IF EXISTS] table1, table2 ...;
恢复外部数据
psql -U your_username -d sample_db -h 127.0.0.1 -p 5432 < backup_external.sql
其他控制台命令
\h            	explain sql, such as \h select
\?				help
\l 				list all db
\c [database_name] 		connect to db
\d 				list all tables of current db
\d [table_name] 	show table structure, like describe table in mysql
\du 			list all user
\e 				open text editor
\conninfo 		print database and connection infomation
数据类型
整数类型
| 类型 | 字节数 | 说明 | 取值范围 |
|---|---|---|---|
| SMALLINT | 2 字节 | 小整数 | -32768 ~ 32767 |
| INT | 4 字节 | 整数 | -2147483648 ~ 2147483647 |
| BIGINT | 8 字节 | 大整数 | -92233720368547758089 ~ 9223372036854774807 |
浮点数
| 类型 | 字节数 | 说明 | 取值范围 |
|---|---|---|---|
| REAL | 4 | 6 位十进制数字精度 | 1E-37 ~ 1E+37 |
| DOUBLE PRECISION | 8 | 15 位十进制数字精度 | 1E-307 ~ 1E+308 |
PostgreSQL 支持 SQL 标准表示,float 和 float(p) 声明非精确的数值类型。p 声明以二进制表示的最低可接受精度。
- REAL - float(1) 到 float(24)
- DOUBLE PRECISION - float(25) 到 float(35)
范围之外的 p 值将导致错误,没有声明精度的 float 将被当作 DOUBLE PRECISION。
任意精度类型
NUMERIC 表示数值是任意精度,使用 NUMERIC(M, N) 表示,M 称为精度,总位数,N 表示标度,表示小数的位数。比如 123.456 ,精度是 6, 标度是 3
超出精度则四舍五入处理。
日期与时间
TIME, DATE, TIMESTAMP 和 INTERVAl,每一个类型都有合法取值范围,当不合法时会以零值插入到数据库。
| 类型 | 字节数 | 说明 | 取值范围 |
|---|---|---|---|
| TIME | 8 字节 | 一天内时间 | 00:00:00 - 24:00:00 插入 HHMMSS 字符串会自动转成时间 HH:MM:SS |
| DATE | 4 字节 | 日期 | YYYY-MM-DD |
| TIMESTAMP | 8 字节 | 日期和时间 | YYYY-MM-DD HH:MM:SS |
字符串类型
字符串类型
| 类型 | 字节数 | 说明 | 取值范围 |
|---|---|---|---|
| CHAR(n)/CHARACTER(n) | 固定长度非二进制,不足补空白 | 由 n 决定 | |
| VARCHAR(n)/CHARACTER VARYING(n) | 变长非二进制,有长度限制 | n 决定 | |
| TEXT | 变长非二进制,无长度限制 | 由字符串决定 |
二进制类型
PostgreSQL 提供 BYTEA 类型,用来存储二进制字符串,BYTEA 类型存储空间位 4 字节加上实际的二进制字符串。
CREATE TABLE tmp ( b BYTEA );
INSERT INTO tmp VALUES (E'\\000');
SELECT * from tmp;
布尔类型
PostgreSQL 提供 BOOLEAN 布尔类型,用一个字节来存储,有 TRUE,FALSE 两个值。
其他有效文本,可以代替 TRUE 或者 False。比如 ‘t’, ‘true’, ‘y’, ‘yes’, ‘1’, 或者 ‘f’, ‘false’, ‘n’, ‘no’, ‘0’
数组类型
PostgreSQL 允许将字段定义成变长或者变长的一维或者多维数组,数组类型可以是基本类型或者是用户定义类型。
声明数组
numbs INT[],
zz TEXT[4][4]
对于一维数组也可以
arr_column INT ARRAY[5]
插入数组
CREATE TABLE tmp (bt int[]);
INSERT INTO tmp VALUES('\{\{1,1,1\}, \{2,2,2\}, \{3,3,3\}\}');
SELECT * FROM tmp;
除开这些基础类型,PostgreSQL 还支持非常多的复杂类型,比如 json, xml 等等,具体可以参考官网 , 这些复杂类型的使用可以单开一篇文章来讲了,初识篇就到此。
reference
利用 imewlconverter 制作 Rime 词库
之前就写过文章介绍这款跨平台的开源输入解决方案 Rime,所有的配置以及同步方法都在之前的文章中有介绍。这篇文章主要介绍如何制作 Rime 的扩展词库。虽然目前网上也有一些非常不错的词库,但是很多内容还是需要自己慢慢培养的。
词库转换工具
从 2.4 版本起支持加密的搜狗词库了,直接导出搜狗词库,然后转成 Rime 的格式即可。
安装 dotnet:
macOS 下直接 brew install dotnet-sdk
下载 release 对应版本,然后运行:
dotnet ImeWlConverterCmd.dll -?
在 macOS 下使用 dotnet ImeWlConverterCmd.dll "-?".
具体转换命令,比如导入一个搜狗细胞词库成 Rime 词库,则命令为:
dotnet ImeWlConverterCmd.dll -ct:pinyin -os:linux -i:scel ./input.scel -o:rime ./rime.txt
ImeWlConverterCmd.dll 工具的其他重要参数,对于输出为 rime 的 -ct:pinyin/wubi/zhengma,也可以通过 -os:windows/macos/linux 来指定操作系统。
繁简转换
安装 opencc 繁简转换工具
sudo apt install opencc
然后运行装换
opencc -i source.txt -o dest.txt
会将 source.txt 文本内容全部转换成 dest.txt 繁体的文本。
然后将文本内容全部拷贝到 luna_pinyin.mywords.dict.yaml 文件中,并添加文件头:
---
name: luna_pinyin.mywords
version: "0.0.1"
sort: by_weight
use_preset_vocabulary: true
...
说明:
sort: by_weight,词条的排序方式,可选填by_weight按照词频高到低,original保持原码表中的顺序use_preset_vocabulary: true表示是否导入预设的词汇表,当词库中没有定义拼音和词频的时候开启
然后找到 luna_pinyin.extended.dict.yaml,打开文件导入新的词库
import_tables:
  - luna_pinyin.mywords
搜狗细胞词库
下载对应的细胞词库:
然后使用上面的方法转换。
搜狗拼音备份词库 bin
dotnet ImeWlConverterCmd.dll -ct:pinyin -os:linux -i:sgpybin ./input.bin -o:rime ./rime.txt
清华大学开放中文词库
包含了 IT, 财经,成语,地名,历史名人,诗词,医学,饮食,法律,汽车,动物,等几大类词库。
通讯录姓名
我所有的通讯录都在 Google 通讯录 中保存着,页面上可以很方便的导出 csv 文件。有了这个文本文件就可以快速制作通讯录姓名的词库。
简单观察一下通讯录 csv 的结构就知道第一列就是姓名,解析一下文件然后将第一列弄出来。和上面的流程一直,制作一个 luna_pinyin.contacts.dict.yaml 文件保存这些通讯录名字,然后将该词库添加到 extended 中。部署即可生效。
纯文本词库
dotnet ImeWlConverterCmd.dll -ct:pinyin -os:linux -i:word ~/Downloads/entry.csv -o:rime ./rime-.txt
Rime 导入词库
通过扩展来导入词库,纯文本管理,
Rime 导出词库
同步后在同步的文件夹中能找到纯文本保存的词库。
文章分类
最近文章
- Dinox 又一款 AI 语音实时转录工具 前两天介绍过 [[Voicenotes]],也是一款 AI 转录文字的笔记软件,之前在调查 Voicenotes 的时候就留意到了 Dinox,因为是在小红书留意到的,所以猜测应该是国内的某位独立开发者的作品,整个应用使用起来也比较舒服,但相较于 Voicenotes,Dinox 更偏向于一个手机端的笔记软件,因为他整体的设计中没有将语音作为首选,用户也可以添加文字的笔记,反而在 Voicenotes 中,语音作为了所有笔记的首选,当然 Voicenotes 也可以自己编辑笔记,但是语音是它的核心。
- 音流:一款支持 Navidrom 兼容 Subsonic 的跨平台音乐播放器 之前一篇文章介绍了Navidrome,搭建了一个自己在线音乐流媒体库,把我本地通过 [[Syncthing]] 同步的 80 G 音乐导入了。自己也尝试了 Navidrome 官网列出的 Subsonic 兼容客户端 [[substreamer]],以及 macOS 上面的 [[Sonixd]],体验都还不错。但是在了解的过程中又发现了一款中文名叫做「音流」(英文 Stream Music)的应用,初步体验了一下感觉还不错,所以分享出来。
- 泰国 DTV 数字游民签证 泰国一直是 [[Digital Nomad]] 数字游民青睐的选择地,尤其是清迈以其优美的自然环境、低廉的生活成本和友好的社区氛围而闻名。许多数字游民选择在泰国清迈定居,可以在清迈租用廉价的公寓或民宿,享受美食和文化,并与其他数字游民分享经验和资源。
- VoceChat 一款可以自托管的在线聊天室 VoceChat 是一款使用 Rust(后端),React(前端),Flutter(移动端)开发的,开源,支持独立部署的在线聊天服务。VoceChat 非常轻量,后端服务只有 15MB 的大小,打包的 Docker 镜像文件也只有 61 MB,VoceChat 可部署在任何的服务器上。
- 结合了 Google 和 AI 的对话搜索引擎:Perplexity AI 在日本,因为 SoftBank 和 Perplexity AI 开展了合作 ,所以最近大量的使用 Perplexity ,这一篇文章就总结一下 Perplexity 的优势和使用技巧。