2021 年读书笔记
根据豆瓣的记录,今年读了 48 本书,没去年读哲学、金融那么入迷,所以大部分的读书记录还是集中在了前两个季度。
之间几年的读书笔记:
哲学
因为去年政治学的著作,所以想要开始读一些西方哲学史相关的内容,但柏拉图、苏格拉底等著作目前又无法直接读懂,需要借助大量的二手著作,二次解读,所以经过了去年大量[[洛克]]的作品之后,今年第一季度就读了很多[[卢梭]]的作品:
- [[社会契约论]],这是卢梭关于政治学的一本著作,其大名应该很多人都知道,尤其是其中最著名的一句话「人生而自由,却无往不在枷锁之中。自以为能掌控一切的人,却比其他任何人更是奴隶」。
- [[论人类不平等的起源和基础]],卢梭认为人类不平等的起源是人的虚荣心和私有制。人在[[自然状态]]下是平等的,只是进入了社会之后才不平等。这本书只是卢梭为第戎学院写的一个征文内容,但其观点却另当时的社会为之一振。
- 接下来读的就是[[忏悔录]],这是一部卢梭的自传,卢梭毫无顾忌地把自己一生中不堪、肮脏都放到了读者面前。
- [[爱弥尔]] 这一本书并没有消化完全,虽然我知道这本书是卢梭想要教育出一个合格公民而写的一部关于教育的书,但我因为缺乏对那个时期的一些认识,可能需要再补充一些历史背景之后再读。
- [[通过知识获得解放]],这是 2021 年重读的一本书,这是[[波普尔]]的一本论文集,从知识,社会科学,到书籍思想,到文化,在这本书里面波普尔探讨了非常多的问题以及思考。最让我印象深刻的是破普尔对于科学知识的认识,[[我们的知识是建立在暂时性和尝试性解决办法之上]],我们当前的科学知识正确的唯一原因就是其是暂时经受了猛烈的批评。自然科学的方法和社会科学一样,通过实验得出尝试性解决方法,如果经得住批评就接受,如果被驳倒就尝试另外一个方法。
社科
- [[人类理解论]]
- [[人类大瘟疫 一个世纪以来的全球性流行]]
- [[生活在宋朝]]
- [[牛津通识读本:大卫休谟]]
- [[刘擎西方现代思想讲义]],非常容易读,作为一本哲学入门书籍不错,并且对西方哲学的流派和哲学家都有一个介绍和总结,如果对其中的某些思想或哲学家感兴趣不妨再找其他著作阅读
- [[做一个清醒的现代人]]
- [[马克思韦伯 跨越时代的人生]]
- [[货币的非国家化]],这是一本读着读着就不自觉想起 Web 3,区块链,比特币的书,[[哈耶克]] 在其中主张废除中央银行,允许私人发币,货币也可以自由竞争。
- [[文明 现代化 价值投资与中国]] 这是投资人李录关于「价值投资」,现代化,文明和中国的思考,在我看来是一本非常容易读的书,李录在书中也就很多问题展开了自己的论述,关于「文明的传播」,「现代化是否有可能在中国诞生」,「现代化的传播和现代化的道路之争」,「现代化的本质和铁律」,「对未来中国的预测」 等等问题。在投资上,我至始至终都坚信的是认识到了才能赚到超额的收益,而如何提高自己的认识,去读伟大的投资家是如何思考问题的,他们就是学习的对象。
投资 期权
- [[投资中最重要的事]] 算是一本投资经典书吧,作者是 [[霍华德 马克斯]],作者在其中阐述了自己的投资逻辑,如何看待市场,判断估值,理解风险,关注周期,等等,是一部非常不错的投资书籍,并且通过这一本书,可以了解非常多的观点,就这些观点也可以去发现更多的经典著作。
- [[简易期权]],算是期权的入门书吧,看名字就大概能理解,这算是一本非常简单介绍期权的著作,不是非常推荐,但如果要看可以快速的根据目录来了解一下什么期权,以及各种期权的种类
- [[每天学一点金融投资学]]
- [[投资 一部历史]]
- [[彼得林奇教你理财]],彼得林奇也是在投资历史上留下了辉煌的一笔
- [[对赌]]
- [[期权交易:核心策略与技巧解析]]
- [[漫步华尔街]],个人非常推荐的一本投资书,因为通过这一本书让我了解了更多的投资理论,[[价值投资]],[[技术分析]],[[基本面分析]],[[随机漫步理论]],[[现代投资组合理论]],[[行为金融学]] 等等理论,没有哪一个理论是绝对的正确,也不是说坚守哪一个理论就能百分之百超越市场
- [[麦克米伦谈期权]]
- [[暗池]]
人物传记
-
[[算法帝国]] 当时了解到盈透证券,偶然间获知了此书,书中的第一章关于[[Interactive Brokers 盈透证券]] 创始人的故事非常精彩,读完了这部分后面就略读过去了 - [[将心注入 舒尔茨]] 这是星巴克创始人[[霍华德 舒尔茨]]的第一本个人传记,这也是舒尔茨关于创办星巴克的故事。故事也非常精彩,读完之后对星巴克又有了全新的认识,它在我这里便不再只是一个咖啡品牌了。
- [[一路向前]] 这是舒尔茨再次担任 CEO 之后的著作,星巴克在丢失了创始人舒尔茨之后一度曾经走上了歧路
- [[大投机家]],这是德国投资家科斯托拉尼的自传,在他的历史时代,他有着非常超前的思考,对「投机」也有自己的行事逻辑。不借钱投资(不加杠杆),构建富有想象力的投资方案,耐心。书中对股市的长期,短期,已经外部影响因素都有一定的讨论。这算不上一本投资的经典书籍,但作为业余读物却也能在其中收获不少。
小说
- [[希望之线]] 东野圭吾 2021 最新的小说
- [[无名之町]] 疫情下的海边小镇发生的一起命案,死者是受人尊敬的老师
纪实文学
- [[巨浪下的小学]] 海啸过后
- [[无规则游戏:阿富汗屡被中断的历史]]
社科
- [[繁荣与衰退]] 美联储前主席[[格林斯潘]] 的著作
- [[全球房地产]],正如其名,就是介绍了世界各个主流市场的房地产经济,包括了香港的,德国的,美国的等等。我没有精读,大致留下了一个印象。
其他
- [[费曼学习法]],以输出来促使输入,通过教别人来学习。费曼学习法可以简化成四个步骤,理解概念,教给别人,回顾,简化内容。
- [[不购买的习惯]],法语中并不存在「穷」这个说法,法国人不说「穷」,而是说现在没有钱,也就是说「穷」不是一种属性,而是一种状态。只允许拥有少量的物品,就促使我们去好好利用,好好相处。
专业
- [[Reading-2021]]
Bash 中的 Parameter Expansion
Parameter Expansion 是一个用来描述命令行中部分参数被展开(内容被替换)的术语。在大部分的场景中,被展开的参数通常会带有 $ 符号,在一些特定的场景中,额外的花括号(curly braces)也是必须的。
比如:
echo "'$USER', '$USERs', '${USER}s'"
'testuser', '', 'testusers'
上面的例子展示了基本的 parameter expansions(PE) 是什么,第二个 PE 结果是一个空字符串,那是因为参数 USERs 是空的。其实 s 不是参数的一部分,但是因为 bash 无法分辨这一点,所以我们需要使用 {} 来限定参数的边界(前后)。
Parameter Expansion 也可以让我们去修改会被展开的字符串,这个操作会使得一些修改变得非常方便:
for file in *.JPG *.jepg
do mv -- "$file" "${file%.*}.jpg"
done
上述的代码会重命名所有扩展名为 .JPG 和 .jepg 的 JPEG 文件到 .jpg 扩展名。然后 ${file%.*} 表达式则会截取 file 文件从开头到最后一个 . 的内容。
其他的一些 PE tricks
${parameter:-word}, Use Default Value 如果当 parameter 未设置或为null时,使用默认值word,否则直接使用 parameter 的值${parameter:=word},Assign Default Value 赋值,当parameter未设置或为 null 时,word会被赋值给 parameter,然后 parameter 的值会被展开${parameter:+word},Use Alternate Value 如果 parameter 是 null 或者 未设置,那么结果没有任何被替换,如果 parameter 有值,则会被替换成 word${parameter:offset:length}Substring Expansion,使用 offset 和 length 限定的字串展开,序号从0开始。${#parameter}使用 parameter 的长度展开,如果 parameter 是一个数组名,则展开其中元素个数${parameter#pattern}pattern会从 parameter 值开始匹配,最短的 match 会从 parameter 中被删除然后剩余的被展开${parameter##pattern},##后面的 pattern 会把最长的 match 删掉${parameter%pattern},pattern 从 parameter 后往前匹配,最短的匹配被删除,剩余部分展开${parameter%%pattern},从后往前,最长的 match 会被删除${parameter/pat/string},parameter 值中的第一个出现的pat会被替换为string${parameter//pat/string}, 每一个出现的pat都会被替换${parameter/#pat/string},${parameter/%pat/string}
reference
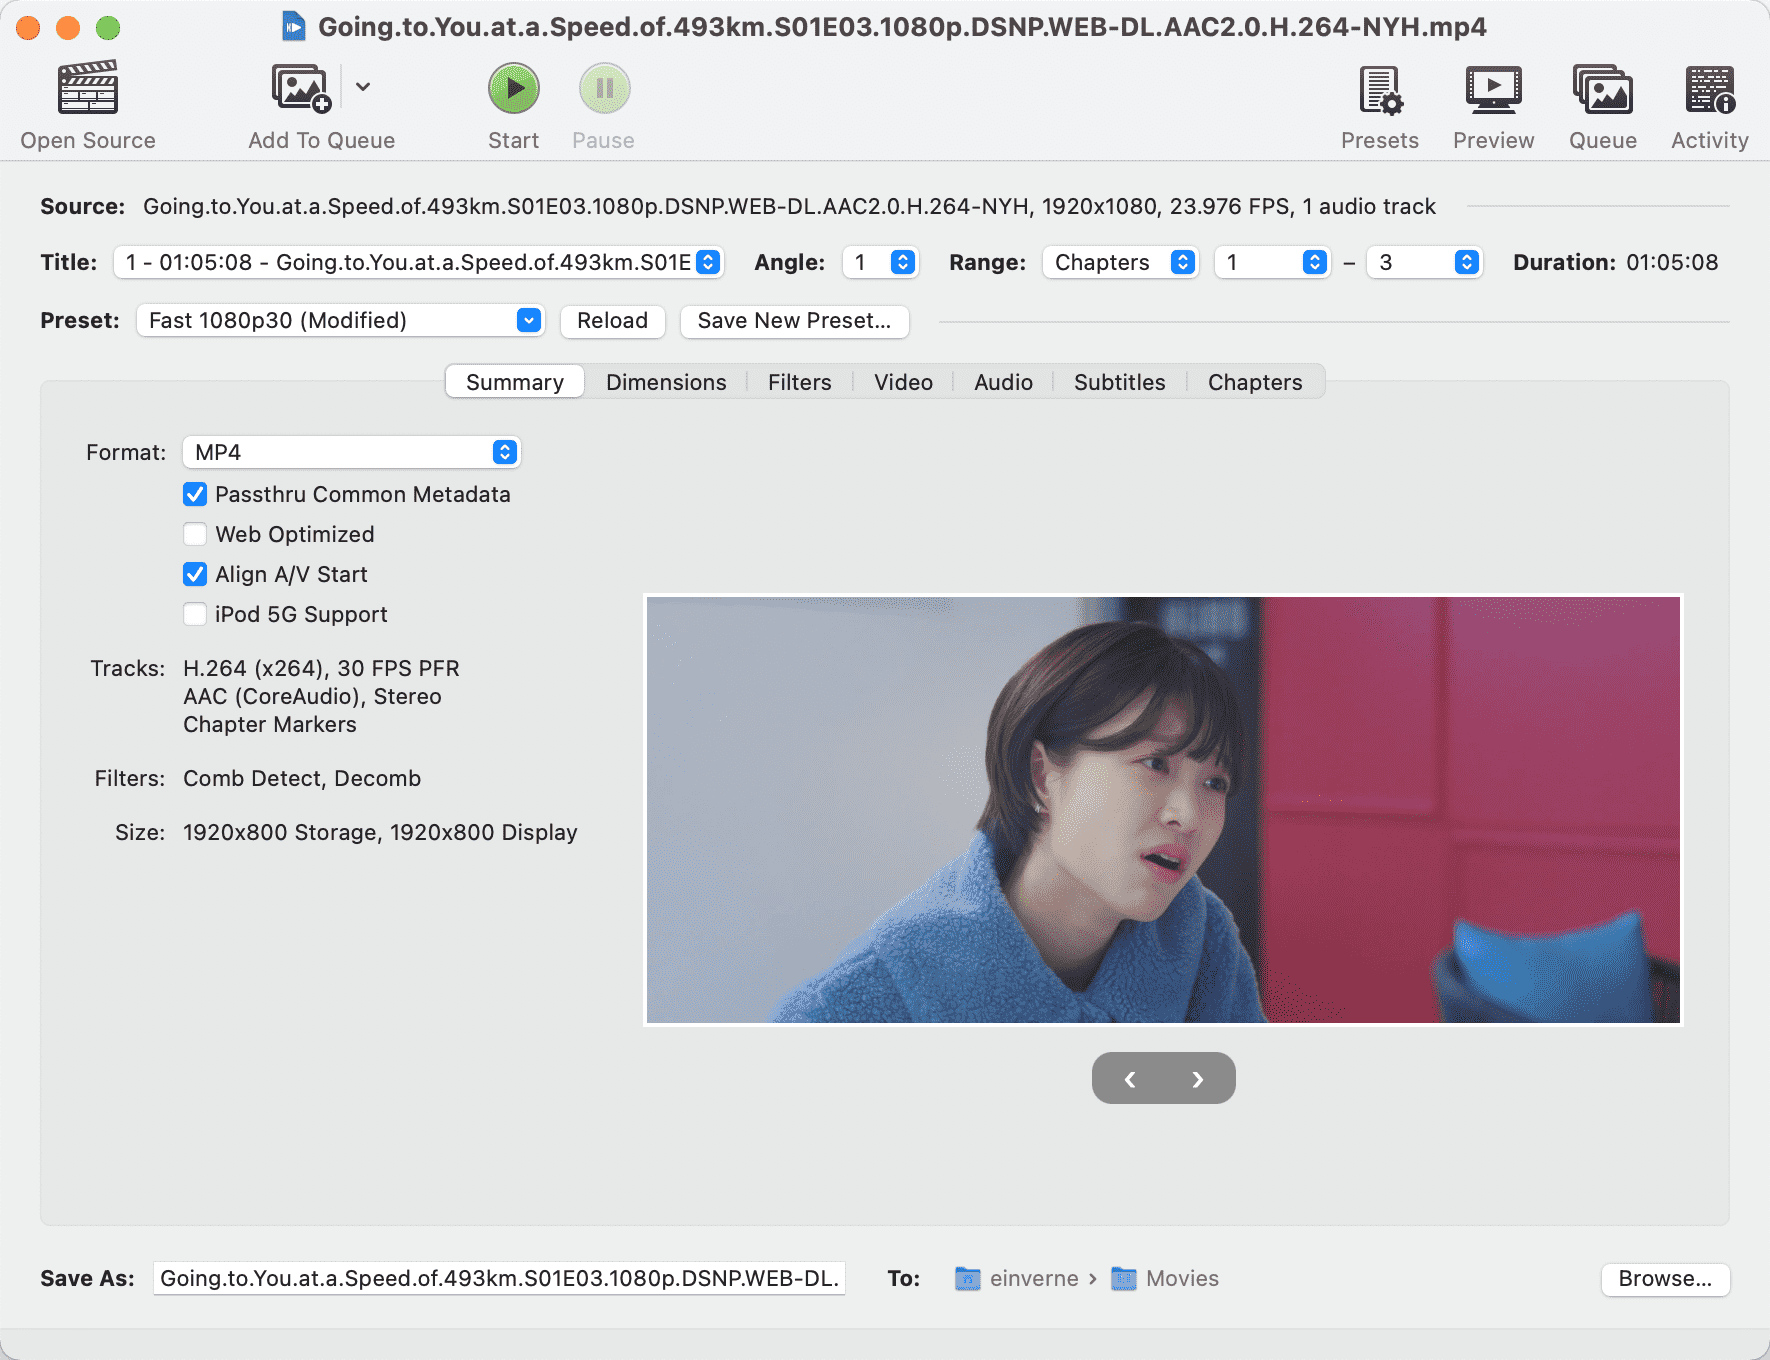
使用 HandBrake 压缩转码视频
HandBrake 是一款开源的全平台的视频转码压制工具,基于 [[FFmpeg]],可以算作一个 GUI 版本的 FFmpeg。
安装
macOS:
brew install --cask handbrake
基础知识复习
分辨率 resolution
分辨率,也称为解析度,指的是视频中像素点的个数。
帧率 frame rate
帧率指的是每秒在屏幕上刷新的画面个数。
需要显示器硬件支持,大多数屏幕的刷新率在 60Hz 左右。
通常情况下 30FPS 已经能够保证流畅。
码率 bit rate
码率指的是单位时间内文件包含的数据量。
相同分辨率,码率越高约清晰。但是超过一定范围之后,清晰度变不会显著提高。
文件体积 = 总码率 * 时长。
媒体封装格式
通常见到的媒体封装格式包括:
- MKV
- MP4
- WebM
编解码格式
视频、音频数据的压缩方式。
常见的有:
- H.264 / H.265(HEVC)
预估文件的大小
通常可以通过分辨率大小、码率、帧率来预估一个视频文件的大小:
- 720P / 1 Mbps / 30 FPS / x264 / AAC = 1 小时视频大小在 450M 左右
- 1080P / 2 Mbps / 30 FPS / x264 / AAC = 1 小时视频大小在 900M 左右
使用
当了解了视频编解码的基本信息之后再去使用 HandBrake 就简单很多了。
使用 HandBrake 的使用场景通常有:
- 压缩原始文件,如果想要在互联网上分发音视频文件,可以通过 HandBrake 压缩到一个合适的大小之后再分发
- 视频转码,将视频文件转码成各个平台都兼容的格式,比如 MP4 等
- 给视频文件增加字幕,音轨
软件界面:
不丢失数据 降级 Android 应用版本
之前一次不消息把 Google Play Store 中的自动更新启用了,之后一个夜里把所有应用都更新了,不过有些应用本来就不想升级的,比如网易云音乐(有一些低版本没有广告,没有乱七八糟的直播什么的),微信。所以想着能不能在不丢失数据的情况下降级应用。简单的搜索了一下果然可以。
这里需要使用到 adb 命令,不同的系统直接安装即可,我现在在 Linux 下之前就已经安装过。
macOS 下:
brew cask install android-platform-tools
执行:
adb devices
查看是否连接,如果出现了设备 ID,则表明连接成功了。
然后准备好特定版本的 apk。
adb push wechat_7.0.0.apk /sdcard/Download/wechat_7.0.0.apk
然后进入下一步:
adb shell
进入系统的 shell 环境。
pm install -d -r /sdcard/Download/wechat_7.0.0.apk
说明:
-d表示运行降级安装-r表示保存数据重新安装现有应用
如果无法安装报错:
255|OnePlus7Pro:/ $ pm install -d -r /sdcard/Download/wechat_7.0.0.apk
avc:  denied  { read } for  scontext=u:r:system_server:s0 tcontext=u:object_r:fuse:s0 tclass=file permissive=0
System server has no access to read file context u:object_r:fuse:s0 (from path /sdcard/Download/wechat_7.0.0.apk, context u:r:system_server:s0)
Error: Unable to open file: /sdcard/Download/wechat_7.0.0.apk
Consider using a file under /data/local/tmp/
Error: Can't open file: /sdcard/Download/wechat_7.0.0.apk

Exception occurred while executing 'install':
java.lang.IllegalArgumentException: Error: Can't open file: /sdcard/Download/wechat_7.0.0.apk
	at com.android.server.pm.PackageManagerShellCommand.setParamsSize(PackageManagerShellCommand.java:520)
	at com.android.server.pm.PackageManagerShellCommand.doRunInstall(PackageManagerShellCommand.java:1283)
	at com.android.server.pm.PackageManagerShellCommand.runInstall(PackageManagerShellCommand.java:1249)
	at com.android.server.pm.PackageManagerShellCommand.onCommand(PackageManagerShellCommand.java:185)
	at android.os.BasicShellCommandHandler.exec(BasicShellCommandHandler.java:98)
	at android.os.ShellCommand.exec(ShellCommand.java:44)
	at com.android.server.pm.PackageManagerService.onShellCommand(PackageManagerService.java:22322)
	at android.os.Binder.shellCommand(Binder.java:940)
	at android.os.Binder.onTransact(Binder.java:824)
	at android.content.pm.IPackageManager$Stub.onTransact(IPackageManager.java:4644)
	at com.android.server.pm.PackageManagerService.onTransact(PackageManagerService.java:4515)
	at android.os.Binder.execTransactInternal(Binder.java:1170)
	at android.os.Binder.execTransact(Binder.java:1134)
那么需要将 apk 移动到 /data/local/tmp/:
mv /sdcard/Download/wechat_7.0.0.apk /data/local/tmp/
然后再安装:
pm install -d -r /data/local/tmp/wechat_7.0.0.apk
如果还不行,那么可以保留数据卸载应用然后重新安装:
pm uninstall -k com.tencent.mm
pm install -d /data/local/tmp/wechat_7.0.0.apk
使用 Swizzin 从零开始构建自己的 Seedbox
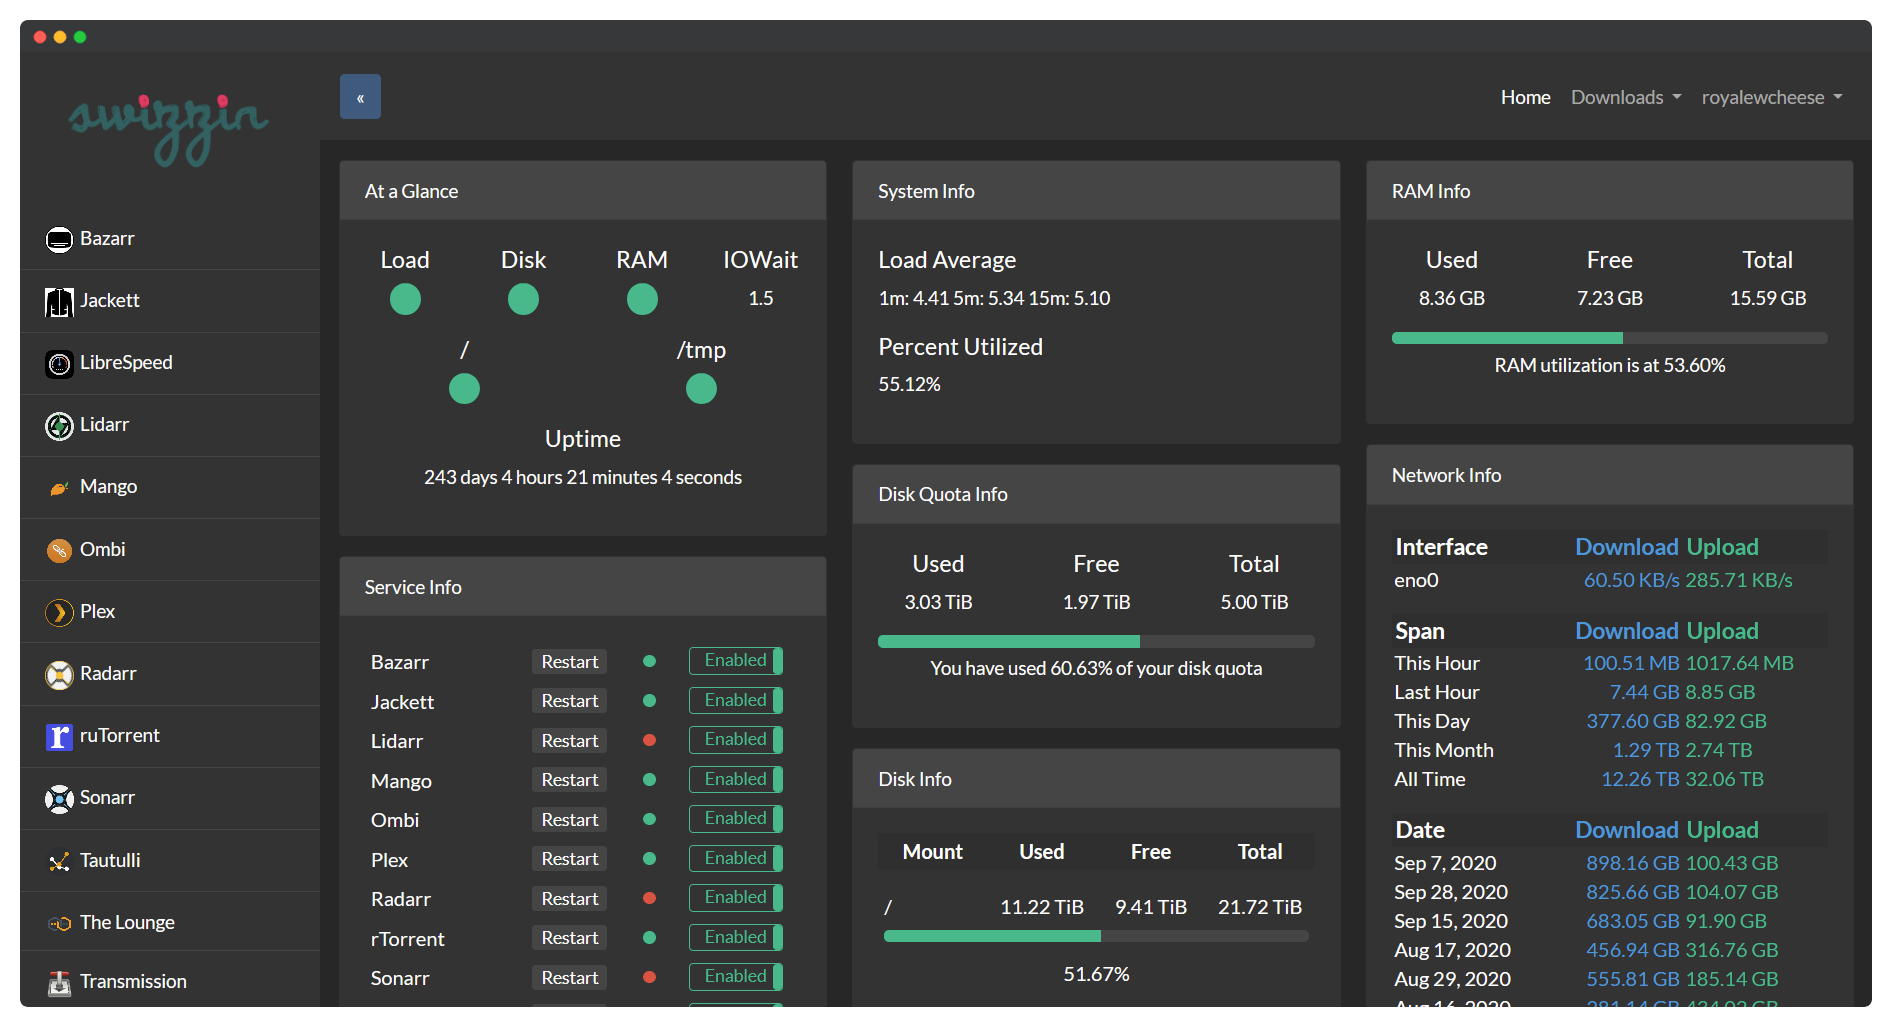
[[Swizzin]] 是一个轻量级、模块化的 [[Seedbox]] 解决方案,可以安装在 Debian 9/10 或 Ubuntu 16.04/18.04/20.04 上。QuickBox 的软件包已经被移植过来,包括 Webmin 控制面板。
Swizzin 可以安装如下的组件:
- BT/PT 客户端:qBittorrent, rTorrent/ruTorrent, flood, Transmission, Deluge
- 影音播放:Plex, Emby, ffmpeg
- 资料同步:rclone, btsync(resilio sync), syncthing
- 其他影音相关:bazarr, headphones, [[Jackett]], lidarr, quassel, sickchill, [[Sonarr]], subsonic, ombi, 等等
- 资源获取:Couchpotato, rapidleech, sickgear, 等等
- 文件管理:shellinabox, filebrowser, vsftpd, 等等
- 网盘:[[NextCloud]]
- Usenet: nzbget, nzbhydra, 等等
- Linux 桌面环境:X2Go
- 聊天室:ZNC, the Lounge
- Web 服务器:Nginx, LEMP (Webmin), Let’s Encrypt
后台界面:
项目地址 GitHub: https://github.com/swizzin/swizzin
支持的操作系统
- Debian 9/10
- Ubuntu 16.04/18.04/20.04
一键安装脚本
wget
bash <(wget -qO - git.io/swizzin) && . ~/.bashrc
curl
bash <(curl -sL git.io/swizzin) && . ~/.bashrc
如果在 Ubuntu 下,以 sudo 来执行上面的安装脚本,需要在命令中包含 -H 参数,以确保你的主目录在 sudo 启动时被修改为 /root 。安装程序会自动处理这个问题:
sudo -H su -c 'bash <(wget -O- -q https://git.io/swizzin-setup)'
更进阶的设置可以参考 这里 。
box 命令
box 有如下子命令:
help
install
remove
update
upgrade
adduser
deluser
chpasswd
panel fix-disk
list
test
Swizzin 更改用户名密码
Swizzin 的密码是在执行初始化脚本的时候设定的,可以使用如下命令重置密码:
sudo box chpasswd your_name
更改 rtorrent 默认下载位置
修改 vi ~/.rtorrent.rc:
directory.default.set = /mnt/storage/torrents/rtorrent
重启 rtorrent 服务
sudo systemctl restart rtorrent@<yourusername>
sudo systemctl status rtorrent@<yourusername>
重启 Syncthing
sudo systemctl restart syncthing@yourname.service
重启 Plex
sudo systemctl restart plexmediaserver
修改 ruTorrent 主题
ruTorrent 的安装地址在
/srv/rutorrent/plugins/theme/themes
找到合适的主题克隆到该目录下即可。
Transdroid/Transdrone 配置
[[Transdroid]] 是一款 Android 上用来管理 BT 客户端的软件,Swizzin 安装的 ruTorrent 需要按照如下方式配置才能连接上。
Name: rtorrent (or whatever you like)
Server type: rtorrent
IP or host name: <the hostname of your server>
Username: <your username>
Password: <your password>
Advanced Settings:
    SCGI mount point: /rutorrent/plugins/httprpc/action.php OR /<username>
    Use SSL: ON
每天学习一个命令:通过 arp 学习地址解析协议
ARP( Address Resolution Protocol) 地址解析解析,用来将 IP 地址解析为 MAC 地址的协议。
主机会维护一张 ARP 表,存储 IP 地址和 MAC 地址映射关系。
arp
直接执行 arp 会列出系统当前的 arp 记录:
arp
Address                  HWtype  HWaddress           Flags Mask            Iface
10.236.151.50            ether   50:9a:4c:2d:--:--   C                     eth0
172.17.0.2               ether   02:42:ac:11:00:02   C                     docker0
10.236.151.83            ether   ac:87:a3:17:72:26   C                     eth0
172.25.0.2               ether   02:42:ac:19:00:02   C                     br-8ff872eb50bd
如果有多张网卡,可以使用 -i 指定网卡:
arp -i eth0
使用 -a 参数使用 BSD 风格输出:
$ arp -a
? (10.236.151.19) at 50:9a:4c:2d:--:-- [ether] on eth0
? (10.236.151.200) at e4:54:e8:cd:--:-- [ether] on eth0
删除 ARP 记录,可以使用 -d 参数:
sudo arp -d 192.168.0.1
删除之后 ARP 记录就会显示为 incomplete。
添加 ARP 记录:
sudo arp -s 192.168.0.1 12:34:56:78:90:ab
如果要批量添加,可以从文件中读取添加,可以先准备好一个文件,然后其中添加 IP 和 MAC 地址:
192.168.0.201 11:22:33:44:55:66
192.168.0.202 12:23:34:45:56:67
最后使用 -f 参数:
sudo arp -f arp_list.txt
Azure Cosmos DB 简单使用入门
Azure Cosmos DB 是 Azure 提供的一个分布式 NoSQL 数据库,Cosmos DB 提供一定的关系型数据库的能力,并且可以无缝地扩容。
Azure 提供了 30 天免费的试用时长,可以注册一个 Azure 帐号体验一下。该帐户中获得前 1000 RU/s 的免费吞吐量和 25 GB 的免费存储。
Cosmos DB 和其他非关系型数据库区别
Cosmos DB 是微软提供的多区域分布式的数据库,可以根据需要自动缩放吞吐量,自动扩容。
Cosmos DB 的优势
- 多地区,可以在全球范围能有不错的响应时间,Cosmos DB 可以自行复制副本,用户可以与最近的副本进行交互
- 高吞吐和弹性存储,透明水平分区和多主数据库复制,任何区域内,只需发出一次 API 调用,即可将每秒数千个请求弹性扩容到数百个请求,用户只需为实际使用的吞吐量和存储付费
- 一致性,用户无需关心多个地区的数据一致性问题
- 用户无需关心索引,数据库架构,Cosmos DB 会自动为所有数据构建索引
- SLA 可用性保证,Azure 托管 Cosmos DB,用户不需要管理和操作复杂的多数据中心和部署软件的升级
- 支持多种数据库模型
- SQL
- MongoDB
- Cassandra
Azure Cosmos DB 账户结构
- 一个数据库账户下面有零个或多个数据库
- 一个数据库下面有零个或多个容器
- 一个容器包括零个或多个项
- 容器用于存储数据
- 创建容器时需要提供分区键,文档中选择的要存储的属性,用于路由到要写入,更新或删除的分区
- 容器会实现集合,表,图等
下面就重点对 Cosmos DB 中的每个概念介绍一下。
Azure Cosmos DB databases
在 Azure Cosmos DB 中数据库类似于 namespace。数据库是一组 container。
Azure Cosmos DB containers
Azure Cosmos DB container (容器)就是数据真正存放的地方。和关系型数据库不同的是,当发生扩容的时候,不是扩展 VM 的存储空间, Cosmos DB 会横向扩展。数据会存储在一台或多肽服务器中,称为分区(partitions)。为了增加吞吐量或存储,需要添加更多的分区。这为容器提供了无限的吞吐量和存储。当创建容器的时候,需要添加分区键(partition key)。这个分区键需要从文档的属性中选择。该属性将用于将数据路由到要写入、更新或删除的分区。也可以被用于 WHERE 查询子句,以实现高效的数据检索。
Cosmos DB 中数据的基础存储机制称为物理分区,可以拥有高达 10000 RU/s 和多大 50 GB 的数据。Azure Cosmos DB 使用可存储多达 20 GB 数据的逻辑分区对此进行抽象。随着添加更多分区,逻辑分区允许服务为基础物理分区上的数据提供更大的弹性和更好的管理。 若要详细了解分区和分区键,请参阅将数据分区。
创建容器的时候,会需要配置吞吐量:
- 专用吞吐量:专门留给该容器使用
- 有两种类型的专用吞吐量:标准和自动缩放
- 共享吞吐量:
- 在数据库级别指定,与数据库中最多 25 个容器共享。
容器与 Schema 无关,容器中的项可以具有任意 Schema 或不同的实体,只要它们共享相同的分区键。默认情况下,容器中的所有数据都会自动编制索引,无需显式索引。
容器中的数据必需具有每个逻辑分区键值唯一的 id。
Azure Cosmos DB 容器的属性
Cosmos DB 容器具备一组系统定义的属性。这些属性值会根据不同的 API 附加在数据上,比如常见的:
_rid,容器唯一标识符_etag,用于乐观并发控制的实体标记_ts,容器上次更新的时间戳_self,容器的可寻址 URIid,用户配置,容器的名字indexingPolicy,用户可配置,提供更改索引的功能TimeToLive,用户配置,从容器自动删除changeFeedPolicy,用户配置,用于读取对容器中的项所做的更改uniqueKeyPolicy,用户配置,确保逻辑分区中一个或多个值的唯一性AnalyticalTimeToLive,用户配置,在设置的时间段后从容器中自动删除功能
Azure Cosmos DB items
数据在 Cosmos DB 中表现为一个项,集合中的一个文件,表格的一行,或者图形中的一个节点或边缘。
item 的属性
_rid,项的唯一标识符_etag,乐观并发控制的实体标记_ts,上次更新的事件戳_self,项的可寻址 URIid,逻辑分区中用户定义的唯一名称
建模和分区
嵌入数据
在关系型数据库中,通常是将数据规范化,将数据规范化通常就是将数据拆分成不同的不同的实体。比如一个人的信息可以拆分成联系人,多条地址记录,多条联系人记录等等。通常可以通过类型来进一步区分,比如地址可以是家庭地址,或工作地址等。
规范数据的前提是为了避免冗余记录。而在 Cosmos DB 中可以使用 嵌入的方式,将此人的相关信息嵌入到一个文档中。
{
    "id": "1",
    "firstName": "Thomas",
    "lastName": "Andersen",
    "addresses": [
        {
            "line1": "100 Some Street",
            "line2": "Unit 1",
            "city": "Seattle",
            "state": "WA",
            "zip": 98012
        }
    ],
    "contactDetails": [
        {"email": "thomas@andersen.com"},
        {"phone": "+1 555 555-5555", "extension": 5555}
    ]
}
这样在创建或更新此人的信息时都是单个写入操作。
什么时候使用嵌入
通常是如下的场景:
- 实体之间存在包含关系
- 实体之间存在一对多关系
- 嵌入的数据不经常更改
- 嵌入 ude 数据在未绑定的情况下不会增长
- 嵌入的数据会频繁地统一查询
什么时候不嵌入
如果文档中有一个无限制增长的数组,那么最好不要嵌入此数组。
可以考虑将数组拆分开,并在数组的元素中加入原始引用的 ID。
引用数据
通过在文档中包含 ID 的方式来完成引用。
比如下面的文档设计为一个人的股票持仓。
Person document:
{
    "id": "1",
    "firstName": "Thomas",
    "lastName": "Andersen",
    "holdings": [
        { "numberHeld":  100, "stockId": 1},
        { "numberHeld":  50, "stockId": 2}
    ]
}

Stock documents:
{
    "id": "1",
    "symbol": "zbzb",
    "open": 1,
    "high": 2,
    "low": 0.5,
    "vol": 11970000,
    "mkt-cap": 42000000,
    "pe": 5.89
},
{
    "id": "2",
    "symbol": "xcxc",
    "open": 89,
    "high": 93.24,
    "low": 88.87,
    "vol": 2970200,
    "mkt-cap": 1005000,
    "pe": 75.82
}
这种方法的缺点就是当要显示一个人的投资组合的时候,应用程序需要多次访问数据库来加载每个股票的信息。
什么时候使用引用
- 表示一对多关系。
- 表示多对多关系。
- 相关数据频繁更改。
- 引用的数据可能没有限制。
尽量避免使用可能较大的可变即集合。而通过将 ID 分散在单个文档中的方式来保存关系。
多对多关系
在关系型数据库中如果要处理多对多的关系,通常是引入一张关系表,保存 ID 对 ID 的关系。
在文档数据库中,可以通过分别在实体中冗余关系的方式来记录多对多的关系。
比如作者,作者图书关系,图书,三个实体之间的联系。一本书可能有多个作者,而一个作者也可能写很多本书。
这个时候就可以考虑在作者的文档中加入 books 数组,在图书的文档中加入 authors 数组来表示。这样就可以不用关系表来保存多对多的关系了。同时也可以减少应用程序需要访问服务器的次数。
创建样例数据
可以使用 New item 菜单添加新的 item
{
    "id": "1",
    "category": "personal",
    "name": "groceries",
    "description": "Pick up apples and strawberries.",
    "isComplete": false
}
其中的 id 为数据的唯一 ID。
Cosmos DB 常用查询语法
最基本的查询语法,比如查询全部文档
SELECT * FROM c
指定顺序
SELECT * FROM c ORDER BY c._ts desc
查询条件
TTL
TTL,生存时间,Cosmos DB 能够在一段时间之后自动将项从容器中删除。可以在容器级别设置 TTL,系统会基于 TTL 值自动删除过期的项,不需要客户端应用程序显式的发出删除请求。TTL 的最大值是 2147483647 秒,大约 24855 天或 68 年。
删除过期项是一个后台任务,使用剩余的请求单元,即用户请求没有使用的请求单元。TTL 过期后,如果容器出现请求过载的情况,并且没有足够的 RU 使用,也会延迟数据删除操作。但是任何查询都不会通过接口返回 TTL 过期后的数据。
- 容器的生存时间 (
DefaultTimeToLive)- 缺失,项不回自动过期
- 如果设置为 -1,默认情况下,项不回过期
- 如果设置为非零数字,项将在上次修改后 n 秒后过期
- 项的生存时间 (
ttl)- 仅当父容器的
DefaultTimeToLive存在且不是设置为 null 时,此属性适用 - 如果存在,将替代父容器的
DefaultTimeToLive
- 仅当父容器的
reference
Obsidian 插件篇之 Dataview
在过去的一年里面,我基本上只用 Obsidian 来记录,并且我也将我过去几年的 Jekyll 的内容作为 submodule 引入到了 Obsidian Vault,所以现在这个仓库中有非常多的笔记。
前些天在 Twitter 上看到有人说 Obsidian 基于 Markdown 的管理方式没有 Roam Research,和 [[Logseq]] 那样基于块的灵活,并且无法动态展示内容,比如有人用 Notion 那种表格的形式来管理读书记录,观影记录,用 Obsidian 就没有太好的办法去做到,但其实只要使用 Dataview 这一个插件就可以实现。
- 源代码:https://github.com/blacksmithgu/obsidian-dataview
- 文档: https://blacksmithgu.github.io/obsidian-dataview/
在过去的使用过程中,我并没有太多的需求要去使用这一款插件,大部分的场景我都会直接使用搜索(Ctrl+Shift+F)关键字或标签来做到。但随着现在笔记越来越多,我产生了一个需求,比如我想要查看我笔记中打了某个标签的笔记列表,我想查看某个时间段中我记录的关于某个人物的笔记,又或者我会在笔记中将我看过的影视作品记录下来,我想查看过去我看过的某个导演的作品列表,这一些都可以通过 Dataview 结合 Obsidian 来达到。
这样的需求和我之前在了解 [[Zettelkasten 笔记法]] 中关于 [[202008261820-Zettel-笔记中间层]] 的概念不谋而合。当原子的笔记变得越来越多的时候,为了将这些原子的笔记集合到某一个主题下,通常我们会使用分类、标签等等方式来组织,那么使用一个笔记中间层来管理就变得顺理成章,而在过去我通常都是使用手工的方式来组织,比如我在管理读书笔记的时候,我会新建一个年度的笔记 [[Reading-2021]] ,然后在其中以季度为标题,然后记录每一本书。同样观影记录也类似。
而当我得知了 Dataview 插件之后,我发现这样的中间层可以通过组织数据而自动产生,只需要我在每一个笔记中加上 YAML Front matter,然后用适当的查询语句就可以做到。下面就直接来介绍一下这个插件。
基本概念
在 Obsidian 中可以用不同的方式对数据(笔记)进行标记,Dataview 会追踪所有 Markdown 文件中标记的数据。
Dataview 插件中几个重要的概念:
- YAML Front Matter,Markdown 文件开头标记元数据部分
- Inline Field, 行内标记字段
- Implicit Field, 隐式字段
YAML Front Matter
Obsidian 的 metadata 使用 YAML front matter,一般写在文件的最上面,使用 key-value 结构,既对人友好,也对 Obsidian 可读。YAML 是 “Yet Another Markup Language” 的缩写。
Front matter 一般是纯文本文件从第一行开始的一块区域。这是 Markdown 文件通常用来添加 metadata 的方式。Jekyll, Hugo, Gatsby 等等静态网站生成器都使用这个方式。
这个区块就可以对这个 Markdown 文件添加额外的描述信息。
YAML 区块需要三条 --- 短横线标记开始和结束。并且这个区块需要在文件的最上面。
比如:
---
key: value
key2: value2
key3: [one, two, three]
key4:
- four
- five
- six
---
从 Obsidian 0.12.12 开始,有四个原生支持的标签:
tagsaliasescssclasspublish
后两个我一般不怎么使用,所以我创建了一个模板,每一次创建新的笔记,都会自动包含上述两个标签:
---
category:
aliases:
tags:
time:
---
你当然还可以用 Templater 插件针对不同的笔记内容插入不同的 YAML 头,比如去记录看过的电影,我就会多加上 rating, comment 字段,简单的记录评分和短评。
Inline Fields
在页面中使用行内字段
除了上面显式地使用 YAML 来对文件进行标记,也还可以在内容中使用行内的语法对 markdown 文件进行标记,Dataview 支持 Key:: Value 这样的格式:
# Markdown Page

One Field:: Value
**Bold Field**::  Nice!
或者也可以写在一行内:
刚刚看完[[浪漫的体质 Melo 体质]],可以打 [rating:: 5] 分,这是一部让人看了非常[mood:: 轻松愉悦]的[category:: 喜剧片]
上面一个句子同样达到了给当前这个文档加上了如下的标签:
- rating: 5
- mood: 轻松愉悦
- category: 喜剧片
在之后的检索中直接可以使用。
在 Task 中使用行内字段
同样在 Task 语法中也可以使用,通常在 Markdown 中我们会使用 -[ ] blah blah 来标记一个任务,比如:
- [ ] todo task [metadata key:: value]
- [x] finished task [completion:: 2021-12-30]
同样可以使用行内的标记。在 Dataview 官方的说明中我们也可以使用 emoji 来分别表示,到期(🗓️YYYY-MM-DD),完成(✅YYYY-MM-DD),创建(➕YYYY-MM-DD)的日期。如果不想使用 emoji 也可以直接用文字 [due:: ], [create:: ], [completion:: ]。
行内字段的类型
所有 Dataview 中的字段都有类型,这决定了在渲染的时候的顺序。
如果没有匹配上任何类型,就是字符串:
FieldName:: This is a demo text.
数字类型:
FieldName:: 6
FieldName:: 2.4
FieldName:: -10
布尔值:true/false
FieldName:: true
FieldName:: false
日期:ISO8601 标准,YYYY-MM[-DDTHH:mm:ss.nnn+ZZ]
Example:: 2021-04-18
Example:: 2021-04-18T04:19:35.000
Example:: 2021-04-18T04:19:35.000+06:30
时长:格式 <time> <unit>,比如 6 hours 或者 4 minutes
Example:: 7 hours
Example:: 4min
Example:: 16 days
Example:: 9 years, 8 months, 4 days, 16 hours, 2 minutes
Example:: 9 yrs 8 min
链接:Obsidian 的格式,如果要在 Front matter 中使用,则需要使用双引号
Example:: [[A Page]]
Example:: [[Some Other Page|Render Text]]
数组:
Example:: 1, 2, 3
Example:: "yes", "or", "no"
对象,字典:
field:
  value1: 1
  value2: 2
  ...
字段 Fields
页面中的隐式字段
Dataview 会给每一个文件都自动添加一些默认的 metadata 信息,这些字段在后面的检索语法中都可以使用。
Implicit Field 字段1
file.name: 文件标题(字符串)file.folder: 文件所属文件夹路径file.path: 文件路径file.size: (in bytes) 文件大小file.ctime: 文件的创建时间(包含日期和时间)file.mtime: 文件的修改时间file.cday: 文件创建的日期file.mday: 文件修改的日期file.tags: 笔记中所有标签数组,子标签会按照每一个层级分别展开存储,比如#Tag/A/1,会有三个[#Tag, #Tag/A, #Tag/A/1]file.etags: 除去子标签的数组file.inlinks: 指向此文件的所有传入链接的数组file.outlinks: 此文件所有出站的链接数组file.aliases: 文件别名数组file.day: 如果文件名中有日期,那么会以这个字段显示。比如文件名中包含 yyyy-mm-dd(年-月-日,例如2021-03-21),那么就会存在这个 metadata。
任务中的隐式字段 implicit field in task
同样对于 Tasks,Dataview 也会自动创建一些隐式的字段。
每一个任务都会有如下的字段:
- Task 会继承所在文件的所有字段,比如 Task 所在的页面中已经包含了 rating 信息了,那么 task 也会有
completed任务是否完成fullyCompleted: 任务以及所有的子任务是否完成text: 任务名line: task 所在行path: task 所在路径section: 连接到任务所在区块link: 连接到距离任务最近的可连接的区块subtasks: 子任务real: 如果为 true, 则是一个真正的任务,否则就是一个任务之前或之后的元素列表completion: 任务完成的日期due: 任务到期时间created: 创建日期annotated: 如果任务有自定义标记则为 True,否则为 False
Dataview Query Language
一旦定义了上述的字段(标签、属性)就可以用 Dataview 定义的查询语法来检索并展示内容。这是一个类 SQL 的语法,一个最简单的例子:
```dataview
TABLE rating AS "Rating", summary AS "Summary" FROM #games
SORT rating DESC
```
Dataview 插件提供了三种样式的展现形式:
- table, 检索内容以表格形式展现
- list, 列表形式展现
- task, 检索内容中的任务
一个标准的语法是这样的:
```dataview
[list|table|task] field1, (field2 + field3) as myfield, ..., fieldN
from #tag or "folder" or [[link]] or outgoing([[link]])
where field [>|>=|<|<=|=|&|'|'] [field2|literal value] (and field2 ...) (or field3...)
sort field [ascending|descending|asc|desc] (ascending is implied if not provided)
```
说明:
dataview告诉 Obsidian 这个地方需要使用 Dataview 插件list|table|task告诉 Dataview 插件展现形式from则告诉 Dataview 包含什么文件,如果是#tag获取标签,获取文件夹,等等Where:筛选 from 中的内容,进行过滤,可以指定从某个标签(在yaml字段中的标签),或某个文件夹中检索信息。sort:排序:可以按某个字段进行排序,可以升序(使用参数ascending、asc)或降序(使用参数descending、desc)
table
个人最常使用的一个展现形式,可以以表格的形式展示多列。
```dataview
table field
from #tag
sort file.ctime desc
```
表示过滤出所有包含 #tag 的文件,并显示 field 列,最后以表格形式,并以文件创建时间倒序渲染展示。
进阶用法
除了上面提到的 Query 语法,Dataview 插件还提供了另外两种查询语法。
- 行内查询
- Dataview JS 进阶查询
行内查询 Inline DQL
Dataview 提供的查询可以直接在行内使用,比如
# 查看当前文件名
`= this.file.name`
# 今天日期
`= date(today)`
# 距离某个日期时长
`=(date(2023-12-31)-date(today))`
可以在 Dataview 设置中自定义行内查询的前缀。
Dataview JS
Dataview JS 给了用户进一步查询的能力,可以直接使用 JavaScript , Dataview JS 定义了一些预置函数可以直接使用。
使用 dataviewjs 代码块:
```dataviewjs
let pages = dv.pages("#books and -#books/finished").where(b => b.rating >= 4);
for (let group of pages.groupBy(b => b.genre)) {
   dv.header(group.key);
   dv.list(group.rows.file.name);
}
```
在 Dataview JS 中需要使用 dv 变量,插件定义了一些默认的函数。
检索页面
通过 dv.pages() 函数:
```dataviewjs
dv.pages("#korean-drama") //返回所有带有标签 books 的页面
dv.pages('"folder"') //返回所有在 folder 文件夹的页面
dv.pages("#yes or -#no") //返回所有带有标签 yes 或者没有标签 no 的页面
dv.pages("") //返回所有页面
```
检索路径
返回文件的路径:
```dataviewjs
dv.pagePaths("#books") //返回所有带有标签 books 的页面路径
dv.pagePaths('"folder"') //返回所有在 folder 文件夹的页面路径
dv.pagePaths("#yes or -#no") //返回所有带有标签 yes 或者没有标签 no 的页面路径
```
返回单个页面
```dataviewjs
dv.page("Index") //返回名称为 Index 的页面
dv.page("books/The Raisin.md") //返回所有在 books 文件夹下的 The Raisin 文件的页面
```
渲染
通过 header 来设置标题,比如 level=1 就是设置一级标题:
dv.header(level, text)
列表
```dataviewjs
dv.list([1, 2, 3]) //生成一个1,2,3的列表
dv.list(dv.pages().file.name)  //生成所有文件的文件名列表
dv.list(dv.pages().file.link)  //生成所有文件的文件链接列表,即双链
dv.list(dv.pages("").file.tags.distinct()) //生成所有标签的列表
dv.list(dv.pages("#book").where(p => p.rating > 7)) //生成在标签 book 内所有评分大于 7 的书本列表
```
任务列表
```dataviewjs
// 从所有带有标签 project 的页面中获取所有的任务生成列表
dv.taskList(dv.pages("#project").file.tasks)

// 从所有带有标签 project 的页面中获取所有的未完成任务生成列表
dv.taskList(dv.pages("#project").file.tasks
    .where(t => !t.completed))

// 从所有带有标签 project 的页面中获取所有的带有特定字符的任务生成列表
// 可以设置为特定日期
dv.taskList(dv.pages("#project").file.tasks
    .where(t => t.text.includes("#tag")))

// 将所有未完成且带有字符串的任务列出
dv.taskList(
    dv.pages("").file.tasks
    .where(t => t.text.includes("#todo") && !t.completed),1)
```
表格
```dataviewjs
// 根据标签 book 对应的页面的 YAML 生成一个简单的表格,其中 map 为对应的内容所对应的表头,按顺序填入即可。
// b 可以是任意值,只是代表当前传入的文件为 b
dv.table(["File", "Genre", "Time Read", "Rating"], dv.pages("#book")
    .sort(b => b.rating)
    .map(b => [b.file.link, b.genre, b["time-read"], b.rating]))
```
同样也可以在行内使用 Dataview JS:
`$= dv.current().file.mtime`
总结
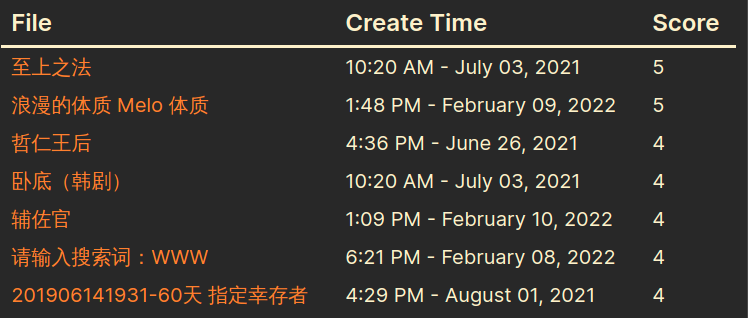
再回到我最初的需求,比如我想查看我笔记中所有包含了 korean-drama 标签的笔记,以及我的打分。只要我的笔记中之前已经包含了 Front Matter,就可以用下面的代码直接检索出来。
```dataview
table file.ctime as "Create Time", rating as "Score"
from #korean-drama
sort rating desc
```
结果:
再比如我想知道我笔记中包含了洛克这个单词的所有笔记,以及出现的行内容。
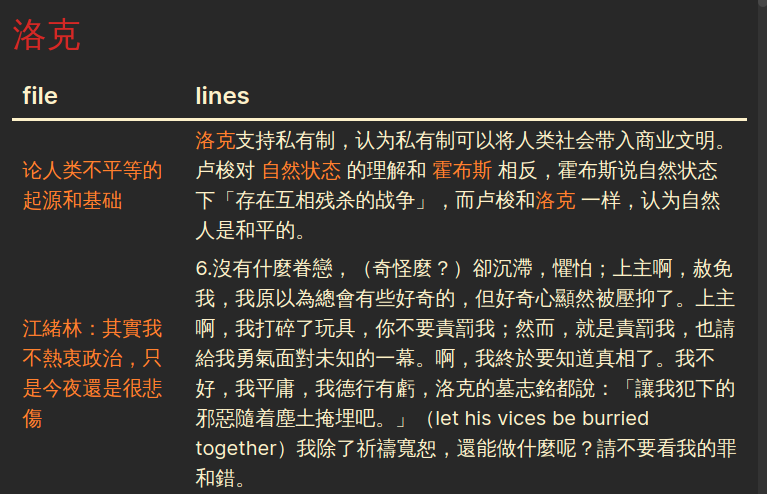
那么可以用这一段代码:
```dataviewjs
const files = app.vault.getMarkdownFiles()
const prompt = "洛克"

const fileObject = files.map(async (file) => {
    const fileLink = "[["+file.name.split(".")[0]+"]]"
    const content = await app.vault.cachedRead(file)
    return {fileLink, content}
})

Promise.all(fileObject).then(files => {

let values = new Set(files.reduce((acc, file) => {
    const lines = file.content.split("\n").filter(line => line.match(new RegExp(prompt, "i")))
    if (lines[0] && !file.fileLink.includes("Untitled")) {
        if (acc[0]) {
            return [...acc, [file.fileLink, lines.join("\n")]]
        } else {
            return [[file.fileLink, lines.join("\n")]]
        }
    }
    return acc
}, []))

dv.header(1, prompt)
dv.table(["file", "lines"], Array.from(values))

})
```
reference
- https://blacksmithgu.github.io/obsidian-dataview/
- [[obsidian-dataview-query-example]]
使用 k3s 和 WireGuard 网络部署 Kubernetes 集群
在今年的黑色星期五入手了几个不同 VPS 提供上的机器,包括之前的 A400,以及 HostHatch,手上的机器可以用来学习搭建一个 Kubernetes。
在之前的文章中已经介绍过netmaker,这是一个可以用来管理 [[WireGuard]] 网络的工具,这篇文章就简单介绍一下如何在不同的云服务器提供商的主机之间,利用 WireGuard 构建的局域网,并使用 k3s 来搭建一个简单的 Kubernetes 集群。
概念介绍
Netmaker
Netmaker 是一个开源的、基于 WireGuard 网络的组网工具,可以非常方便的构建 WireGuard 网络。
WireGuard
[[WireGuard]] 是一个已经合并到 Linux 内核的轻量级 VPN 协议,可以在不同的主机中建立点对点通信隧道。
K3s
[[k3s]] 是 Rancher Lab 发布的一款轻量级的 Kubernetes 发行版。
Kubernetes
Kubernetes 是一个用于管理容器的开源运维平台,非常易于扩展。通常简称 k8s。
工具选择
因为我搭建 k8s 只是为了学习,不是为了应用于生产,所以不直接使用 Kubernetes,而是选择更轻量的 K3s,也可以在性能没有那么好的 VPS 上运行。
Kubernetes 安全性的问题则通过 WireGuard 网络解决,WireGuard 可以在不同主机节点之间建立加密隧道,可以让节点和节点之间的通信都只经过这条加密隧道,这样即使我的不同的主机在不同的地点,可以保证之间的通信是可靠的。但是存在一个问题便是,如果只是只有几台机器,那么完全可以通过手工的方式来管理 WireGuard 网络,但如果机器很多则管理起来会非常麻烦,所以这里使用 Netmaker,可以只通过简单命令快速构建一个私有局域网。
这里不会使用 Netmaker 更加只能的一些特性,比如 DNS,storage,或者 High Availability(高可用),只简单的借助其基本的组网特性。
设置
在这个演示的过程中,我使用两台 RackNerd 的 1核2G VPS(分别叫做 RN1,RN2)作为 worker 节点 ,以及一台 2核4G 的 A400 机器作为 k3s master 节点,然后有一台另外的机器安装 Netmaker 管理端。
- 操作系统:机器都安装 Ubuntu 20.04
- 节点机器都已经安装
apt install wireguard-tools - Netmaker 节点安装了 Docker 以及 docker-compose,并且保证 80, 8081, 50051 端口是开放的
Netmaker 安装 WireGuard 设置
第一步首先需要通过 Netmaker 构建一个节点与节点之前的安全网络,用于之后的通信。首先在 Netmaker 节点的机器上安装 Netmaker。
教程可以参考之前的 Netmaker 文章,为了方便起见可以选择一键安装脚本:
sudo wget -qO - https://raw.githubusercontent.com/gravitl/netmaker/master/scripts/nm-quick.sh | bash
如果熟悉 docker-compose 可以下载 docker-compose.yml 自行修改配置后启动。
启动之后可以根据脚本的提示获取 Netmaker 登录后台的地址。在 UI 界面中创建用户,并登录。
在界面中创建一个 Network 叫做 k3s,然后在选项中配置私有网络地址的范围是 10.11.11.0/24。
这一步完成之后,就可以将不同的主机节点添加到这个网络中,首先点击 Access Keys,选择 k3s 网络,然后创建 Key,Key 的名字重要,可以随意,然后给这个 Key 100 次使用机会。然后就会获得一个安装脚本,通常是 curl 开头的。
然后在去其他节点中依次安装,将其添加到 Netmaker 网络中。
确保节点已经安装 wireguard-tools 包,然后使用 root 账户:
su -
# 粘贴安装脚本
curl ...
# 完成安装后执行 wg show 查看状态是否正常
wg show
wg show 命令会显示网络接口,如果节点添加成功,可以继续在其他节点中依次执行上述步骤,直到把所有节点都添加到网络中。然后其 Netmaker 后台,点开 k3s 网络可以查看到网络中添加进来的主机节点,以及其私有 IP 地址。一般 Netmaker 会根据主机的 Hostname 来在界面中展示,可以点击修改来重命名网络中的任何节点名字。
K3s 安装
假设 master 节点安装在 A400 机器,worker 节点使用两台 RackNerd 节点。
那么首先登录 A400 机器
# 切换到 root
su -
# 查看 IP
ip a
可以看到结果中会有一个 nm-k3s 的网络接口,其中显示的 IP 地址就是 WireGuard 的地址,假设是 10.11.11.4,然后需要将此 IP 地址替换下面命令中的 IP 地址。
curl -sfL https://get.k3s.io | INSTALL_K3S_EXEC=”server --node-ip 10.11.11.4 --node-external-ip 10.11.11.4 --flannel-iface nm-k3s” sh -
等待安装完成,可以使用如下命令查看状态:
systemctl status k3s
kubectl get nodes
kubectl get pods --all-namespaces
一旦确认状态都没有问题,所有的 pods 都正常运行,可以开始部署 worker 节点。首先从 master 节点获取 node key:
cat /var/lib/rancher/k3s/server/node-token
然后在每一个 worker 主机上执行:
# 切换到 root
su -
# 查看 IP
ip a
获取机器的私有 IP 地址,用来替换下面命令中的 10.11.11.x。然后下面命令中的 MASTER 需要替换成 k3s master 机器的 IP,如果是上面的例子就是 10.11.11.4,将 MASTER 修改为 4。
然后将 <TOKEN VAL> 替换成上面 cat /var/lib/rancher/k3s/server/node-token 命令输出的结果。
curl -sfL https://get.k3s.io | INSTALL_K3S_EXEC="agent --server https://10.11.11.MASTER:6443 --token <TOKEN VAL> --node-ip 10.11.11.X --node-external-ip 10.11.11.X --flannel-iface nm-k3s" sh -
替换上面的命令中的部分,完成执行,使用如下命令查看状态:
systemctl status k3s-agent
然后依次在两台 worker 机器中执行。
然后到 master 节点执行:
sudo kubectl get nodes
sudo kubectl get pods --all-namespaces -o wide
显示如下:

测试
创建一个 pingtest.yml
apiVersion: apps/v1
kind: Deployment
metadata:
  name: pingtest
  namespace: pingtest
spec:
  selector:
    matchLabels:
      app: pingtest
  replicas: 4
  template:
    metadata:
      labels:
        app: pingtest
    spec:
      affinity:
        podAntiAffinity:
          requiredDuringSchedulingIgnoredDuringExecution:
          - labelSelector:
              matchExpressions:
              - key: app
                operator: In
                values:
                - pingtest
            topologyKey: "kubernetes.io/hostname"
      containers:
      - name: busybox
        image: busybox
        command: ["/bin/sh", "-ec", "sleep 1000"]
然后执行:
kubectl create namespace pingtest
kubectl apply -f pingtest.yml
kubectl get pods -n pingtest -o wide
执行完成之后,可以看到三个节点中有三个运行的 pods,因为上面指定了 replicas 是 4,所以会有一个在 pending 中。

进入一个运行的节点,执行 ping:
kubectl exec -it pingtest-588df6f488-zzcrp -n pingtest -- sh
然后执行 ping 其他节点的操作。
Nginx test
创建一个 nginx.yml:
apiVersion: apps/v1
kind: Deployment
metadata:
  name: nginx
  labels:
    app: nginx
spec:
  selector:
    matchLabels:
      app: nginx
  replicas: 2
  template:
    metadata:
      labels:
        app: nginx
    spec:
      containers:
      - name: nginx
        image: nginx:1.14.2
        ports:
        - containerPort: 80
---
apiVersion: v1
kind: Service
metadata:
  labels:
    app: nginx
  name: nginx
spec:
  ports:
  - port: 80
    protocol: TCP
    targetPort: 80
  selector:
    app: nginx
  sessionAffinity: None
  type: ClusterIP
然后执行:
kubectl create namespace nginx
kubectl apply -f nginx.yml -n nginx
然后
kubectl exec -it pingtest-588df6f488-zzcrp -n pingtest -- sh
在其中可以访问其他 worker 节点中的 nginx index.html
reference
搭建临时 socks5 代理
这篇文章简要的介绍一下如何在 VPS 快速使用 Docker 安装一个 socks 代理来满足临时需要 socks 代理的情况,适合直接在 VPS 上安装,然后用完立即删除。
然后搭配 Chrome 下的浏览器插件直接实现快速代理。
或者可以搭配 [[proxychains-ng]] 来实现终端下的代理。
搭建临时 socks5 代理
docker run -d --name socks5 -p 1090:1080 -e PROXY_USER=<USER> -e PROXY_PASSWORD=<PASSWD> --restart=always serjs/go-socks5-proxy
docker compose 安装可以参考这里。
说明:
- Docker 映射端口,比如
1090:1080将外部端口 1090 映射到容器内 1080 端口
测试服务是否正常,如果有设置密码:
curl -x socks5://[user:password@]proxyhost[:port]/ url
    curl --socks5 --user <PROXY_USER>:<PROXY_PASSWORD> <docker host ip>:1080 http://ifcfg.co
如果没有密码:
curl --socks5 server.ip:port https://example.com
Proxychains
socks proxy + proxychains-ng
reference
文章分类
最近文章
- Dinox 又一款 AI 语音实时转录工具 前两天介绍过 [[Voicenotes]],也是一款 AI 转录文字的笔记软件,之前在调查 Voicenotes 的时候就留意到了 Dinox,因为是在小红书留意到的,所以猜测应该是国内的某位独立开发者的作品,整个应用使用起来也比较舒服,但相较于 Voicenotes,Dinox 更偏向于一个手机端的笔记软件,因为他整体的设计中没有将语音作为首选,用户也可以添加文字的笔记,反而在 Voicenotes 中,语音作为了所有笔记的首选,当然 Voicenotes 也可以自己编辑笔记,但是语音是它的核心。
- 音流:一款支持 Navidrom 兼容 Subsonic 的跨平台音乐播放器 之前一篇文章介绍了Navidrome,搭建了一个自己在线音乐流媒体库,把我本地通过 [[Syncthing]] 同步的 80 G 音乐导入了。自己也尝试了 Navidrome 官网列出的 Subsonic 兼容客户端 [[substreamer]],以及 macOS 上面的 [[Sonixd]],体验都还不错。但是在了解的过程中又发现了一款中文名叫做「音流」(英文 Stream Music)的应用,初步体验了一下感觉还不错,所以分享出来。
- 泰国 DTV 数字游民签证 泰国一直是 [[Digital Nomad]] 数字游民青睐的选择地,尤其是清迈以其优美的自然环境、低廉的生活成本和友好的社区氛围而闻名。许多数字游民选择在泰国清迈定居,可以在清迈租用廉价的公寓或民宿,享受美食和文化,并与其他数字游民分享经验和资源。
- VoceChat 一款可以自托管的在线聊天室 VoceChat 是一款使用 Rust(后端),React(前端),Flutter(移动端)开发的,开源,支持独立部署的在线聊天服务。VoceChat 非常轻量,后端服务只有 15MB 的大小,打包的 Docker 镜像文件也只有 61 MB,VoceChat 可部署在任何的服务器上。
- 结合了 Google 和 AI 的对话搜索引擎:Perplexity AI 在日本,因为 SoftBank 和 Perplexity AI 开展了合作 ,所以最近大量的使用 Perplexity ,这一篇文章就总结一下 Perplexity 的优势和使用技巧。