让网站在分享时预览更美观
在最近用 Telegram 分享网页的时候,Telegram 会预先抓取网页形成一个缩略预览,但是如果是自己的网站没有适配一些 meta 信息,抓取出来的信息就非常不堪入目。所以优化一下网站在分享的时候的预览图,这个术语叫做 Rich Previews,想查看网站是否已经优化好,可以查看下面的网站:
想要好看的预览需要如下的标签
Title最长 65 个字符,否则 Google 结果就会被截断Meta description最好小于 155 字符og:title最好不超过 35 个字符,否则预览会截断og:description65 字符og:url页面 urlog: imageJPG 或者 PNG,最小分辨率 300 × 200 像素favicon网站 logo, 32 × 32 像素
上面的网站目前支持很多聊天工具,比如 WhatsApp, Telegram, Skype ,还有社交网站 Facebook,Twitter 等等。
举例
<title>Rich Link Preview</title>
<meta name="description" content="Also want these pretty website previews?" />
<meta property="og:title" content="Rich Link Preview" />
<meta property="og:description" content="Also want these pretty website previews?" />
<meta property="og:url" content="http://richpreview.com/" />
<meta property="og:image" content="http://richpreview.com/richpreview.jpg" />
<link rel="shortcut icon" href="http://richpreview.com/favicon.ico" type="image/x-icon" />
这些标签的定义都在 http://ogp.me/ 这个网站上,只要遵循这个 The Open Graph protocol 协议基本上能搞定大部分的网站。
reference
Python 经典项目整理:阅读好的代码
阅读经典的项目是学习的起点。
- Howdoi Howdoi 是代码搜寻工具,使用 Python 编写。
- Flask Flask 是基于 Werkzeug 和 Jinja2,使用 Python 的微框架。它能够快速启动,并且开发意图良好。
- Diamond Diamond 是 python 的守护进程,它收集指标,并且将他们发布至 Graphite 或其它后端。 它能够收集 cpu, 内存,网络,i/o,负载和硬盘指标。除此,它拥有实现自定义收集器的 API,该 API 几乎能 从任何资源中获取指标。
- Werkzeug Werkzeug 起初只是一个 WSGI 应用多种工具的集成,现在它已经变成非常重要的 WSGI 实用模型。 它包括强大的调试器,功能齐全的请求和响应对象,处理 entity tags 的 HTTP 工具,缓存控制标头,HTTP 数据,cookie 处理,文件上传,强大的 URL 路由系统和一些社区提供的插件模块。
- Requests Requests 是 Apache2 许可的 HTTP 库,使用 Python 编写。
- Tablib Tablib 是无格式的表格数据集库,使用 Python 编写。
reference
Python 项目的结构
之前和朋友聊天,说到 Python 项目的结构问题,Python 确实是一门比较灵活的语言,你可以单独执行某个文件,把这些文件扔到一起看起来像个工程,但是外人来看其实就是一个个独立的小文件,小模块,对于小型项目来说可能并不会造成什么问题,但是对于大型项目,尤其是如果需要多人合作,有一个关于工程结构的基本认识是非常必要的。
Python 没有强制的结构规范,但是有一个大家的共识
README.rst
LICENSE
setup.py
requirements.txt
sample/__init__.py
sample/core.py
sample/helpers.py
docs/conf.py
docs/index.rst
tests/test_basic.py
tests/test_advanced.py
项目的结构是项目的门面,简单易懂的项目结构能够让介入的第三人快速的熟悉项目,Python 项目结构没有太多的约束和限制,Python 提供的导入和模块管理使得结构化 Python 相对简单,但也要注意一些比如循环依赖的问题。
模块
为了解决项目结构的问题就不得不提到模块(module),这是 Python 最主要的抽象层,模块允许将代码分为不同的部分,每个部分包含相关的数据和功能。
模块名尽量要短,使用小写,并且避免使用特殊符号,比如(.)或者 (?) 等。不推荐在模块名中使用下划线。
# ok
import library.plugin.foo
# not ok
import library.foo_plugin
import 的工作原理,比如 import modu 将会寻找合适的文件,调用目录下的 modu.py 文件,如果没有找到,Python 解释器会递归地在 PYTHONPATH 环境变量中查找该文件,如果没有则抛出 ImportError 异常。一旦找到 modu.py Python 解释器将在隔离的作用域内执行模块。所有顶层语句都会被执行,包括其他的引用。方法和类的定义会存储到模块字典中。这个模块的变量、方法和类通过命名空间暴露给调用方。
import 语句也可以为 from modu import * ,使用 from modu import func 能够精确定位想要导入的方法,并将其放入到全局命名空间。
# 较差的写法
[...]
from modu import *
[...]
x = sqrt(4)  # sqrt 是模块 modu 的一部分么?或是内建函数么?上文定义了么?

# 稍好
from modu import sqrt
[...]
x = sqrt(4)  # 如果在 import 语句与这条语句之间,sqrt 没有被重复定义,它也许是模块 modu 的一部分。

# 最好的做法
import modu
[...]
x = modu.sqrt(4)  # sqrt 显然是属于模块 modu 的。
包
Python 提供非常简单的包管理系统,简单地将模块管理机制扩展到一个目录上,就是包。任意包含 __init__.py 文件的目录都被认为是一个 Python 包。如果包内的模块和子包没有代码共享的需求,使用空白 __init__.py 是正常的做法。
导入深层嵌套包可以使用 import very.very.deep.module as mod 可以简化导入冗长子包。
对象
使用无状态的函数是一种更好的编程范式。
把有隐式上下文和副作用的函数与仅包含逻辑的函数(纯函数)谨慎地区分开来,会带来 以下好处:
- 纯函数的结果是确定的:给定一个输入,输出总是固定相同。
- 当需要重构或优化时,纯函数更易于更改或替换。
- 纯函数更容易做单元测试:很少需要复杂的上下文配置和之后的数据清除工作。
- 纯函数更容易操作、修饰和分发。
装饰器
装饰器本质上是一个 Python 函数,它可以让其他函数在不需要做任何代码变动的前提下增加额外功能,装饰器的返回值也是一个函数对象。它经常用于有切面需求的场景,比如:插入日志、性能测试、事务处理、缓存、权限校验等场景。装饰器是解决这类问题的绝佳设计,有了装饰器,我们就可以抽离出大量与函数功能本身无关的雷同代码并继续重用。概括的讲,装饰器的作用就是为已经存在的对象添加额外的功能。
def use_logging(func):

    def wrapper():
        logging.warn("%s is running" % func.__name__)
        return func()   # 把 foo 当做参数传递进来时,执行 func() 就相当于执行 foo()
    return wrapper

def foo():
    print('i am foo')

foo = use_logging(foo)  # 因为装饰器 use_logging(foo) 返回的时函数对象 wrapper,这条语句相当于  foo = wrapper
foo()                   # 执行 foo() 就相当于执行 wrapper()
使用 @ 符号,装饰器的语法糖
def use_logging(func):

    def wrapper():
        logging.warn("%s is running" % func.__name__)
        return func()
    return wrapper

@use_logging
def foo():
    print("i am foo")

foo()
这样就可以省略掉 foo = use_logging(foo) 这句赋值。
带参数的装饰器
def use_logging(level):
    def decorator(func):
        def wrapper(*args, **kwargs):
            if level == "warn":
                logging.warn("%s is running" % func.__name__)
            elif level == "info":
                logging.info("%s is running" % func.__name__)
            return func(*args)
        return wrapper

    return decorator

@use_logging(level="warn")
def foo(name='foo'):
    print("i am %s" % name)

foo()
类装饰器
class Foo(object):
    def __init__(self, func):
        self._func = func

    def __call__(self):
        print ('class decorator runing')
        self._func()
        print ('class decorator ending')

@Foo
def bar():
    print ('bar')

bar()
通过 functools.wrap 来找回原函数的元信息
from functools import wraps
def logged(func):
    @wraps(func)
    def with_logging(*args, **kwargs):
        print func.__name__      # 输出 'f'
        print func.__doc__       # 输出 'does some math'
        return func(*args, **kwargs)
    return with_logging

@logged
def f(x):
   """does some math"""
   return x + x * x
Python 类相关的内置装饰器
@staticmathod、@classmethod、@property
上下文管理器
上下文管理器是一个 Python 对象,为操作提供了额外的上下文信息。with 语句初始化上下文
with open('file.txt') as f:
    contents = f.read()
实现这个功能有两种简单的方法:使用类或使用生成器。 让我们自己实现上面的功能,以使用类方式开始:
class CustomOpen(object):
    def __init__(self, filename):
        self.file = open(filename)

    def __enter__(self):
        return self.file

    def __exit__(self, ctx_type, ctx_value, ctx_traceback):
        self.file.close()

with CustomOpen('file') as f:
    contents = f.read()
生成器使用 Python 自带的 contextlib
from contextlib import contextmanager
@contextmanager
def custom_open(filename):
    f = open(filename)
    try:
        yield f
    finally:
        f.close()

with custom_open('file') as f:
    contents = f.read()
由于这两种方法都是一样的,所以我们应该遵循 Python 之禅来决定何时使用哪种。 如果封装的逻辑量很大,则类的方法可能会更好。 而对于处理简单操作的情况,函数方法可能会更好。
reference
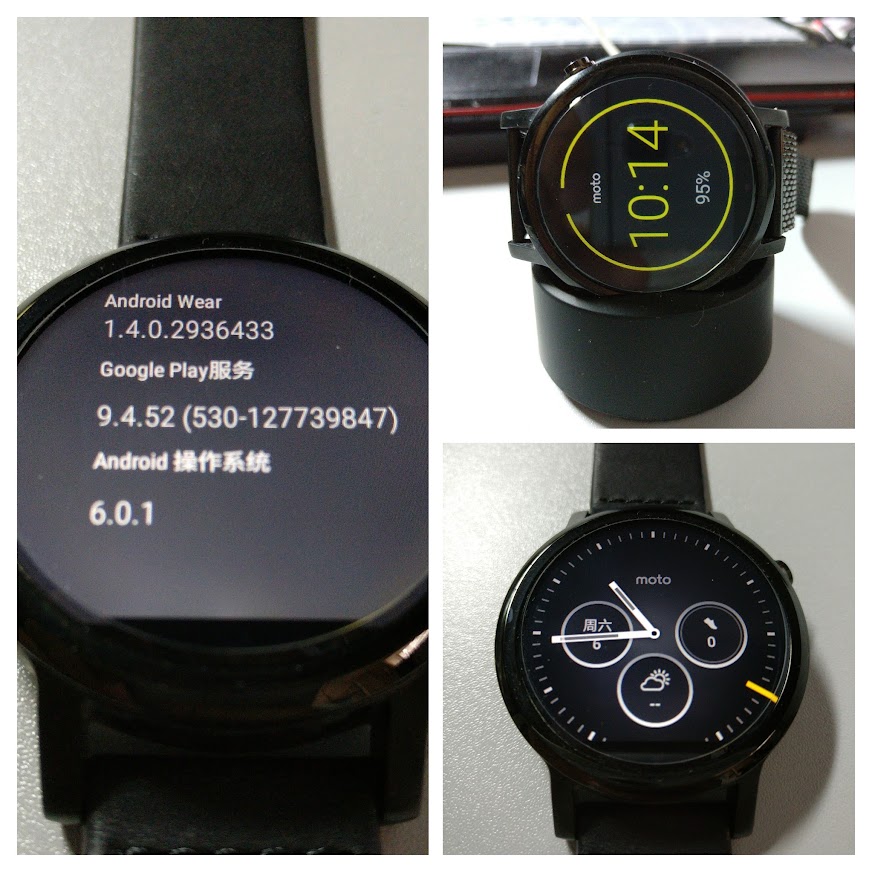
国行 Moto 360 2代一周使用感受
在拿到 moto 360 2代国行之前就已经做过调研, 国行并不支持国际版 Android Wear 程序同步,需要用国内阉割版 Android Wear 连接,并且不能使用 Play Store 中各种定制表盘及Android wear 应用。虽然可以通过使用 国际版 Android Wear 1.3 版本连接并同步 moto 360 来激活并使用各种表盘及应用,但是拿到手使用一个星期之后,我依然还是对国行 moto 360 2代表示失望。
在没有了 Google Now 的情况下,语音几乎是不可用状态,国行所带的出门问问,在国际版 Android wear 激活的情况下几乎不可用,真实使用一次都没成功。当然在国内版 Android wear激活的情况下,可能会有一些用处,但是Android wear 的精华就是 Google Now,没有了核心的支持,几乎就沦为只能看时间,只能收通知的尴尬境地。
不过值得赞扬的是续航能力,在一周的使用情况下,12h的待机下来基本还能保证40%以上的电量,这一点值得称赞,但是几乎是一天一冲的情况下,如果能够将续航能力再提高,或许更能吸引用户。单独的无线充电技术,在使用过程也并没有出现太大的问题,至于网上曾经说过的位置放置稍有偏差就无法充电的问题也并没有遇到。
在目前给手表适配的app还不多的情况下,要给微信给个赞,在国际版 Andorid wear 匹配链接下不仅能够收通知,并且在回复时提供表情,语音,语音转文字三种方式,并就使用过程来说,中文识别并没有出现太大问题,语音消息声音大小也合适,至于表情目前似乎只能有内置的一些可选,但是也足够使用。
另一个不错的feature就是这个通知静音的设置,表盘上,从上网下可以调出设置。这个功能本来也是我在原生 Android 上非常喜欢的,可以设置自动睡眠静音,自动在Google日历上出现Event时静音。我希望在我规划好的时间里不被打扰。当然手表作为通知的扩展他的提醒也应该遵循手机的设置。

另外说到二代 6.0.1 的升级,在和国际版相比不支持 WIFI,不支持手势的差距下,在更新了 6.0.1 之后手势的功能被补了回来。
期望
在购买 Moto 360 2代之前,抱有的期望有以下几点:
- 体验 Android Wear,感受一下新系统
- Google Fit 的扩充,记录心率等等
- 期望可以通过 GPS 记录路线
基于以上的期望,到现在来看
体验
新的 Android Wear 基本就是 Android 通知的外延,Google 在对 Android Wear 的设计中就将其操作固定成卡片式的左右滑动,不同应用间的通知使用上下滑动切换,相同通知的内容,通过向左滑可以进行更多的操作。
在表盘界面,向左滑可以调出所有应用;先下滑可以调出通知设置,静音设置,还有影院模式,进入设置等操作;向上滑动可以调出系统通知,如果不存在未读通知则不显示任何通知。
长按表盘可以更换表盘设计,当然这一点非常值得称赞,我不希望生产商在手表出厂就固定了一套表盘界面,而后就再无法更改,而这一点正是 Moto 360 ,以及 Android Wear 值得称赞的地方,并且将表盘设计开放给第三方能够带来无穷的想象力结果,喜欢指针手表,拿就可以选择指针的表盘设计,如果喜欢电子表盘,也可以选择电子表盘。
在来通知时,通过向右滑动可以忽略消息,向左滑动可以进行更多的操作,比如Gmail,可以选择存档,回复,删除等等;微信可以选择回复,忽略等等。
Google Fit && GPS
在早先手机上,Google Fit曾经出现没有再后台自动启动服务而暂停记录的情况,通过 Watch 带了了更多的数据,并且也希望能够对 Google Fit 的数据做更多的补充。如今市面上的“智能手表”,“智能手环”如果不能记步,不能记录心率都快称不上智能设备了。在调研的过程中获知2代 Moto 360 其实并不带 GPS 功能,如果想要使用记录路径的话,其实使用的依然是手机的 GPS,虽然这一点有点不便,但是鉴于记录路径这个功能其实日常并不常用,并且带来的电量消耗也会随之增加,所以在运动版和普通版之间还是选择了普通版,不过有机会还是要尝试一下运动版的。
Reference
SQLAlchemy 使用记录
什么是 SQLAlchemy ?
The Python SQL Toolkit and Object Relational Mapper
create engine
首先 要创建 Engine 实例
sqlalchemy.create_engine(*args, **kwargs)
创建 mysql 连接
# driver mysql-python
DB_PATH = "mysql+mysqldb://root:password@host:port/dbname?charset=utf8mb4"
xchat_engine = create_engine(
    DB_PATH,
    echo =False,
    pool_size=40,
    pool_recycle=3600
)
连接的字符串 URL 格式 dialect[+driver]://user:password@host/dbname[?key=value..] ,其中
dialect是使用的数据库 mysql, oracle, postgresql 等等driver是连接数据库需要的驱动 DBAPI,比如 psycopg2, pyodbc, cx_oracle 等等
另外这个字符串也可以使用 sqlalchemy.engine.url.URL 实例。
对于 MySQL 而言,driver 可以有如下选择
# default
engine = create_engine('mysql://scott:tiger@localhost/foo')

# mysql-python
engine = create_engine('mysql+mysqldb://scott:tiger@localhost/foo')
# sudo apt-get install libmysqlclient-dev
# pip install mysqlclient

# MySQL-connector-python
engine = create_engine('mysql+mysqlconnector://scott:tiger@localhost/foo')

# OurSQL
engine = create_engine('mysql+oursql://scott:tiger@localhost/foo')

# pymysql
engine = create_engine('mysql+pymysql://user:pass@localhost/foo')
PyMySQL 是使用纯 Python 实现的。
Declare a Mapping
定义和数据库 Map 的实体
from sqlalchemy import Column, Integer, String
from sqlalchemy.ext.declarative import declarative_base

Base = declarative_base()

class SomeClass(Base):
    __tablename__ = 'some_table'
    id = Column(Integer, primary_key=True)
    name =  Column(String(50))
declarative_base() 方法会返回一个 base class,所有自己定义的 class 都要从此继承。关于定义类(表)中数据类型的选择,可以参考文末的对应关系。定义好之后 sqlalchemy.schema.Table 和 sqlalchemy.orm.mapper 会产生。结果可以从类变量获取
# access the mapped Table
SomeClass.__table__

# access the Mapper
SomeClass.__mapper__
如果想要自己定义的字段和数据库中字段相区别,可以在 Column 中定义 some_table_id
id = Column("some_table_id", Integer, primary_key=True)
通过 base class 定义的类包含一个 MetaData 通过这个 MetaData 可以定义 Table ,然后通过如下语句就可以直接在数据库中生成定义好的表。
engine = create_engine('sqlite://')
Base.metadata.create_all(engine)
创建 Map 类实例
加入定义了 User 类,创造一个实例
ed_user = User(name='ed', fullname='Ed Jones', password='edspassword')
创建 Session
做好了一切准备,可以和数据库进行交互,ORM 和数据库打交道的是 Session ,从之前定义的 engine 中创建 sessionmake
from sqlalchemy.orm import sessionmaker
Session = sessionmaker(bind=engine)
这个 Session 实例,是一个 session 创造的工厂,之后所有的 session 都可以由他创建
session = Session()
这里创建的 session 实例还不会开启任何连接,当第一次被用到,session 会从 Engine 维护的连接池中获得一个连接,一直持有该连接知道 commit 所有的提交或者显式的关闭 session 对象。
Session 的生命周期模式,记住,Session 只是特定对象的一个工作区,限定到特定的数据库连接,
关于 Session 使用更多的问题 可以参考之前的文章。当然官网也有很多使用说明。
Adding and Updating Objects
当有了 Session 之后,就可以通过 session 来操作数据库。比如
session.add(ed_user)
当把实例对象 add 到 session 之后,其实不会直接提交给数据库,这个时候只有 flush 操作,这个时候
our_user = session.query(User).filter_by(name='ed').first()
也能够将刚刚 add 的实例检索出来,真正的提交只有执行 session.commit() 之后。
如果发现单一插入数据库比较费时,那么在 SQLAlchemy 1.0.0 之后,可以使用新引入的特性批量操作。
在 Session 中有
- Session.bulk_save_objects()
- Session.bulk_insert_mappings()
- and Session.bulk_update_mappings()
简单的例子:
s = Session()
objects = [
    User(name="u1"),
    User(name="u2"),
    User(name="u3")
]
s.bulk_save_objects(objects)
s.commit()
Querying
查询
# User objects
for instance in session.query(User).order_by(User.id):
    print(instance.name, instance.fullname)

# tuples
for name, fullname in session.query(User.name, User.fullname):
    print(name, fullname)

# named tuples, supplied by the KeyedTuple class can be treated much like an ordinary Python object
for row in session.query(User, User.name).all():
    print(row.User, row.name)
> <User(name='wendy', fullname='Wendy Williams', password='foobar')> wendy

# 控制返回字段
for row in session.query(User.name.label('name_label')).all():
    print(row.name_label)

from sqlalchemy.orm import aliased
user_alias = aliased(User, name='user_alias')
for row in session.query(user_alias, user_alias.name).all():
    print(row.user_alias)

for u in session.query(User).order_by(User.id)[1:3]:
    print(u)

for name, in session.query(User.name).\
    filter_by(fullname='Ed Jones'):
    print(name)

for name, in session.query(User.name).\
    filter(User.fullname=='Ed Jones'):
    print(name)
其他跟多的 filter 操作可以参考这里
Returning Lists and Scalars
在查询时可以通过这些方法来选择返回的数量
query = session.query(User).filter(User.name.like('%ed')).order_by(User.id)
query.all()         # return list
query.first()       # return first
query.one()         # multiple rows found raise an MultipleResultsFound, or no row found raise NoResultFound
query.one_or_none() #  if no results are found, it doesn’t raise an error just return None, however, it does raise an error if multiple results are found.
query.scalar()      # 调用 one() 方法,一旦成功,返回行的第一列
SQLAlchemy 同样也支持直接使用 Text 来写 sql 语句,具体可以参考官网
计数可以使用 count
session.query(User).filter(User.name.like('%ed')).count()

from sqlalchemy import func
session.query(func.count(User.name), User.name).group_by(User.name).all()

session.query(func.count(User.id)).scalar()
更多关于外键等等,可以查看官网:http://docs.sqlalchemy.org/en/latest/orm/tutorial.html
SQLAlchemy vs Python vs SQL 数据结构对应表
| SQLAlchemy | Python | SQL |
|---|---|---|
| BigInteger | int | BIGINT |
| Integer | int | INTEGER |
| Boolean | bool | BOOLEAN or SMALLINT |
| Date | datetime.date | DATE (SQLite: STRING ) |
| DateTime | datetime.datetime | DATETIME (SQLite: STRING ) |
| Enum | str | ENUM or VARCHAR |
| Float | float or Decimal | FLOAT or REAL |
| Interval | datetime.timedelta | INTERVAL or DATE from epoch |
| LargeBinary | byte | BLOB or BYTEA |
| Numeric | decimal.Decimal | NUMERIC or DECIMAL |
| Unicode | unicode | UNICODE or VARCHAR |
| Text | str | CLOB or TEXT |
| Time | datetime.time | DATETIME |
其他重要内容
在定义 Model 时定义表引擎和编码
在 model 中使用 __table_args__ 来定义
class User(BaseModel):
    __tablename__ = 'users'
    __table_args__ = {
        "mysql_engine": "InnoDB",    # 引擎
        "mysql_charset": "utf8"         # 编码
    }

    ...
模型属性名和表字段名不一样
在定义 Column 时指定
id = Column('id', Integer, primary_key=True, autoincrement=True)
定义多列组合唯一索引
有些时候定义表时需要多列组合唯一,比如
class User(Base):
    field1 = Column(Integer, primary_key=True)
    field2 = Column(Integer, primary_key=True)
那么可以
class User(Base):
    field1 = Column(Integer)
    field2 = Column(Integer)
    __table_args__ = (
        UniqueConstraint('field2', 'field1'),
        {},
    )
From: StackOverflow
编码问题
在使用 mysqldb 这个 driver 的时候莫名其妙遇到编码的问题,数据库,表,都是 utf8mb4,在 CentOS6 下面死活用不了 utf8mb4 作为连接编码
can't initialize character set utf8mb4 (path /usr/share/mysql/charsets/)
一直都是这个错误,但在我本地一切 OK,这时候我想是不是机器 driver 的问题,换成 pymysql 之后就 OK 了。
http://docs.sqlalchemy.org/en/latest/dialects/mysql.html#charset-selection
也是醉了。
数据库表没有主键
SQLAlchemy 在映射数据库时会寻找数据的 Primary Key,如果没有会报错。1
sqlalchemy.exc.ArgumentError: Mapper mapped class PicSearchword->pic_searchword could not assemble any primary key columns for mapped table 'pic_searchword'
SQLAlchemy ORM 会必须要求表拥有 Primary Key,而如果代码是建立在 Alchemy Core 之上,使用 Table 和 select() 则没有这个要求。
reference
- 《Essential SQLAlchemy 2nd Edition 2015》
Android 人脸检测
最近项目使用,总结了目前 Android 中使用到的人脸检测技术,主要分成三部分来介绍:
- Android 原生支持人脸检测,从 API 1 开始就提供原生的人脸检测,但是该方法识别率相对较低
- 在后来的发展中 Google 将人脸识别技术放到了 Google Play Services 中,从 Google Play Service 7.8 之后提供的 Mobile Vision API 中我们可以使用新的人脸检测API。这个方法不仅能够识别有没有人脸,还能够识别人脸的区域,甚至在视频流中追踪相同的人脸,并且提供了一系列方法来获取眼睛、嘴巴、鼻子、脸颊的位置,利用这个 API 就能够在动态的视频中给人脸增加一些有趣的效果,加个胡子,带个帽子,等等,市面上有一些动态增加表情的 App 利用的似乎就是这个技术。
- Face++, 国内一家做人脸检测的提供商,不过其免费版服务需经过网络,也就意味着需要联网将照片上传到其服务器,然后他返回识别的结果回来。
- 其他服务,经过搜索 OpenCV 也能提供类似的服务,但是目前我还没有详细了解。 OpenCV 做计算机视觉有一定积累,相信识别准确率应该有保障。
接下来就依次介绍前三种人脸检测的方法。
Android 原生人脸检测API
android.media 包中的人脸检测API 有如下两个限制:
- Bitmap 必须以 Config.RGB_565 解码
- 输入的 Bitmap 宽度需要为偶数
只要注意这两个限制,另图片眼睛的距离不要太小,其他的代码核心的没几句话。
/**
 * There are some limitation in this 用android.media 包中识别人脸package.
 * 使用使用使Face Detection API's input Bitmap must :
 * <p/>
 * 1. config with Config.RGB_565<br/>
 * 2. Bitmap width must be even<br/>
 * <p/>
 * more details can be checked
 * http://stackoverflow.com/q/17640206/1820217
 *
 * @param bitmap Bitmap
 */
private void detectUsingNative(final Bitmap bitmap) {
    if (null == bitmap || isRunning) {
        if (listener != null) {
            listener.onFail();
        }
        return;
    }
    facesCount = 0;
    final android.media.FaceDetector faceDetector = new android.media.FaceDetector(bitmap.getWidth(), bitmap.getHeight(), MEDIA_MAX_DETECT_FACE_NUMBER);
    androidNativeFacesResults = new android.media.FaceDetector.Face[MEDIA_MAX_DETECT_FACE_NUMBER];
    final Handler handler = new Handler();
    thread = new Thread() {
        @Override
        public void run() {
            facesCount = faceDetector.findFaces(bitmap, androidNativeFacesResults);

            handler.post(new Runnable() {
                @Override
                public void run() {
                    if (listener != null) {
                        listener.onSuccess();
                    }
                }
            });

            isRunning = false;
        }
    };
    thread.start();
    isRunning = true;
}
Play Service 中人脸检测
Play Service 中的人脸检测是随着 Mobile Vision API 一同出现的,这个库中还有一些其他的API,比如识别二维码,识别文字等等,并且 Play Service 中的人脸识别更准确的说应该叫人脸追踪,在官方实现的 Demo 中,直接调用手机摄像,能够一直追踪镜头中的同一人头像。
以下是部分实现,详细代码可参考文末给出的 GitHub 代码。
/**
 * 使用 Play Service 中人脸检测
 *
 * @param bitmap Bitmap
 */
private void detectUsingGms(Bitmap bitmap) {
    if (null == bitmap) {
        if (listener != null) {
            listener.onFail();
        }
        return;
    }
    facesCount = 0;

    detector = new FaceDetector.Builder(context)
            .setTrackingEnabled(false)
            .setLandmarkType(FaceDetector.ALL_LANDMARKS)
            .setClassificationType(FaceDetector.ALL_CLASSIFICATIONS)
            .build();

    // This is a temporary workaround for a bug in the face detector with respect to operating
    // on very small images.  This will be fixed in a future release.  But in the near term, use
    // of the SafeFaceDetector class will patch the issue.
    Detector<Face> safeDetector = new SafeFaceDetector(detector);

    // Create a frame from the bitmap and run face detection on the frame.
    Frame frame = new Frame.Builder().setBitmap(bitmap).build();

    faces = safeDetector.detect(frame);

    if (!safeDetector.isOperational()) {
        // Note: The first time that an app using face API is installed on a device, GMS will
        // download a native library to the device in order to do detection.  Usually this
        // completes before the app is run for the first time.  But if that download has not yet
        // completed, then the above call will not detect any faces.
        //
        // isOperational() can be used to check if the required native library is currently
        // available.  The detector will automatically become operational once the library
        // download completes on device.

        if (listener != null) {
            listener.onFail();
        }
        return;
    }
    if (listener != null) {
        listener.onSuccess();
    }
}
Face++ 人脸检测服务
Face++ 提供了联网的人脸检测服务,需要到其网站上注册开发者账号获取API使用权限。其大概检测代码如下:
    /**
     * 使用 Face++ 人脸检测
     *
     * @param file File
     */
    private void detectUsingFacePlus(File file) {
        if (!file.exists() || isRunning) {
            if (listener != null) {
                listener.onFail();
            }
            return;
        }
        final PostParameters parameters = new PostParameters();
        parameters.setImg(file);
        final Handler handler = new Handler();
        facesCount = 0;
        thread = new Thread() {
            @Override
            public void run() {
                boolean hasFace = false;
                boolean detectSucceed = false;
                Log.d("FacePlusDetect", "Detect Request :" + parameters.toString());
                HttpRequests httpRequests = new HttpRequests(FACEPLUSPLUS_APIKEY, FACEPLUSPLUS_APISECRET, false, true);
                JSONObject result;
                try {
                    result = httpRequests.detectionDetect(parameters);
                    if (result != null) {
                        detectSucceed = true;
                        JSONArray faces = result.getJSONArray("face");
                        double imgWidth = result.getDouble("img_width");
                        double imgHeight = result.getDouble("img_height");
                        if (faces != null && faces.length() > 0 && null != listener) {
                            // Has face!!
                            facesCount = faces.length();
                            facePlusResults = new RectF[facesCount];
                            hasFace = true;
                            for (int i = 0; i < facesCount; i++ ){
                                float x, y, w, h;
                                facePlusResults[i] = new RectF();
                                // 需注意返回结果的center,width,height 都为0~100,百分比
                                x = (float) faces.getJSONObject(i).getJSONObject("position").getJSONObject("center").getDouble("x");
                                y = (float) faces.getJSONObject(i).getJSONObject("position").getJSONObject("center").getDouble("y");
                                w = (float) faces.getJSONObject(i).getJSONObject("position").getDouble("width");
                                h = (float) faces.getJSONObject(i).getJSONObject("position").getDouble("height");
                                float realx = (float) (x * imgWidth / 100);
                                float realy = (float) (y * imgHeight / 100);
                                float realw = (float) (w * imgWidth / 100);
                                float realh = (float) (h * imgHeight / 100);
                                facePlusResults[i].set(realx - realw /2,
                                        realy - realh / 2,
                                        realx + realw / 2,
                                        realy + realh / 2);
                            }
//                            String genderStr = playServiceFaces.getJSONObject(0).getJSONObject("attribute").getJSONObject("gender").getString("value");
//                            gender = Gender.getValueOf(genderStr);
                        } else {
                            hasFace = false;
//                            detectSucceed = true;
//                            gender = Gender.OTHER;
                        }
//                        Log.d("FacePlusDetect", "Detect Result : hasFace = " + hasFace + "; gender = " + gender.toString());
                    }
                } catch (FaceppParseException e) {
                    detectSucceed = false;
                    Log.d(TAG, "Detect FaceppParseException !");
                    e.printStackTrace();
                } catch (JSONException e) {
//                    if (hasFace) {
//                        gender = Gender.OTHER;
//                    }
                    Log.d(TAG, "Detect JSONException !");
                    e.printStackTrace();
                }

                if (detectSucceed) {
                    handler.post(new Runnable() {
                        @Override
                        public void run() {
                            if (listener != null) {
                                listener.onSuccess();
                            }
                        }
                    });
                } else {
                    handler.post(new Runnable() {
                        @Override
                        public void run() {
                            if (listener != null) {
                                listener.onFail();
                            }
                        }
                    });
                }

                isRunning = false;
            }
        };
        thread.start();
        isRunning = true;
    }
Detect Result


FaceDetectDemo 代码可参考:https://github.com/einverne/AndroidFaceDetectDemo
Reference
全部代码可参考 : https://github.com/einverne/Android-Face-Recognition
- http://opencv.org/platforms/android.html
- https://github.com/crankdaworld/OpenCV-Android-FaceDetect-GoodFeature
- http://code.tutsplus.com/tutorials/an-introduction-to-face-detection-on-android--cms-25212
- http://stackoverflow.com/questions/17839388/creating-a-scaled-bitmap-with-createscaledbitmap-in-android
- http://stackoverflow.com/questions/37300874/why-isnt-the-new-play-services-facedetector-available-on-some-devices
- http://stackoverflow.com/questions/17640206/how-to-overcome-the-face-detection-api-restrictions
转换图片格式,png, jpg, webp
总结一下目前常用的图片格式转换命令,以及如何在这些常见的格式之间转换,包括 png, jpeg, webp 。
png 和 jpg 格式相互转换
安装 imagemagick 用到的工具在这个包中。
sudo apt install imagemagick
首先检查图片格式
identify temp.jpg
将一张图片转换格式
convert image.jpg image.png
批量转换图片
mogrify -format png /tmp/*.jpg
给图片添加边框
convert path/to/demo.jpg -border 30x30 -bordercolor white bordered.png
更改图片的分辨率
convert path/to/demo.jpg -resize 1920x1080 after-resize.tiff
将目录下所有的 jpg 图片转换成 png 格式,并保存在同目录
for file in *.jpg; do convert $file -resize 50% small-$file.png; done
webp 格式转换
Google 已经将 webp 的解码工具放到了 libwebp 包中
sudo apt install webp
然后能够使用
dwebp input.webp -o output.png
如果要将 png 文件转换成 webp,可以使用 cwebp
cwebp input.png -o output.webp
ffmpeg
或者也可以使用 ffmpeg 来转换格式:
ffmpeg -i file.webp out.png
reference
以十六进制查看文件的方法整理
使用 file 命令来检测 data 文件的类型
file data
zsh 和 bash 原生 echo 支持将十六进制 HEX 转成 ASCII
echo -e '\x68'
将二进制文件写入文件
printf "\x68\x65\x6c\x6c\x6f\x20\x77\x6f" | cat - oldfile > newfile
命令查看
Linux 下可以使用如下命令查看文件二进制
xxd filename.txt
hexdump filename.txt
编辑
GUI 二进制编辑器
sudo apt-get install ghex

biew

hexedit
使用二进制模式编辑文件
vim -b datafile
在 vim 编辑器中使用 :%!xxd 来将文件变成十六进制
使用 :%!xxd -r 来转变为原来的文件
十六进制模式下只有修改十六进制部分才会生效,右边可显示文本部分修改不会对文件有修改效果。
Clonezilla 克隆系统
之前遇到的一个问题,安装 Linux Mint 的系统分区快要满了,但是我又不想重装系统,于是就提出来这样的一个问题 —- 如何在不重装系统的情况下,将系统盘从一块分区中复制到另一块磁盘的分区中,整体备份系统。当时整天得想着如何解决这样的一个问题比较好,于是有了这篇文章。当然也借由这篇文章讲述一个复杂问题的提出到解答的整个过程。其他类似问题的解决过程也是类似的。
一个问题的提出到解决
问题:整体备份 Linux 系统,免去重装系统,进行各种配置,以及安装各种应用的麻烦
问题相关:Windows 下有 Ghost 类似的工具可以协助完成 Windows 系统镜像的制作,并且可以完整恢复系统,而 Mac 下有 Time Machine 类似的工具,似乎可以还原整个系统。我想 Linux 下应该也存在类似的工具。
问题解决:经过 Google,Linux 下备份系统的方式可以有很多,我不想使用命令行,如果有现成工具最好,最后锁定关键词 “Clonezilla”,一款非常强大的备份工具,可以用来备份整块硬盘,从分区到镜像,或者直接写入其他硬盘或者分区。
之后搜索 Clonezilla 相关教程以及使用,借助 YouTube 视频熟悉使用过程,下载 ISO 镜像,安装物理硬盘,制作启动 U 盘,从 U 盘启动电脑,熟悉 Linux 下电脑硬盘的名称,sda1,sdb1,sdb2,sdc1,类似的名称,基本上 sda 就表示一块硬盘,后面接的数字是在该硬盘上的分区,在使用 Clonezilla 的过程中一定要注意备份数据,目标一定要指定空分区,或者空磁盘,否则目标磁盘的数据会全部被清除。
在我的真实例子中,我的 Linux Mint 安装在一块硬盘的一个分区中,利用命令或者 GUI,查看该分区的名称,然后我的解决方法是给电脑新安装了一块 SSD,将光驱位换了。然后给该硬盘分区,并查看该分区的名称,然后利用学习到的 Clonezilla 来完成系统从一个分区到另一个分区的克隆。

从上图就可以看出,我是将 /dev/sdb8 分区拷贝到 /dev/sda1 分区。
如下使用 sudo blkid 查看 UUID。
/dev/sda1: UUID="a7a98d76-5dab-4272-8b9a-b82042b279c5" TYPE="ext4"
/dev/sdb1: LABEL="Program" UUID="000E3FDB00097ED7" TYPE="ntfs"
/dev/sdb5: LABEL="Document" UUID="000C3A300002F285" TYPE="ntfs"
/dev/sdb6: LABEL="Media" UUID="0005653100096CB5" TYPE="ntfs"
/dev/sdb7: UUID="ad6f91df-ba08-4fad-8efc-ac1254320e2d" TYPE="swap"
/dev/sdb8: UUID="5f920149-5676-46ef-b545-e50be77c65e2" TYPE="ext4"
/dev/sdc1: LABEL="System" UUID="EEBACEF9BACEBCF9" TYPE="ntfs"
/dev/sdc2: UUID="8A0005F80005EBCF" TYPE="ntfs"
在完成从分区到分区的克隆之后,修复系统磁盘 UUID 以及启动引导 grub。这里花费了一些时间去了解 [[GRUB]] 的启动过程。学习了一些命令。
sudo blkid   #查看磁盘 UUID
sudo fdisk -l  #查看磁盘

vim /etc/fstab  #磁盘的信息
vim /boot/grub/grub.cfg   #启动引导的信息
# 大部分的情况下不需要直接修改这两个文件,查看一下内容即可,使用其他命令更新,无需手动的修改里面的值。

update-grub2   #更新启动引导
由于我在使用 Clonezilla 备份恢复的时候使用的是从硬盘一块分区拷贝到另一块硬盘分区,所以在完成备份成功之后两款分区的 UUID 是一样的,这样就导致开机引导的时候总是回到原来的系统,需要给新的分区重新指定一个 UUID,然后更新 GRUB 才能完成启动到新的硬盘分区。可以通过下面的教程完成 UUID 的修改。
至于修改 Linux 分区的 UUID 其实是另一个问题,当完成从问题提出到解决的过程就能解决。
修改 Linux 分区 UUID
以下为翻译,原文见[参考]1
UUID 介绍
Linux 分区的 UUID 的全称是 Universally Unique IDentifier。 这个 ID 会被用在不同的地方用来标识硬盘分区。最常见的就是在 /etc/fstab 文件中, 这个文件用来再系统启动时挂载分区。以下是一个小例子:
# <file system> <mount point>   <type>  <options>       <dump>  <pass>
proc            /proc           proc    nodev,noexec,nosuid 0       0
# / was on /dev/sdc3 during installation
UUID=9467f4de-4231-401f-bcaa-fee718d49e85 /               ext4    errors=remount-ro 0       1
# swap was on /dev/sdb1 during installation
UUID=aabe7e48-2d11-421f-8609-7ea9d75e7f9b none            swap    sw              0       0
UUID 的理由
理论上来讲创建两个 UUID 相同的几率是非常小的,可以参考 Random UUID , 但是如果使用 DD 或者 Clonezilla 在同一台设备克隆并恢复了分区,那么就有可能导致完全一样的分区 ID。
使用以上两个命令将会创建两个一模一样的分区,包括 UUID。在这样的情况下,就需要手动更改 UUID。
修改 UUID
第一步,首先利用 sudo blkid 来获取分区标示。
/dev/sdb1: UUID="aabe7e48-2d11-421f-8609-7ea9d75e7f9b" TYPE="swap"
/dev/sdc1: UUID="9467f4de-4231-401f-bcaa-fee718d49e85" TYPE="ext4"
/dev/sdc3: UUID="93a54a4a-e0f5-4152-ae59-2245e8d16ee4" TYPE="ext4"
/dev/sde5: UUID="9467f4de-4231-401f-bcaa-fee718d49e85" TYPE="ext4"
/dev/sde6: LABEL="var" UUID="30433f28-1b79-4b4d-9985-fef5b1c886b5" TYPE="ext4"
如上图可以看出 /dev/sdc1 和 /dev/sde5 的 UUID 完全一致。第二步,使用命令 uuidgen 产生新的 UUID
uuidgen
f0acce91-a416-474c-8a8c-43f3ed3768f9
最后将新的 UUID 应用到新的分区中,
sudo tune2fs /dev/sde5 -U f0acce91-a416-474c-8a8c-43f3ed3768f9
最后,更新 grub (sudo update-grub) 来使用新的 UUID,以免导致系统的混乱。
reference
我使用的 Xposed module
什么都不多说,这个神器就如 Chrome 下的 Tampermonkey,有很多神奇的待发现。
更新及 change log: http://forum.xda-developers.com/showthread.php?t=3034811
安装之前
查看设备CPU架构
例如:Nexus 6 CPU芯片是 armv7,选择 arm 即可。 Play Store 上有一个 Hardware Info 的 APP,可以查看 CPU 架构。
然后需要确认手机的 SELinux 设置成 Permissive , 可以使用 SELinuxModeChanger 一款修改 SELinux 的应用。不过 N6 默认是 Permissive 的,也就不用修改了。
下载必要内容
准备好apk,和 zip 包,最好也下载好 xposed-uninstaller*.zip ,当刷入 zip 包之后无限启动的时候可以恢复。不过最好的方式还是通过 recovery 整体备份原来的数据 Nandroid backup 。数据是最重要的!!切记。
Android 6.0 的 framework zip 包在 官网 可以下到。 而 APK 在 Xda 论坛可以找到。
刷入
通过 recovery 刷入 flash zip 之后进入系统会很长时间,之后启动 Xposed Installer ,enable module 之后需要 soft reboot 。 切记需要点击 Xposed Installer 中的 reboot ,不能自己手工 reboot ,否则无法识别 module,掉进这个坑,重启无数次无效。
保留 modules
经过反复尝试保留下来的一些modules,
AdBlocker
屏蔽广告,另外一个可选择的屏蔽广告的 module 叫做 MinMinGuard,还没尝试,效果应该也很好。很多 ROM 集成的 Adaway 似乎也不错。
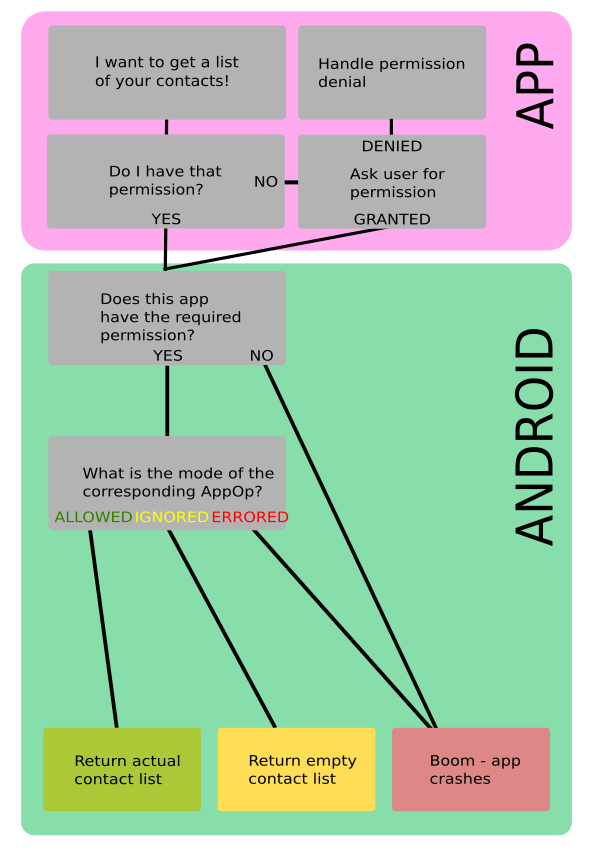
AppOpsXposed
权限管理,一张图解释所有
Xposed Pokemon
模拟地址,但是 XPrivacy 也是可以有相同的功能的。但是最后还是另一个 module 叫做 Xposed Pokemon 好用。
GravityBox MM
可以定制很多部分,包括状态栏,导航栏,感觉最有用的就是可以定制长按 recent 按钮弹出小的 Launcher。然后自定义快速点击 recent 两次切换最近使用应用也是很有用的。还可以给状态栏加上网速监测。
自用上这个功能感觉已经不在需要刷其他ROM来支持一些特殊功能了,完全原生+Xposed 就已经让我很舒服了。
Greenify
休眠后台服务,很好的App。
No Lock Home
原生 Android 的 Smart Lock 只有根据蓝牙,GPS和侦测随身携带,这个 module 增加了可以根据 WIFI,或者 mac 地址或者 LAC CID 来增加信任的地点,感觉这个更加实用。日常实用 WIFI 的地方一般都是自己熟悉的地方,将那些地方的 WIFI AP name 或者 WIFI Mac 地址加入信任列表,这样就不用总在熟悉的地方解锁解锁解锁了。自己熟悉的地方也总不至于丢手机的吧。
WechatForwarder
很强大的转发,原先一直想要的转发功能都能搞定了。
WechatUnrecalled
微信不撤回
XInsta
下载 Instagram 的图片,自从 IFTTT 不让我自动下载图片之后就诞生了这种需求。也正是因为这个需求让我发现并使用了 Xposed,然后又间接的找到了很多好玩的 module ,不过后来又找到了自动下载 ins 照片到 Google Drive 的方法。
运动修改器
修改运动记步频率,还挺神奇的。
NavBar / StatusBar media visualizer [L-M]
在导航栏或者状态栏显示音乐波形,太赞了。
不太需要的 module
使用之后感觉不太需要的 module ,但是很强大的 module
XPrivacy
很复杂的但是很强大的权限管理,非常细节,但是对新手不好,使用非常复杂。对权限要求比较高的可以尝试一下。
链接: http://repo.xposed.info/module/biz.bokhorst.xprivacy
Flat Style Bar Indicators
高度自定义状态栏
Flat Style Colored Bars
和之前使用的 tint status bar 效果差不多,根据应用颜色改变状态栏和导航栏的颜色
Flat Style Colored Keyboard
自动改变键盘的颜色,我使用 TouchPal 所以也用不到。
Ifont
修改系统字体
Amplify
查看那些服务,禁用服务,省电
所有的 Xposed Module 都可以在 http://repo.xposed.info/module-overview 这里找到。当然 Xda 也有很多更新内容。
文章分类
最近文章
- Dinox 又一款 AI 语音实时转录工具 前两天介绍过 [[Voicenotes]],也是一款 AI 转录文字的笔记软件,之前在调查 Voicenotes 的时候就留意到了 Dinox,因为是在小红书留意到的,所以猜测应该是国内的某位独立开发者的作品,整个应用使用起来也比较舒服,但相较于 Voicenotes,Dinox 更偏向于一个手机端的笔记软件,因为他整体的设计中没有将语音作为首选,用户也可以添加文字的笔记,反而在 Voicenotes 中,语音作为了所有笔记的首选,当然 Voicenotes 也可以自己编辑笔记,但是语音是它的核心。
- 音流:一款支持 Navidrom 兼容 Subsonic 的跨平台音乐播放器 之前一篇文章介绍了Navidrome,搭建了一个自己在线音乐流媒体库,把我本地通过 [[Syncthing]] 同步的 80 G 音乐导入了。自己也尝试了 Navidrome 官网列出的 Subsonic 兼容客户端 [[substreamer]],以及 macOS 上面的 [[Sonixd]],体验都还不错。但是在了解的过程中又发现了一款中文名叫做「音流」(英文 Stream Music)的应用,初步体验了一下感觉还不错,所以分享出来。
- 泰国 DTV 数字游民签证 泰国一直是 [[Digital Nomad]] 数字游民青睐的选择地,尤其是清迈以其优美的自然环境、低廉的生活成本和友好的社区氛围而闻名。许多数字游民选择在泰国清迈定居,可以在清迈租用廉价的公寓或民宿,享受美食和文化,并与其他数字游民分享经验和资源。
- VoceChat 一款可以自托管的在线聊天室 VoceChat 是一款使用 Rust(后端),React(前端),Flutter(移动端)开发的,开源,支持独立部署的在线聊天服务。VoceChat 非常轻量,后端服务只有 15MB 的大小,打包的 Docker 镜像文件也只有 61 MB,VoceChat 可部署在任何的服务器上。
- 结合了 Google 和 AI 的对话搜索引擎:Perplexity AI 在日本,因为 SoftBank 和 Perplexity AI 开展了合作 ,所以最近大量的使用 Perplexity ,这一篇文章就总结一下 Perplexity 的优势和使用技巧。