InfluxDB 使用
InfluxDB 数据库是用 Go 语言实现的一个开源分布式时序、事件和指标数据库。InfluxDB 提供类 SQL 语法。
需要注意的是 InfluxDB 单节点是免费的,但是集群版是要收费的。
安装
sudo apt install influxdb
数据库设计
正因为 InfluxDB 是一个时序数据库,在实际使用的时候有些概念需要提前知道。InfluxDB 数据库中的每一个数据都有一列 time 保存时间戳 (RFC3339 形式显示)。
| time | butterflies | honeybees | location | scientist |
|---|---|---|---|---|
| 2015-08-18T00:00:00Z | 12 | 23 | 1 | langstroth |
| 2015-08-18T00:00:00Z | 1 | 30 | 1 | perpetua |
以该数据说明,butterflies 和 honeybees 是 Field keys 用来保存元数据,每一个 key 都对应这 value,下面的数字都是要存储的值。
location 和 scientist 是 Tags,用来存储元数据。location 有两种取值,scientist 也有两种取值。所以组合可以有四种 tag 集合。tag 是可选的。但是推荐给数据加上 tags。和 field 不同,tags 都是索引,这意味着在查询时可以更快。
measurement 可以理解成 tags, fields 和 time 列的容器。measurement 的名字是数据的描述,和关系型数据库中的表可以做对应。在 InfluxDB 中可以创建多个数据库,不同数据库中的数据文件是隔离存放的,存放在磁盘上的不同目录
每一个 measurement 可以属于不同的 retention policies(存储策略),一个 retention policy 描述了 InfluxDB 保存数据多久(DURATION)和多少副本被保存到 cluster 中(REPLICATION)。(Replication factors 不对单节点开放)
在 InfluxDB 中 series 是一组数据的集合,这些数据共享一个 retention policy,measurement 和 tag set。理解 series 的概念才能设计好数据库的 schema。
最后 point 是在相同 series 中相同 timestamp 的数据。
InfluxDB Shell
如果需要使用 shell 需要安装
sudo apt install influxdb-client
然后在终端输入
influx
进入,默认的端口是 8086。输入 help 可以查看命令列表。
influx 命令参数
influx 启动命令常用参数
influx -database 'name'  # 数据库
influx -host 'hostname'  # 默认是 localhost
influx -password 'password' # 如果有密码
influx -port 'port'     # 端口
更多参数可以使用 influx --help 查看。
基本操作
查看数据库
show databases
创建和删除数据库
create database test
drop database test
切换使用数据库
use test
表基本操作,查询,插入
显示所有表
show measurements
删除表
drop measurement test_table
插入数据
insert [measurement],[tag],[field],[time]
insert cpu,host=serverA,regin=us value=0.64
解释:
- 如果 measurement 表不存在,自动创建。
host和region是 tagvalue是 0.64- 如果字段存在则会报错
这里还要注意 measurement 和 tag 之间不能有空格,空格后面是真正要存储的值,所以如果要存两个 field,那么就需要
insert temperature,machine=unit42,tpye=assembly external=25,internal=37
注意 type=assembly 和 external 之间的空格。
查询数据
select "host","region","value" from "cpu"
select * from "temperature"
更多的查询可以参考这里
用户管理
查看用户
show users
创建用户
create user "username" with password "password"
create user "username" with password "password" with all privileges
删除用户
drop user "username"
Python Client
安装下面的客户端
pip install influxdb
其实这个 client 也只不过是在 influxdb 提供的 HTTP 接口外封装了一层 API,如果熟悉 HTTP 的接口,可以直接调用 influxdb 提供的接口。
curl -sL -I localhost:8086/ping
比如:
创建数据库
import requests
posturl = 'http://localhost:8086/query'
data = {'q': 'create DATABASE mydb'}
response = requests.post(posturl, data=data)
类似于 curl 命令如下:
curl -GET http://localhost:8086/query --data-urlencode "q=CREATE DATABASE mydb"
写数据
import requests
posturl = 'http://localhost:8086/write?db=mydb'
data="cpu_load_short,host=server01,region=us-west value=0.69"
response = requests.post(posturl, data=data)
类似于 curl 命令如下:
curl -i -XPOST 'http://localhost:8086/write?db=mydb' --data-binary 'cpu_load_short,host=server01,region=us-west value=0.64 '
如果使用 python client:
#!/usr/bin/env python
# -*- coding: utf-8 -*-

import psutil
import time
from influxdb import InfluxDBClient

host = "localhost"
port = 8086
user = "root"
password = "root"
dbname = "test"


def read_info():
    cpu_time_info = psutil.cpu_percent(1, True)
    data_list = [
        {
            'measurement': 'cpu',
            'tags': {
                'cpu': 'i7'
            },
            'fields': {
                'cpu_info_user': cpu_time_info[0],
                'cpu_info_system': cpu_time_info[1],
                'cpu_info_idle': cpu_time_info[2],
                'cpu_info_interrupt': cpu_time_info[3],
                'cpu_info_dpc': cpu_time_info[4]
            }
        }
    ]
    return data_list


def parse_db(dbs):
    l = []
    for db in dbs:
        l.append(db['name'])
    return l


if __name__ == '__main__':
    client = InfluxDBClient(host, port, user, password)  # 初始化
    dbs = client.get_list_database()
    if dbname not in parse_db(dbs):
        client.create_database(dbname)
    for i in range(20):
        client.write_points(read_info())
        time.sleep(2)
大致是这样,但是这个 client 似乎还有 bug,在使用的时候就发现 HTTP 方法不支持,Method Not Allowed 这样的错误,需要自己手动改一改。
reference
- https://docs.influxdata.com/influxdb/v1.6/tools/shell/
- https://influxdb-python.readthedocs.io/en/latest/include-readme.html
- https://blog.csdn.net/qq_37258787/article/details/79190027
- http://eskiyin.cc/2017/03/13/influxdb-and-influxdb-python/
一周 CP 反编译记录
记录一下反编译一周 CP Android 3.26.0.451 版本,并拿到请求 sign 加密方法的过程。反编译的过程基本上可以划分为几个步骤
- 将 Android apk 文件反编译得到混淆的 java 代码
- 在混淆过的代码中找到发起请求的部分
- 找到请求发起 sign 加密部分加密方式
反编译 Android apk
关于第一步 Android 反编译的教程和工具 可以参考之前的文章。
查看混淆的代码
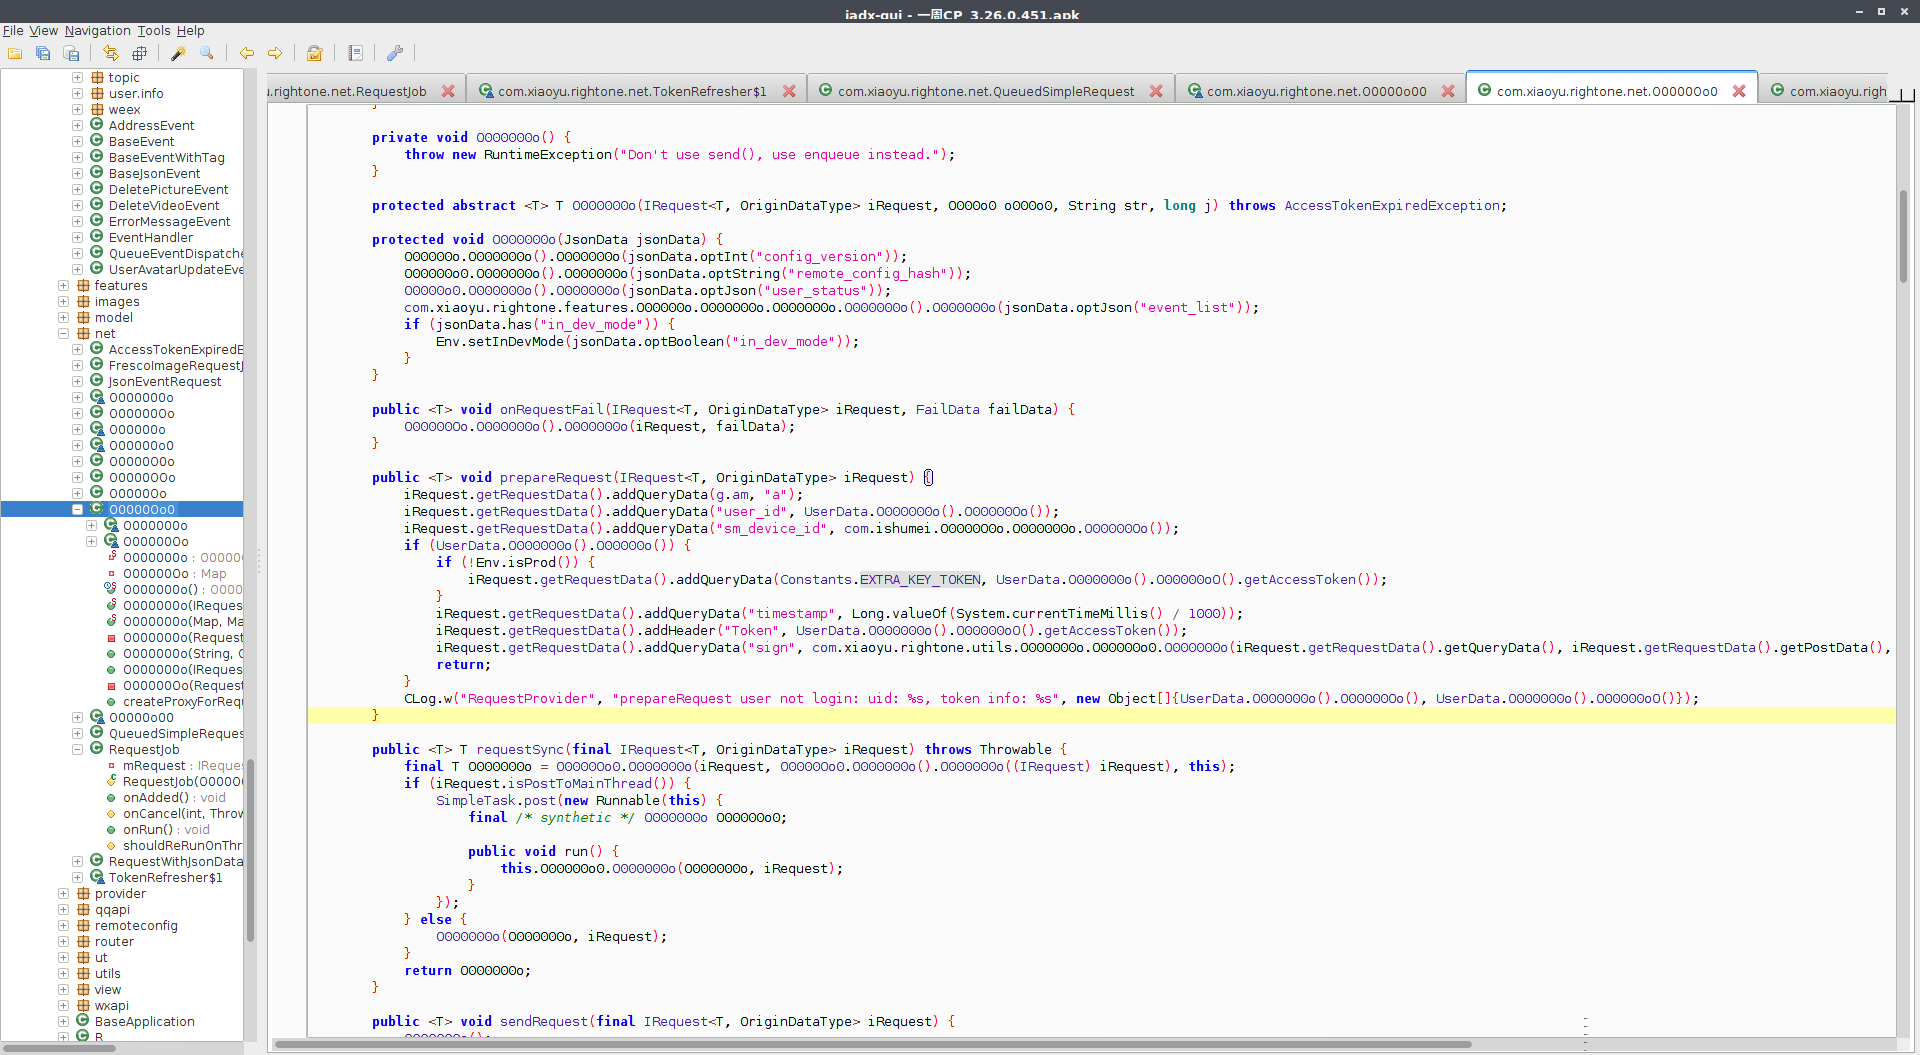
在反编译得到混淆过后的代码之后,这个时候不能盲目的去看,之前可以抓包看下应用内发出去的请求 path,找到关注的 path,比如在这里,找到一个请求的 path,然后沿着这个请求的 path 找到了发起请求的通用方法 prepareRequest(),看到这里就能清晰的看到请求发出去的时候带的几个通用参数 user_id, sm_device_id ,然后签名部分 timestamp ,Token ,sign,最关键的部分就是这里的 sign 的生成方式。
然后到这里看到生成 sign 的方法,第一眼看过去就看到了希望 SHA-1 他使用的是这个哈希算法,这个算法也主要就是用于签名校验。
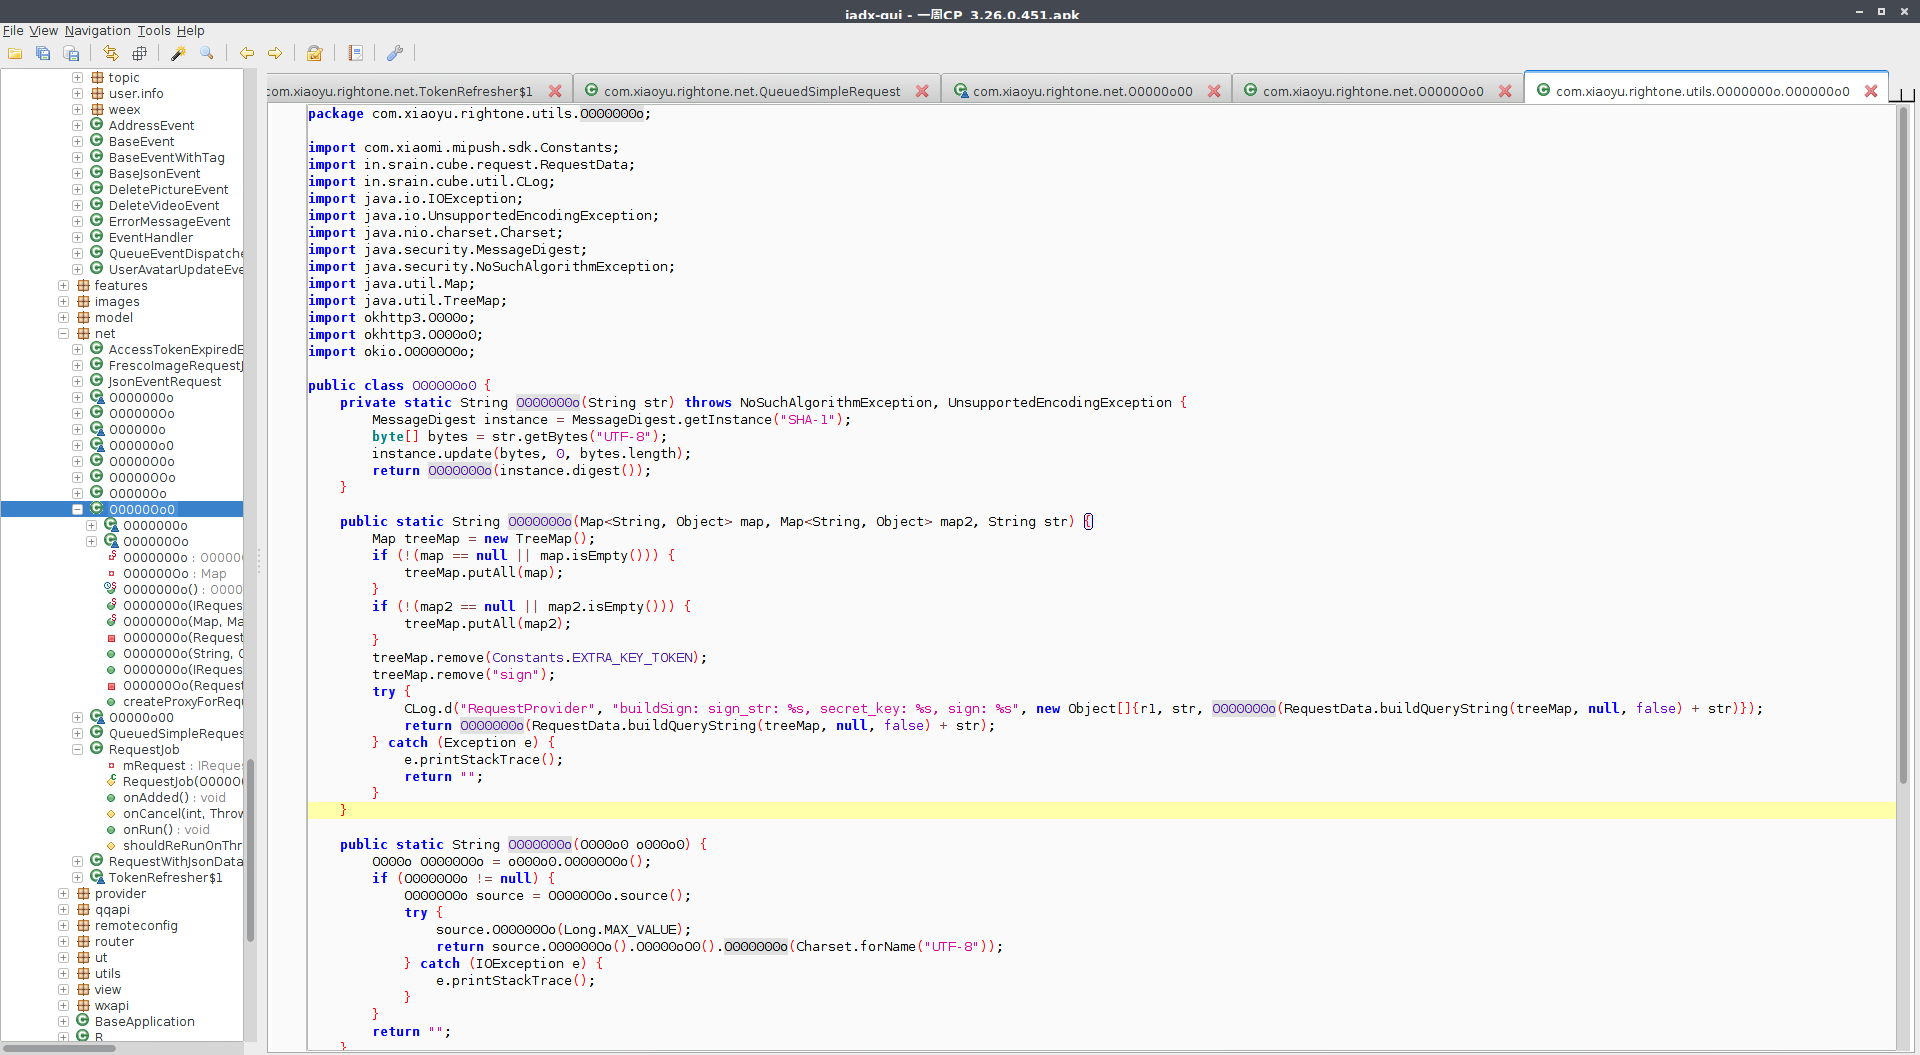
然后可以沿着这个思路去看各个参数的值,比如这里他用到了 RequestData.buildQueryString() 这个方法
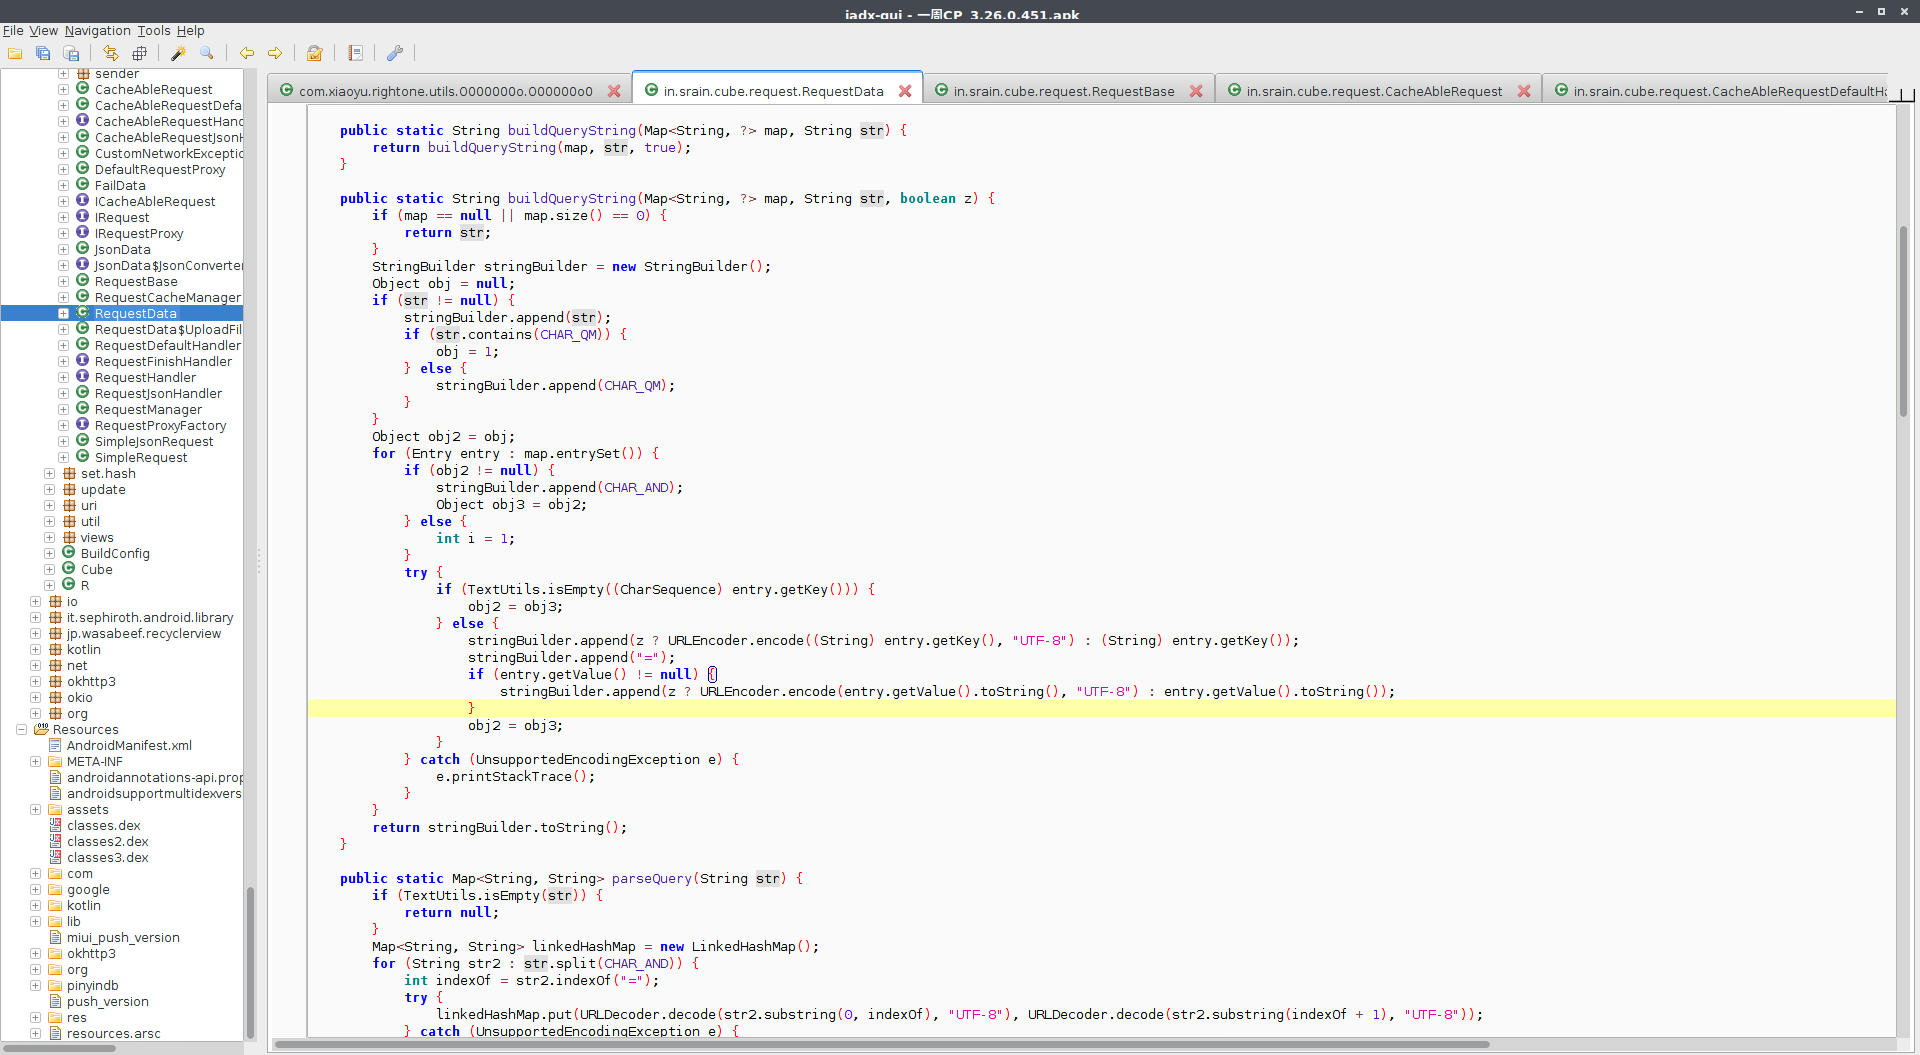
大致看一下这个代码大概能猜到是将请求参数的 key value 拼接起来连成字符串返回。这个时候大致思路已经清晰,所以我用 Java 大致实现了一下 sign 生成的代码。
Java 实现
import com.jutils.base.RequestData;
import java.io.UnsupportedEncodingException;
import java.security.MessageDigest;
import java.security.NoSuchAlgorithmException;
import java.util.HashMap;
import java.util.Map;
import java.util.TreeMap;

public class WeekCPTest {
	private static String sha1(String str) throws NoSuchAlgorithmException, UnsupportedEncodingException {
		MessageDigest instance = MessageDigest.getInstance("SHA-1");
		byte[] bytes = str.getBytes("UTF-8");
		instance.update(bytes, 0, bytes.length);
		return O000000o(instance.digest());
	}

	private static String O000000o(byte[] bArr) {
		StringBuilder stringBuilder = new StringBuilder();
		for (byte b : bArr) {
			int i = (b >>> 4) & 15;
			int i2 = 0;
			while (true) {
				char c = (i < 0 || i > 9) ? (char) ((i - 10) + 97) : (char) (i + 48);
				stringBuilder.append(c);
				int i3 = b & 15;
				i = i2 + 1;
				if (i2 >= 1) {
					break;
				}
				i2 = i;
				i = i3;
			}
		}
		return stringBuilder.toString();
	}

	public static String makeSign(Map<String, Object> map, Map<String, Object> map2, String str) {
		Map treeMap = new TreeMap();
		if (!(map == null || map.isEmpty())) {
			treeMap.putAll(map);
		}
		if (!(map2 == null || map2.isEmpty())) {
			treeMap.putAll(map2);
		}
		treeMap.remove("token");
		treeMap.remove("sign");
		try {
			return sha1(RequestData.buildQueryString(treeMap, null, false) + str);
		} catch (Exception e) {
			e.printStackTrace();
			return "";
		}
	}


	public static void main(String[] args) {
		HashMap<String, Object> query = new HashMap<>();
		query.put("d", "a");
		query.put("user_id", "5624198");
		query.put("timestamp", "1533102328");
		query.put("sm_device_id", "201807021511598922958a5fbc8a5de09cb9019d34a48b01c51f66d9435c31");
//		query.put("Token", "1576511275532288_5624198_1559013109_58f16d8bd82677acc30d87542f5504b0");

		query.put("start", "80");
		query.put("last_object_id", "1742");
		query.put("keyword", "");
		query.put("num", "20");
		String s = makeSign(query, new HashMap<>(), "025d25f5a69eb2818b6811ff6edb51b4");
		System.out.println(s);
	}
}
然后使用抓包工具 抓出一个请求,将参数凭借起来使用这个 Test 跑一下,发现是一致的。这个时候再使用 Python 实现一下。
def __sha1(self, str):
    m = hashlib.sha1()
    m.update(str)
    return m.hexdigest()

def __sign(self, params, secret_key, data={}):
    """
    通过请求参数和 secret_key 生成 sign
    :param params: 请求参数
    :param secret_key: 加密 key 和 用户绑定,在登录或者刷新 token 中获取
    :return:
    """
    to_sign = ""
    merged_dict = params.copy()
    merged_dict.update(data)
    if "sign" in merged_dict.keys():
        merged_dict.pop("sign")
    if "token" in merged_dict.keys():
        merged_dict.pop("token")
    for key in sorted(merged_dict.iterkeys()):
        value = merged_dict.get(key)
        logger.info("params %s %s" % (key, value))
        pair = str(key) + "=" + str(merged_dict.get(key))
        if to_sign == '':
            to_sign = to_sign + pair
        else:
            to_sign = to_sign + '&' + pair
    return self.__sha1(to_sign + secret_key)
然后这个时候就发现其实破解一周 CP 的难点不在 sign 而在拿到 secret_key,这个 secret_key 只有在登录和刷新 token 的接口中才会返回。
修正关于 HTTP Header 的错误认识
HTTP 请求的 Header 是不区分大小写的!,一直以为 HTTP 请求的请求头是有区分大小的,知道今天调试发现 Spring 将 header 全部处理成小写,然后有人提了 Bug 58464 然后看到 Stackoverflow 上面有人回答。
HTTP/1.1 和 HTTP/2 都是 case-insensitivt 都是不区分大小写的。
解决 failed to create bus connection no such file or directory 错误
今天在修改 hostname 使用 sudo hostnamectl set-hostname ds 命令时遇到问题:
Failed to create bus connection: No such file or directory
查了一通之后发现缺少 dbus
sudo apt-get install dbus
安装 dbus 然后再修改即可,使用 hostnamectl 方式来修改 hostname 不需要重启,直接推出登录,然后就可以实现了。
D-Bus 是一种高级的进程间通信机制,它由 freedesktop.org 项目提供,使用 GPL 许可证发行。D-Bus 最主要的用途是在 Linux 桌面环境为进程提供通信,同时能将 Linux 桌面环境和 Linux 内核事件作为消息传递到进程。D-Bus 的主要概率为总线,注册后的进程可通过总线接收或传递消息,进程也可注册后等待内核事件响应,例如等待网络状态的转变或者计算机发出关机指令。目前,D-Bus 已被大多数 Linux 发行版所采用,开发者可使用 D-Bus 实现各种复杂的进程间通信任务。
Vim 的颜色主题
Retro groove color scheme for Vim
Linux Mint 下禁用 Alt 拖拽窗口
问题的出现,Linux Mint 使用了很长时间了,一直也没有啥大的问题,只是最近自定义一些快捷键,Alt + Shift ,发现所有的 Alt 相关的操作,只要按住 Alt 键,然后鼠标在任何窗口中就变成了小手,拖拽会直接拖动窗口。
解决方案一
在 System Settings 中选择 Windows, 然后在 Behavior 下面有 Special key to move and resize windows 选择 Disabled 即可。
解决方案二
安装 dconf
sudo apt install dconf-tools
然后在 org -> cinnamon > desktop > wm > preferences 下面的 mouse-button-modifier 中修改 <Alt> 变为 <Super> 或者 <Ctrl>。
reference
威联通折腾篇八:重启服务
家里遇到一次断电,然后 NAS 就这样异常关机了,重启之后提示磁盘有些碎片需要整理,整理的时候 Qnap 会停止 NAS 上所有的服务,包括 Container Station 中的内容,而 Qnap 说了会在检查完磁盘之后重新启动的,然而并没有,所以只能手动来重启这些服务。
幸亏 Qnap 的绝大部分服务都是用启动脚本来启动的,执行下面的命令可以把 NAS 当前运行的所有服务重启。
/etc/init.d/services.sh restart
当然如果要重启单独的比如说 Container Station 也可以使用
/etc/init.d/container-station.sh restart
重启 samba
/etc/init.d/smb.sh restart
同样的方式,在 /etc/init.d/ 目录下有很多的启动脚本,对应着名字找到要重启的内容即可。
解决特定问题
当遇到打开应用出现
This site can’t be reached”(无法访问此站点)或“
refused to connect”(《服务器》 拒绝连接)
基本上重启一下对应的服务即可。
Java 查漏补缺之泛型
简而言之,泛型使类型(类和接口)在定义类,接口和方法时成为参数。类型参数提供了一种简便的方法,使得不同的输入类型可以使用相同的代码。
为什么需要泛型
在强类型语言中,如果定义一个具有具体类型的类,那么这个类就只能被该类型使用。
Generics 给类,接口和方法提供了一个参数化的实现方式,使得同一个类定义,方法定义可以处理不同的类型。Oracle 官方的文档有一句话说得特别好:
Much like the more familiar formal parameters used in method declarations, type parameters provide a way for you to re-use the same code with different inputs.
在方法定义的时候使用的是 formal parameters (形式参数),在调用方法的时候会将实际参数传递给形式参数,传递的是值,而泛型(Generics)则是传递的类型(Types)。
Java 编译期会在编译阶段检查类型。
使用泛型的代码比非泛型代码有如下好处:
- 在编译时进行类型检查,减少错误
- 消除了强制类型装换
- 可以让编程人员更加容易实现通用算法
定义
通常情况下,泛型类 (generic class) 可以如下定义
class name<T1, T2, ..., Tn> { /* ... */ }
尖括号中的类型通常称为类型参数( type parameters 或者称为类型变量 type variables),一旦类定义了类型参数T ,该变量就能在类中使用。
Type Parameter 命名约定
按照惯例, type parameters 的名字都是单一的大写字母,通常和普通的命令规范 区别开来。
经常被使用的泛型变量有:
EforElement被 Java Collections 框架广泛使用KforKey, K V 经常被 Java Collections 框架中的 Map 使用NforNumberTforTypeVforValueS,U,V etc- 2nd, 3rd, 4th types
调用和实例化泛型类型
泛型的调用其实非常简单,只需要将类型参数替换为具体的类型即可,比如
List<String> list;
Type Parameter 和 Type Argument 术语:大部分情况下这两个术语是可以互换的,但他们的使用场景是不一样的。因此
Foo<T>中的 T 是 type Parameter,而Foo<String>中的 String 是 type argument.
泛型使用
泛型方法
对于静态泛型方法(static generic method), type parameter 定义的区域需要出现在返回值的前面
public static <K, V> boolean compare(Pair<K, V> p1, Pair<K, V> p2) {...}
调用该方法的完整的方式:
boolean same = Util.<Integer, String>compare(p1, p2);
// or
boolean same = Util.compare(p1, p2);
泛型类
泛型类也需要声明类型变量,放在类名后
class GenericClass<ID, T> {}

class SubGenericClass<T> extends GenericClass<Integer, T> {}
泛型接口
和泛型类相似,需要在接口名后面声明类型变量,作用于接口中的抽象方法返回类型和参数类型。
interface GenericInterface<T> {
    T append(T seg);
}
有界类型参数
总有一种情况,编程人员想要限制泛型的类型,比如一个操作数字的类或者方法,可能希望泛型只接受 Number 或者其子类的实例。
定义上界,比如 <E extends Comparable> 在这个例子中,表示定义的泛型需要实现 Comparable 接口,这里的 extends 只是通用表示 extends (Class) 或者 implements (interfaces)
如果要定义多个界
<T extends B1 & B2 & B3>
在定义多个界时,需要将 Class 类型放到 interface 之前,比如说上面的例子中假如有 Class B2, interface B1 & B3 ,那么 B2 必须是第一个。
通配符
在代码中也经常能看到 ? 问号,通常叫做通配符(wildcard),表示是类型未知。通配符可以用在非常多的场景,作为参数,field,或者本地变量,有时候也作为返回值(当然不推荐这么做)。
Upper Bounded Wildcards
public static void process(List<? extends Foo> list) { /* ... */ }
upper bounded wildcard,List<? extends Foo> 其中 Foo 是类型,表示 Foo 和任何子类。
Unbounded Wildcards
无界通配符类型(upper bounded wildcard),通常表示的单纯的使用 ? ,比如 List<?>,表示的是一个不知道类型的 list。有两种常用的使用场景
- 当写方法只需要
Object类中的方法时 - 在泛型类中定义的方法不依赖于 type parameter 时,比如 List.size() 或者 List.clear ,并不依赖于定义的泛型类型
举一个官方文档中的例子,假设有如下的方法
public static void printList(List<Object> list) {
    for (Object elem : list)
        System.out.println(elem + " ");
    System.out.println();
}
本意上是想要实现打印一个任何类型的列表,但是并不能达到目的,他并不能打印 List<Integer>, List<String> 等,因为他们并不是 List<Object> 的子类型,如果要实现通用的 printList 方法需要使用 List<?>
public static void printList(List<?> list) {
    for (Object elem: list)
        System.out.print(elem + " ");
    System.out.println();
}
这个时候 List<Integer> 才是 List<?> 的子类型。
Lower Bounded Wildcards
和类型的上界使用 extends,相同的是,如果要表示类型的下界,则使用 super,比如 <? super A> 。需要注意的是,对于通配符 ? 可以单独指定上界,也可以指定下界,但是两者不能同时指定。
public static void addNumbers(List<? super Integer> list) {
    for (int i = 1; i <= 10; i++) {
        list.add(i);
    }
}
代码可以在 List<Integer>, List<Number>, and List<Object> — anything that can hold Integer values. 上运行。
假设
class A { /* ... */ }
class B extends A { /* ... */ }
都知道 B 是 A 的子类型,所以可以
B b = new B();
A a = b;
所以对于泛型类型呢?
List<B> listB = new ArrayList<>();
List<A> listA = listB;        // 编译错误
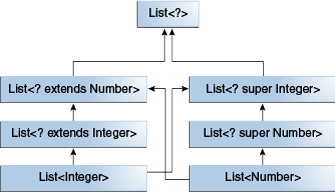
List<Number> 和 List<Integer> 都是 List<?> 的子类型,而 List<Number> 和 List<Integer> 这两者并没有任何关系。
为了让两者有关系,就需要用多泛型的上界,这样
List<? extends Integer> intList = new ArrayList<>();
List<? extends Number>  numList = intList;  // OK. List<? extends Integer> is a subtype of List<? extends Number>
下面有一张图来表示 List 类型的父子类关系
类型擦除
泛型被引入到 Java 语言中,以便在编译时提供更严格的类型检查并支持泛型编程。为了实现泛型,Java 编译器使用[[类型擦除]],声明了泛型的 .java 源代码,在编程生成 .class 文件后,泛型相关的信息就不存在了,源代码中的泛型相关的信息是提供给编译期使用的。:
- 如果类型参数是无界的,则将泛型类型中的所有类型参数替换为其边界或对象。因此,生成的字节码仅包含普通的类,接口和方法。
- 在合适的位置插入类型转换,以保证类型安全
- 生成桥接方法以保留扩展泛型类型中的多态性
类型擦除确保不为参数化类型创建新类;因此,泛型不会产生运行时开销。
泛型信息对 Java 编译器可见,但是对 Java 虚拟机不可见。
在类型擦除过程中,Java 编译器会擦除所有的 type parameters,如果是有界的类型参数则替换成第一个类型,如果是无界的类型参数则替换为 Object。
Java 编译器还会擦除泛型方法参数中的类型参数。比如静态方法:
// Counts the number of occurrences of elem in anArray.
//
public static <T> int count(T[] anArray, T elem) {
    int cnt = 0;
    for (T e : anArray)
        if (e.equals(elem))
            ++cnt;
        return cnt;
}
因为 T 是无界的,则会把 T 出现的地方全部替换为 Object。和泛型类相同,有界的方法中的类型参数也会替换为第一个类型参数。
编写类:
class User implements Comparable<User> {
    String name;

    public int compareTo(User other){
        return this.name.compareTo(other.name);
    }
}
JDK 中接口定义:
package java.lang;
public interface Comparable<T>{
    int compareTo(T o);
}
首先反编译接口:
public interface Comparable
{

    public abstract int compareTo(Object obj);
}
擦除规则 1,参数类型被替换成 Object。如果要看有界类型可以尝试反编译 Collections.class。
编译类:
javac User.java
反编译类:
jad User.class
得到:
class User
    implements Comparable
{

    User()
    {
    }

    public int compareTo(User user)
    {
        return name.compareTo(user.name);
    }

    // 桥接方法
    public volatile int compareTo(Object obj)
    {
        return compareTo((User)obj);
    }

    String name;
}
类型参数没有了,多了无参构造方法,多了 compareTo(Object obj) 桥接方法,擦除规则2 和 3 实现。
泛型的限制
不能使用原始类型来实例化泛型
比如
Pair<int, char> p = new Pair<>(8, 'a'); // compile-time error
会有编译错误。Java 会自动装箱。
无法创建类型参数的实例
比如
public static <E> void append(List<E> list) {
    E elem = new E();  // compile-time error
    list.add(elem);
}
作为解决方案,可以使用反射来创建对象实例
public static <E> void append(List<E> list, Class<E> cls) throws Exception {
    E elem = cls.newInstance();   // OK
    list.add(elem);
}
如下调用
List<String> ls = new ArrayList<>();
append(ls, String.class);
无法申明类型参数为静态
如下是不对的
public class MobileDevice<T> {
    private static T os;

    // ...
}
不能对 parameterized types 进行类型装换和使用 instanceof
因为 Java 编译器会在编译时擦除类型,所以无法验证参数类型在运行时的类型。下面是错误的例子:
public static <E> void rtti(List<E> list) {
    if (list instanceof ArrayList<Integer>) {  // compile-time error
        // ...
    }
}
而对于有界的参数化类型,可以使用
public static void rtti(List<?> list) {
    if (list instanceof ArrayList<?>) {  // OK; instanceof requires a reifiable type
        // ...
    }
}
无法创建参数化类型的数组
不能
List<Integer>[] arrayOfLists = new List<Integer>[2]; // compile-time error
无法创建,捕获或抛出参数化类型的对象
泛型类无法直接或者间接继承 Throwable 。
// Extends Throwable indirectly
class MathException<T> extends Exception { /* ... */ }    // compile-time error

// Extends Throwable directly
class QueueFullException<T> extends Throwable { /* ... */ // compile-time error
但是可以在 throw 语句后使用
class Parser<T extends Exception> {
    public void parse(File file) throws T {     // OK
        // ...
    }
}
不能有重载的方法使用相同的泛型
比如
public class Example {
    public void print(Set<String> strSet) { }
    public void print(Set<Integer> intSet) { }
}
reference
威联通折腾篇九:MySQL 设置
威联通自带 MySQL 当前我使用的版本是 MariaDB 5.5.57 ,威联通也可以看成是类 Unix 系统吧,但是他和 Linux 还是有很多不同,毕竟深度定制过。
MySQL 在威联通的配置路径在
/etc/config/my.cnf
找到该文件,其他配置就和 MySQL 一样了。
如果想要 MySQL 支持远程访问,在 “控制台” - “应用服务” - “MySQL 服务器” 中选择允许远程连接即可。此时设定一个比较强的密码。
Spring 相关资源
收集了一些官方的非官方的学习资源。
文档
- https://docs.spring.io/spring-boot/docs/
- 中文翻译 https://github.com/qibaoguang/Spring-Boot-Reference-Guide
代码
- 官方的样例 https://github.com/spring-projects/spring-mvc-showcase
- 个人的教程 https://github.com/dyc87112/SpringBoot-Learning
- Spring MVC 博客 http://lgbolgger.iteye.com/category/321050
Spring 深度探险
第一篇 Spring MVC 前传
主要讲了 Spring 发展的历史,和 struct 等的对比
第二篇 Spring MVC 概览
以 Servlet 作为入口程序是绝大多数 MVC 框架都遵循的基本设计方案,这里的 DispatcherServlet 被称之为核心分发器。Spring MVC 的核心配置文件定义在 [servlet-name]-servlet.xml 文件中。控制层 Controller 是一个单独的 Java 文件,只是使用注解将其与 HTTP 请求关联。
- 入口程序 DispatcherServlet
- 核心配置 servlet.xml
- 控制逻辑 Controller
这三者构成 Spring MVC 的基础要素。
SpringMVC 在整个 Controller 改造中所涉及到的一些要点:
- 使用参数 - 返回值(Param-Return)实现模式来打造 Controller
-
引入 Annotation 来完成请求 - 响应的映射关系
引入 Annotation 来完成请求 - 响应的映射关系,是 SpringMVC 的一个重大改造。在早期的 SpringMVC 以及其他的 MVC 框架中,通常都是使用 XML 作为基础配置的。而 Annotation 的引入将原本分散的关注点合并到了一起,为实现配置简化打下了坚实的基础。
-
泛化参数和返回值的含义
核心 Servlet 应该能够根据一定的规则对不同的 Http 请求分发到不同的 Servlet 对象上去进行处理。核心 Servlet 应该能够建立起一整套完整的对所有 Http 请求进行规范化处理的流程。
Servlet 模型中,请求 和 响应实现依赖,web.xml 中配置 <servlet> 和 <servlet-mapping> 的对应,将响应的 URL pattern 和其对应的实现类进行关联。针对这个问题,Spring MVC 提出的方案就是提炼一个核心的 Servlet 覆盖对所有 HTTP 请求的处理,这就是 org.springframework.web.servlet.DispatcherServlet 核心分发器。
因此 web.xml 中的配置就被固定
<servlet>
    <servlet-name>dispatcherServlet</servlet-name>
    <servlet-class>org.springframework.web.servlet.DispatcherServlet</servlet-class>
    <load-on-startup>1</load-on-startup>
</servlet>

<servlet-mapping>
    <servlet-name>dispatcherServlet</servlet-name>
    <url-pattern>/**</url-pattern>
</servlet-mapping>
Spring MVC 接下来要处理的内容就是根据一定的规则处理不同的 HTTP 请求,分发到响应的 Servlet 处理。
在 SpringMVC 的设计中,这两个方面的内容总是在一个不断交叉、互为补充的过程中逐步完善的。
处理流程规范化是目的,对于处理过程的步骤划分和流程定义则是手段。因而处理流程规范化的首要内容就是考虑一个通用的 Servlet 响应程序大致应该包含的逻辑步骤:
- 步骤 1 —— 对 Http 请求进行初步处理,查找与之对应的 Controller 处理类(方法)
- 步骤 2 —— 调用相应的 Controller 处理类(方法)完成业务逻辑
- 步骤 3 —— 对 Controller 处理类(方法)调用时可能发生的异常进行处理
- 步骤 4 —— 根据 Controller 处理类(方法)的调用结果,进行 Http 响应处理
在 Java 语言中,最适合表达逻辑处理语义的语法结构是接口,因此上述的四个流程也就被定义为了四个不同接口,它们分别是:
- 步骤 1 —— HandlerMapping
- 步骤 2 —— HandlerAdapter
- 步骤 3 —— HandlerExceptionResolver
- 步骤 4 —— ViewResolver
核心配置文件在整个 SpringMVC 的构成要素中占有一席之地的重要原因就是在于:必须借助一个有效的手段对整个 SpringMVC 的组件进行定义,而这一点正是通过核心配置文件来完成的。
第三篇 DispatcherServlet 与初始化主线
DispatcherServlet 与初始化主线,SpringMVC 的设计原则 Open for extension / closed for modification
Spring MVC 设计中的要点
- SpringMVC 将 Http 处理流程抽象为一个又一个处理单元
- SpringMVC 定义了一系列组件(接口)与所有的处理单元对应起来
- SpringMVC 由 DispatcherServlet 贯穿始终,并将所有的组件串联起来
根据 Servlet 规范的定义,Servlet 中的两大核心方法 init 方法和 service 方法,它们的运行时间和触发条件都截然不同:
init 方法
在整个系统启动时运行,且只运行一次。因此,在 init 方法中我们往往会对整个应用程序进行初始化操作。这些初始化操作可能包括对容器(WebApplicationContext)的初始化、组件和外部资源的初始化等等。
service 方法
在整个系统运行的过程中处于侦听模式,侦听并处理所有的 Web 请求。因此,在 service 及其相关方法中,我们看到的则是对 Http 请求的处理流程。
DispatcherServlet 的初始化主线
初始化主线的驱动要素,servlet 中的 init 方法;初始化主线的执行次序,HttpServletBean->FrameworkServlet->DispatcherServlet;初始化主线的操作对象,Spring 容器(WebApplicationContext)和组件。 一个组件的多种行为模式可以在容器中共存,容器将负责对这些实现类进行管理。DispatcherServlet 中对于组件的初始化过程实际上是应用程序在 WebApplicationContext 中选择和查找组件实现类的过程,也是指定组件在 SpringMVC 中的默认行为方式的过程。
第四篇 SpringMVC 核心配置文件详解
SpringMVC 的核心配置文件在整个应用程序中所起到的作用也是举足轻重的。在 web.xml 中指定 SpringMVC 的入口程序 DispatcherServlet 时,实际上蕴含了一个对核心配置文件的指定过程([servlet-name]-servlet.xml)
namespace     element             attributes
 |             |                         |
<mvc:annotation-driven ignore-default-model-on-redirect="true"/>
 |             |                         |
逻辑分类     过程语义             行为配置选项
Schema-based XML 中的配置节点拥有比较鲜明的功能特性,通过 namespace、element 和 attributes 这三大元素之间的配合,共同完成对一个动态过程的描述。
文章分类
最近文章
- Dinox 又一款 AI 语音实时转录工具 前两天介绍过 [[Voicenotes]],也是一款 AI 转录文字的笔记软件,之前在调查 Voicenotes 的时候就留意到了 Dinox,因为是在小红书留意到的,所以猜测应该是国内的某位独立开发者的作品,整个应用使用起来也比较舒服,但相较于 Voicenotes,Dinox 更偏向于一个手机端的笔记软件,因为他整体的设计中没有将语音作为首选,用户也可以添加文字的笔记,反而在 Voicenotes 中,语音作为了所有笔记的首选,当然 Voicenotes 也可以自己编辑笔记,但是语音是它的核心。
- 音流:一款支持 Navidrom 兼容 Subsonic 的跨平台音乐播放器 之前一篇文章介绍了Navidrome,搭建了一个自己在线音乐流媒体库,把我本地通过 [[Syncthing]] 同步的 80 G 音乐导入了。自己也尝试了 Navidrome 官网列出的 Subsonic 兼容客户端 [[substreamer]],以及 macOS 上面的 [[Sonixd]],体验都还不错。但是在了解的过程中又发现了一款中文名叫做「音流」(英文 Stream Music)的应用,初步体验了一下感觉还不错,所以分享出来。
- 泰国 DTV 数字游民签证 泰国一直是 [[Digital Nomad]] 数字游民青睐的选择地,尤其是清迈以其优美的自然环境、低廉的生活成本和友好的社区氛围而闻名。许多数字游民选择在泰国清迈定居,可以在清迈租用廉价的公寓或民宿,享受美食和文化,并与其他数字游民分享经验和资源。
- VoceChat 一款可以自托管的在线聊天室 VoceChat 是一款使用 Rust(后端),React(前端),Flutter(移动端)开发的,开源,支持独立部署的在线聊天服务。VoceChat 非常轻量,后端服务只有 15MB 的大小,打包的 Docker 镜像文件也只有 61 MB,VoceChat 可部署在任何的服务器上。
- 结合了 Google 和 AI 的对话搜索引擎:Perplexity AI 在日本,因为 SoftBank 和 Perplexity AI 开展了合作 ,所以最近大量的使用 Perplexity ,这一篇文章就总结一下 Perplexity 的优势和使用技巧。