Android 提醒
Android 对话框
实现对话框通常有三种方式:
- 使用 Dialog 类,或者其派生类 每个类被用来提供特定功能,比如日期选择,单选等等
- 对话框主题的 Activity 可以将对话框主题应用到 Activity 上,使 Activity 外观类似于对话框
- Toast 特殊的,短暂的,非模态的消息对话,通常在 Broadcast Receiver 和 Service 中使用,来提示用户响应事件
以下重点考虑 Dialog 类的使用,其派生子类 DatePickerDialog,TimePickerDialog 以后扩展开讲。响应代码可以参考此次 提交。
最常见的对话框 AlertDialog
private void showNormalDialog() {
    AlertDialog.Builder builder = new AlertDialog.Builder(this);
    builder.setTitle("Title");
    builder.setMessage("your message here.");
    builder.setCancelable(true);

    /**
    * Typically, a dialog is dismissed when its job is finished
    * and it is being removed from the screen.
    * A dialog is canceled when the user wants to escape the dialog
    * and presses the Back button.
    * For example, you have a standard Yes/No dialog on the screen.
    * If the user clicks No, then the dialog is dismissed
    * and the value for No is returned to the caller.
    * If instead of choosing Yes or No, the user clicks Back to escape the dialog
    * rather than make a choice then the dialog is canceled
    * and no value is returned to the caller.
    */
    builder.setPositiveButton(
            "Yes",
            new DialogInterface.OnClickListener() {
                public void onClick(DialogInterface dialog, int id) {
                    Toast.makeText(DialogTestActivity.this, "Yes", Toast.LENGTH_SHORT).show();
                    dialog.dismiss();

                }
            });

    builder.setNegativeButton(
            "No",
            new DialogInterface.OnClickListener() {
                public void onClick(DialogInterface dialog, int id) {
                    Toast.makeText(DialogTestActivity.this, "No", Toast.LENGTH_SHORT).show();
                    dialog.dismiss();
                }
            });

    AlertDialog alert = builder.create();
    alert.show();
}
三选对话框
private void showThreeOptionsDialog() {
    Dialog dialog = new AlertDialog.Builder(this)
            .setIcon(android.R.drawable.btn_star)
            .setTitle("喜好调查")
            .setMessage("你喜欢李连杰的电影吗?")
            .setPositiveButton("很喜欢", new DialogInterface.OnClickListener() {
                @Override
                public void onClick(DialogInterface dialog, int which) {
                    Toast.makeText(DialogTestActivity.this, "我很喜欢他的电影。",
                            Toast.LENGTH_LONG).show();
                }
            })
            .setNegativeButton("不喜欢", new DialogInterface.OnClickListener() {
                @Override
                public void onClick(DialogInterface dialog, int which) {
                    Toast.makeText(DialogTestActivity.this, "我不喜欢他的电影。", Toast.LENGTH_LONG).show();
                }
            })
            .setNeutralButton("一般", new DialogInterface.OnClickListener() {
                @Override
                public void onClick(DialogInterface dialog, int which) {
                    Toast.makeText(DialogTestActivity.this, "谈不上喜欢不喜欢。", Toast.LENGTH_LONG).show();
                }
            }).create();
    dialog.show();
}
带输入框的对话框
private void showInputDialog() {
    final EditText editText = new EditText(this);
    Dialog dialog = new AlertDialog.Builder(this)
            .setIcon(android.R.drawable.ic_dialog_info)
            .setTitle("Input your message")
            .setView(editText)
            .setPositiveButton("Sure", new DialogInterface.OnClickListener() {
                @Override
                public void onClick(DialogInterface dialog, int which) {
                    String inputString = editText.getText().toString();
                    Toast.makeText(DialogTestActivity.this, inputString, Toast.LENGTH_SHORT).show();
                }
            })
            .setNegativeButton("No", new DialogInterface.OnClickListener() {
                @Override
                public void onClick(DialogInterface dialog, int which) {
                    dialog.dismiss();
                }
            }).create();
    dialog.show();
}
单选对话框
private void showSingleChoiceDialog() {
    Dialog dialog = new AlertDialog.Builder(this)
            .setTitle("Single Choice")
            .setSingleChoiceItems(new String[]{"item1", "item2"}, 0, new DialogInterface.OnClickListener() {
                @Override
                public void onClick(DialogInterface dialog, int which) {
                    Toast.makeText(DialogTestActivity.this, "" + which, Toast.LENGTH_SHORT).show();
                    dialog.dismiss();
                }
            }).setNegativeButton("Cancel", new DialogInterface.OnClickListener() {
                @Override
                public void onClick(DialogInterface dialog, int which) {
                    dialog.dismiss();
                }
            }).create();
    dialog.show();
}
复选对话框
private void showMultiChoiceDialog() {
    Dialog dialog = new AlertDialog.Builder(this)
            .setTitle("Multi Choice")
            .setMultiChoiceItems(new String[]{"item0", "item1"}, new boolean[]{false, true}, new DialogInterface.OnMultiChoiceClickListener() {
                @Override
                public void onClick(DialogInterface dialog, int which, boolean isChecked) {

                    Toast.makeText(DialogTestActivity.this, "" + which + " " + isChecked, Toast.LENGTH_SHORT).show();
                }
            }).create();
    dialog.show();
}
自定义布局对话框
private void showCustomDialog() {
    LayoutInflater inflater = getLayoutInflater();
    View layout = inflater.inflate(R.layout.dialog_custom, null);
    final EditText editText = (EditText) layout.findViewById(R.id.editText);
    Dialog dialog = new AlertDialog.Builder(this)
            .setTitle("Custom")
            .setView(layout)
            .setPositiveButton("Yes", new DialogInterface.OnClickListener() {
                @Override
                public void onClick(DialogInterface dialog, int which) {
                    Toast.makeText(DialogTestActivity.this, editText.getText().toString() + " ", Toast.LENGTH_SHORT).show();
                }
            }).create();
    dialog.show();
}
reference
Android 使用自定义 keystore 调试
可以在 build.gradle 文件中指定debug 下的 keystore 文件路径,一般放到项目跟目录下,并使用如下方式指定。 更多语法可以参考 Signing Configurations 部分 http://tools.android.com/tech-docs/new-build-system/user-guide
指定 debug variant 下 keystore 路径:
android {
    signingConfigs {
        debug {
            storeFile file('your.keystore')
            keyAlias 'androiddebugkey'
            keyPassword 'android'
            storePassword 'android'
        }
    }
}
推荐还是讲 debug 和 release 下的 keystore 分开。
保存一些和 keystore 相关的命令
-
查询 keystore 中条目
keytool -list -keystore your.keystore -storepass yourpassword
-
修改 keystore 中,使用上一步获取到的证书名字
keytool -changealias -alias 证书名字 -destalias androiddebugkey -keystore your.keystore -storepass yourpassword
-
修改密钥库密码
keytool -storepasswd -keystore your.keystore -storepass yourpassword
-
修改证书密码
keytool -keypasswd -alias androiddebugkey -keystore 证书名字 -storepass yourpassword
reference
全平台录制 GIF:LICEcap
以前写过一篇文章 讲的是如何在 Linux 下使用 byzanz 来录制 GIF,并且能够达到很好的效果,并且文件大小非常合适网络分享。现在就介绍下在其他两大平台 Win/Mac 下录制 GIF 的工具。
LICEcap
录屏 GIF 工具名字叫做: LICEcap 。这也是一款我在使用很长时间之后感觉非常好用的工具。他的官网地址:
http://www.cockos.com/licecap/
他有如下优点:
- 开源,简单,小巧
- 支持直接录屏转 GIF,或者自由 .LCF 格式,使用 REAPER 可以转制成 .gif 或者其他视频格式
- 支持录制中移动录制窗口
- 支持暂停和继续
- 全局快捷键 shift + space 可以暂停继续
更多其他的技巧和优点可查看他官网,目前为止他满足了我所有的需求。
使用:
输出文件:
ScreenToGif
在寻找的过程中还发现一款比较好用的工具,但只有在 Windows 平台上存在,这里也写上吧。
官方地址:https://screentogif.codeplex.com/
- 同样支持直接输出 Gif
- 支持调整大小
更多的介绍和使用说明可上官网查看。
通过 IFTTT 自动下载 Instagram 图片到 Google Drive
在 Instagram 关闭 API 之前可以通过 IFTTT 获取别人的更新 Photos, 但是 Instagram 收紧了 API 政策。既拿不到别人更新的信息流,同样也自己Like 别人照片的信息也拿不到了,原来 IFTTT 有两个 Recipes:
- 一个为自动下载个人 Liked 别人的 Photo 到 Dropbox
- 另一个为自动下载其他 ID 的更新 Photo
然而这两个 Recipes 都被 IFTTT 删去了,我甚至在 StackOverflow 上问过这件事情,只是几个月过去了,也没有任何实质性的方案。
直到这些天,突然脑袋一道闪光,再此之前,我了解了方法可以导出 Instagram 到 RSS,然后看到了别人自动将 Imgur 中的图片上传到 Google Drive ,使用的是 RSS 导出图片,有人写了一脚本传入 URL,就可以提取 URL 中的图片链接。
正是基于这两个方案,我想到了使用 Instagram to RSS to IFTTT to Google Drive 的方案,然后经过尝试,不需要一行代码的情况下,我实现了自动转存的方案。省去了自己写脚本的时间,同样这个方案也自动适配的Instagram 的网页,并不会因为网页结构的变化而导致失败。只要 RSS 有效,那么就会一直生效。
Instagram to RSS
要做到这个事情,就需要借助 RSS bridge 这个项目,这个项目也是当时我在寻找 InoReader RSS 的时候发现的,关于导出微博、知乎、微信的订阅到 RSS 可以以后在展开详谈。回到 RSS bridge ,这个项目本身就是利用爬虫将网站更新内容生成 RSS,本身支持的网站还是很多的,Flickr、GooglePlus、Twitter、Youtube、Pinterest 等等,当然包括 Instagram。
而我使用了 https://bridge.suumitsu.eu/ 这个网站提供的服务,这个网站架设了 RSS bridge 的服务,当然如果有条件的话自己架设也是很不错的选择,只要一直维护就可以。在网页上选择 Instagram 然后填入 Instagram 的用户 ID ,然后获取 Atom 的源即可。拿到这个 Feed URL,在下一步使用。
if RSS to Google Drive
拿到 Feed URL 之后,到 IFTTT,使用 这个 新建一个 Recipe
分析一下刚刚拿到的 URL
https://bridge.suumitsu.eu/?action=display&bridge=Instagram&u=instagram&format=Atom
其中 u 参数后面跟随着的就是 Instagram 的用户 ID,改变 u 后面的参数为需要自动保存的 ID,然后 Save 即可。
Android 常见错误
INSTALL_FAILED_NO_MATCHING_ABIS 的解决办法
出现时机
INSTALL_FAILED_NO_MATCHING_ABIS 的解决办法,在 Android 模拟器上安装 apk 的时候出现
解决办法
是由于使用了 native libraries ,该 native libraries 不支持当前的cpu的体系结构。
INSTALL_FAILED_NO_MATCHING_ABIS is when you are trying to install an app that has native libraries and it doesn't have a native library for your cpu architecture. For example if you compiled an app for armv7 and are trying to install it on an emulator that uses the Intel architecture instead it will not work.
现在安卓模拟器的CPU/ABI一般有三种类型,INTEL X86,ARM,MIPS,
如果选择用INTEL X86出现 INSTALL_FAILED_NO_MATCHING_ABIS 的错误,那就改用ARM的
参考:http://stackoverflow.com/questions/24572052/install-failed-no-matching-abis-when-install-apk
Apache HTTP Client
Android 6.0 中移除 了 Apache HTTP client
程序包org.apache.http.client.methods不存在
android {
    useLibrary 'org.apache.http.legacy'
}
android 6 runtime permission
在 target API 23 之前,应用申请权限为一次性给予,开发者需要在 Manifest 中使用 users-permission 来申请权限,而用户则是在安装应用时一次性赋予应用所有申请的权限。
<manifest xmlns:android="http://schemas.android.com/apk/res/android"
    package="com.android.app.myapp" >
    <uses-permission android:name="android.permission.RECEIVE_SMS" />
    ...
</manifest>
而在 Android API Level 23 也就是 Android 6.0 以后权限的问题被进一步细化,开发者可以在运行时申请权限(Runtime permissions),而此时众多的Android 权限也被细分为 Normal 普通权限 和 Dangerous 危险权限,普通权限和 6.0 以前一样在 Manifest 中申请,并且在安装应用时一次性赋予,而危险权限的申请则需要额外的注意。否则可能会引发异常
java.lang.SecurityException: Permission Denial
所有的权限列表在官方文档 可以查到,每一个权限都标明了 Protection level: normal or dangerous.
运行时获取权限
申请照相权限例子:
/**
 * Requests the Camera permission.
 * If the permission has been denied previously, a SnackBar will prompt the user to grant the
 * permission, otherwise it is requested directly.
 */
private void requestCameraPermission() {
    Log.i(TAG, "CAMERA permission has NOT been granted. Requesting permission.");

    // BEGIN_INCLUDE(camera_permission_request)
    if (ActivityCompat.shouldShowRequestPermissionRationale(this,
            Manifest.permission.CAMERA)) {
        // Provide an additional rationale to the user if the permission was not granted
        // and the user would benefit from additional context for the use of the permission.
        // For example if the user has previously denied the permission.
        Log.i(TAG,
                "Displaying camera permission rationale to provide additional context.");
            Snackbar.make(mLayout, R.string.permission_camera_rationale,
                    Snackbar.LENGTH_INDEFINITE)
                    .setAction(R.string.ok, new View.OnClickListener() {
                        @Override
                        public void onClick(View view) {
                            ActivityCompat.requestPermissions(MainActivity.this,
                                    new String[]{Manifest.permission.CAMERA},
                                    REQUEST_CAMERA);
                        }
                    })
                    .show();
    } else {

        // Camera permission has not been granted yet. Request it directly.
        ActivityCompat.requestPermissions(this, new String[]{Manifest.permission.CAMERA},
                REQUEST_CAMERA);
    }
    // END_INCLUDE(camera_permission_request)
}
重要方法
检查权限
ContextCompat 中
public static int checkSelfPermission (Context context, String permission)
检查是否拥有权限,如果有返回 PackageManager PERMISSION_GRANTED, 如果没有则返回 PERMISSION_DENIED。
在 ActivityCompat 中
public static boolean shouldShowRequestPermissionRationale (Activity activity, String permission)
在 UI 中弹出对话框申请权限,仅仅只有当当前功能需要权限的时候才需要申请。需要参数,目标 activity ,和需要申请的权限,返回是否需要弹出对话框。该方法监测是否需要申请权限。
申请权限
public static void requestPermissions (Activity activity, String[] permissions, int requestCode)
申请权限的权限需要在 manifest 中定义,权限需要是危险权限 #PROTECTION_DANGEROUS dangerous
普通权限 PROTECTION_NORMAL 会在安装时一次性授予, 同样 PROTECTION_SIGNATURE 权限也会在安装时授予。
定义 signature 权限时,不仅需要添加权限说明,还需要相同的签名。
如果app不拥有申请的权限,在用户接受或者拒绝之后,会收到一个回调,说明是否授予了权限,需要实现接口。
public abstract void onRequestPermissionsResult (int requestCode, String[] permissions, int[] grantResults)
因为申请权限不能保证被授予,所以无论在有没有权限的情况下都要保证app能够运行。
requestPermissions 方法会开始一个 activity 来让用户选择是否授予权限,因此程序自身 Activity 可能会 paused 或者 resumed。进一步,授予某些权限可能会导致重启应用,这种情况下系统会重新生成 activity stack ,之后再调用 onRequestPermissionsResult 。
回调方法 onRequestPermissionsResult(int requestCode, String[] permissions, int[] grantResults) 的第一个参数时 requestPermissions 方法传入的,第二个参数是申请的权限,Never null,第三个参数是是否授予权限的结果,也就是 PERMISSION_GRANTED 或者 PERMISSION_DENIED,Never null。
权限介绍
Android 的权限分成四个类别
- normal 普通级别
- dangerous 危险级别
- signature 签名级别
- signatureOrSystem 系统/签名级别
前两个权限直接定义时候即可,6.0以后 dangerous 可以在运行时申请。后两个权限为高级权限,拥有 platform 级别认证才可以申请,应用在没有权限情况下做受限操作,应用会被系统杀掉。
在 Manifest 中使用
users Permission
申请普通权限可以使用
<uses-permission android:name="string"
        android:maxSdkVersion="integer" />
前一个参数简单,后以参数 maxSDKVersion 表示,如果应用从某一个版本开始不需要特定的权限,可以设置该属性。表示高于该 API Level 之后就不授予该权限。
如下定义
<uses-permission-sdk-23 android:name="string"
        android:maxSdkVersion="integer" />
表示只有当app运行在 API Level 23 或以上时才申请权限,以下不申请权限。
自定义权限
<permission android:description="string resource"
            android:icon="drawable resource"
            android:label="string resource"
            android:name="string"
            android:permissionGroup="string"
            android:protectionLevel=["normal" | "dangerous" |
                                     "signature" | "signatureOrSystem"] />
- android:description:对权限的描述,比lable更加的详细,介绍该权限的相关使用情况,比如当用户被询问是否给其他应用该权限时。注意描述应该使用的是string资源,而不是直接使用string串。 android:icon:用来标识该权限的一个图标。
- android:label:权限的一个给用户展示的简短描述。方便的来说,这个可以直接使用一个string字串来表示,但是如果要发布的话,还是应该使用string资源来表示。
- android:name:权限的唯一名字,由于独立性,一般都是使用包名加权限名,该属性是必须的,其他的可选,未写的系统会指定默认值。
- android:permissionGroup: 权限所属权限组的名称,并且需要在这个或其他应用中使用
标签提前声明该名称,如果没有声明,该权限就不属于该组。 - android:protectionLevel:权限的等级
reference
- http://developer.android.com/guide/topics/manifest/permission-element.html
- https://developer.android.com/guide/topics/manifest/permission-element.html#plevel
- http://blog.csdn.net/self_study/article/details/50074781
- http://blog.csdn.net/self_study/article/details/50186435
- http://blog.csdn.net/t12x3456/article/details/7749200
Android Snackbar 使用
Snackbar 提供操作的轻量级反馈。显示在手机底部或者大屏幕的左下,Snackbar显示在所有界面的最上层,并且只显示一次。
Snackbar 可以包含一个操作,使用 setAction(CharSequence, android.view.View.onClickListener) 设置。 Snackbar 可以通过 setCallback(Callback) 来设置显示和消失的回调 Snackbar.Callback
显示时间长短的常量
- int LENGTH_INDEFINITE 没有操作不消失
- int LENGTH_LONG 显示长时间
- int LENGTH_SHORT 显示短时间
Android Support Library (22.2.1) 起才支持 LENGTH_INDEFINITE。如果使用该属性, Snackbar 会一直显示,直到调用 dismiss() 或者下一个 Snackbar 出现。
make 方法的第一个参数表示 Snackbar 会寻找该 View 来hold Snackbar 的View。第二个参数为需要显示的字符串。第三个参数为显示时间,使用以上三个常量。
Snackbar.make(mLayout, R.string.permission_camera_rationale,
        Snackbar.LENGTH_INDEFINITE)
        .setAction(R.string.ok, new View.OnClickListener() {
            @Override
            public void onClick(View view) {
                ActivityCompat.requestPermissions(MainActivity.this,
                        new String[]{Manifest.permission.CAMERA},
                        REQUEST_CAMERA);
            }
        })
        .setCallback(new Snackbar.Callback() {
            @Override
            public void onDismissed(Snackbar snackbar, int event) {
                super.onDismissed(snackbar, event);
                Toast.makeText(getApplicationContext(), "onDismissed", Toast.LENGTH_LONG).show();
            }

            @Override
            public void onShown(Snackbar snackbar) {
                super.onShown(snackbar);
                Toast.makeText(getApplicationContext(), "onShown", Toast.LENGTH_LONG).show();
            }
        })
        .show();
综上,Snackbar 作为带响应的通知来说能带来不错的体验。相较于 Toast 来说,Snackbar 能够提供一种操作,对于修改内容来说,提供短时间内的撤销操作应该是不错的。其他能够想到的一些操作,比如撤销邮件的发送,撤销消息的发送,等等。
每天学习一个命令:tar 压缩和解压文件
tar 本质上只是一个打包命令,可以将多个文件或者文件夹打包到一个 tar 文件中,结合其他的压缩程序再将打包后的档案文件压缩。所以看到 .tar.gz, .tar.bz2, .tar.xz 等等文件其实是 tar 文件之后进行 Gzip, Bzip2, XZ 压缩之后的文件。
命令格式
tar [-] A --catenate --concatenate | c --create | d --diff --compare |
     --delete | r --append | t --list | --test-label | u --update | x
     --extract --get [options] [pathname ...]
tar 命令常用参数
-c      创建 archive
-x      解压文件
-f ARCHIVE      使用该 ARCHIVE
-v      输出 verbose 日志
-t      测试压缩文件内容

-z, --gzip, --gunzip,  gzip 格式
-j  支持 bzip2 格式
使用实例
常见的压缩和解压用法
tar -cvf filename.tar /folder    # 仅打包不压缩
tar -xvf filename.tar            # 解压包
压缩与解压 gzip:
tar -zcvf filename.tar.gz /folder # gzip 压缩
tar -zxvf filename.tar.gz         # 当前目录下解压文件
压缩解压 bzip2 / bz2
tar -jcvf filename.tar.bz2 /folder # bzip2 压缩
tar -jxvf filename.tar.bz2 -C /path # 解压
压缩解压 tar.xz
tar -Jcvf filename.tar.xz /folder  # xz 压缩
tar -Jxvf filename.tar.xz          # 解压
解释
-c表示创建-x表示解压-
-t表示查看压缩包内容注意 c/x/t 三个参数不能同时使用 -v表示打印出日志-j表示 bzip2 压缩方法-J表示 xz 压缩方法-z表示 gzip 压缩方法-f ARCHIVE后面接文件,-f后面需要直接接压缩包名
经过上面的解释,可以习惯上可以记忆成 压缩格式 (z/j/J) + 压缩 / 解压 / 查看 (c/x/t) + v + f 文件名
压缩时排除绝对路径
有的时候在打包文件的时候会跟随着很长的路径,如果不想要这个很长的路径可以使用 -C 参数来将目录 change to directory
比如想要备份 Docker volume 目录 /var/lib/docker/volumes/chevereto_chevereto_content/,如果:
tar -zcvf backup_content.tar.gz /var/lib/docker/volumes/chevereto_chevereto_content/
这样打包,最后的压缩包内容会将整个相对目录也打包进去,可以使用
tar -zcvf backup_content.tar.gz -C /var/lib/docker/volumes/chevereto_chevereto_content/ .
然后打包的结果 tar 中就只有 chevereto_chevereto_content 目录下的内容。
解压时展开压缩包的目录
比如说在使用 -C 来解压目录的时候,在压缩包内所有的文件内容都在 path-1.4 这样的带版本的文件夹内,如果要想要解压到 path 这样的目录,可以使用:
tar xzvf path-1.4.tar.gz -C path --strip-components=1
注意 path 目录需要存在,否则会报错。
列出压缩包内的文件
tar -ztvf filename.tar.gz     # 列出 tar.gz 下文件
tar -zxvf filename.tar.gz folder/filename   # 仅仅解压某个文件

tar -zcvpf fileetc.tar.gz /etc   # 将 /etc/ 内所有文件备份,并保存其权限 -p
保留文件原始属性
tar -zcvpf file.tar.gz /etc
这里多了一个 -p 参数,保留原始属性时使用,比如打包时不想改变文件的权限等等。
打包时排除文件或文件夹
比如说在打包 /etc 和 /home 目录到 file.tar.gz 文件中时排除 /path 目录
tar --exclude /path -zcvf file.tar.gz /etc /home
这里注意 --exclude 参数
打包比特定时间更新的文件
使用 -N 参数来打包更新的文件
tar -N "2016/01/01" -zcvf download.tar.gz /home/einverne/Download
比如只打包指定目录下文件日期新于 20160101 的文件。
解压到指定目录
使用 -C 参数来指定解压到的目录
tar -zxvf filename.tar.gz -C /path/to/
使用 -C 参数将压缩包内容解压到目录 /path/to/filename
不解压直接查看压缩包内容
tar -tf archive.tar.gz
跨机器压缩传输
上面提到的命令都需要将压缩文件存储到本地,那么如果有一种情况,本地空间有限,无法容纳压缩包的内容,想要实时通过压缩,然后传输到另一台机器,可以使用:1
tar czvf - /source | ssh username@remote.host "cd /destination; tar xzvf -"
跨机器打包
比如要在 A 机器将目录 /www/backup 备份到 B 机器的 /home/einverne/Backup 目录,并压缩:
tar zcvf - /www/backup/ | ssh your_username@ip_of_hostname "cat > /home/einverne/Backup/aapanel.tgz"
Gzip Bzip2 vs XZ
Gzip, Bzip2 和 XZ 是 UNIX 系统下常见的压缩工具。 xz 是一个使用 LZMA 压缩算法的无损数据压缩文件格式,xz 文件格式的压缩率更高。
这里 有篇文章对比了三个工具的压缩率,压缩时间等等
xz 文件
如果不使用上面提及的一步压缩和解压方式,可以拆看先解压,再拆包
xz -d file.tar.xz
tar -xvf file.tar
创建同理
tar -cvf file.tar /file
xz -z file.tar
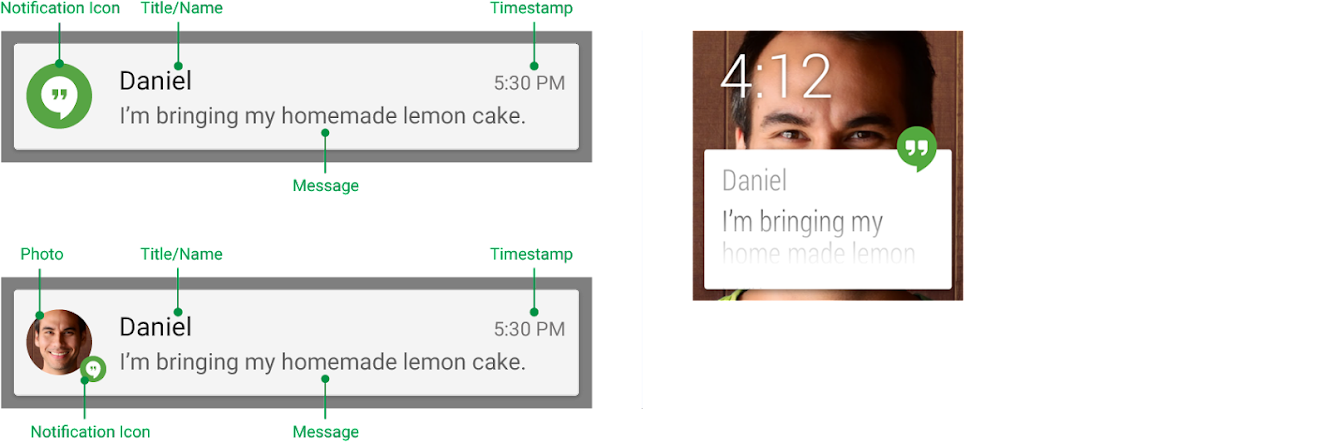
Android Notification
Android Support v4 包中的 NotificationCompat.Builder ,在 Android 3.0 API Level 11 中才有 Notification.Builder。
创建通知
您可以在 NotificationCompat.Builder 对象中为通知指定 UI 信息和操作。要创建通知,请调用 NotificationCompat.Builder.build(),它将返回包含您的具体规范的 Notification 对象。要发出通知,请通过调用 NotificationManager.notify() 将 Notification 对象传递给系统。
必需的通知内容
Notification 对象必须包含以下内容:
- 小图标,由 setSmallIcon() 设置
- 标题,由 setContentTitle() 设置
- 详细文本,由 setContentText() 设置
setContentIntent() 设置用户点击通知之后的动作。
NotificationCompat.Builder 在构造时自动设置时间为 System.currentTimeMillis() ,设置 Audio stream 为 STREAM_DEFAULT。
NotificationCompat.Builder 中可选的其他参数有
- setAutoCancel() 设置通知是否自动消失
- setLargeIcon(Bitmap icon) 设置大图标
- setTicker() 设置通知第一次到达时在status bar 上显示的文字,在Android L版本之后不再显示
- setLights() 设置通知呼吸灯的颜色以及频率
- setDeleteIntent() 设置用户直接在通知列表删除通知时的动作
- setAction() 设置通知中的动作
重要类
NotificationCompat.Builder 不必多说,其他重要的类有 NotificationCompat.Action 通知动作需要包含一个图标,一个标签,一个 PendingIntent 。通知动作在 Android 4.1 之前不会显示。
如果要在通知栏显示复杂View,需要设定 RemoteView,使用 setContent(RemoteViews views) 方法
NotificationCompat.Style 用来展现更丰富的通知内容的样式,直接子类有
- NotificationCompat.BigPictureStyle
- NotificationCompat.BigTextStyle
- NotificationCompat.InboxStyle
- NotificationCompat.MediaStyle
BigPictureStyle 可以显示大图,如果通知附带一张大图片,可以使用该样式。通常 Android 截屏之后显示的通知就是。
Notification notif = new Notification.Builder(mContext)
     .setContentTitle("New photo from " + sender.toString())
     .setContentText(subject)
     .setSmallIcon(R.drawable.new_post)
     .setLargeIcon(aBitmap)
     .setStyle(new Notification.BigPictureStyle()
         .bigPicture(aBigBitmap))
     .build();
InboxStyle 可以产生多行文本的通知,至多可以显示5个字符串。
Notification noti = new Notification.Builder()
     .setContentTitle("5 New mails from " + sender.toString())
     .setContentText(subject)
     .setSmallIcon(R.drawable.new_mail)
     .setLargeIcon(aBitmap)
     .setStyle(new Notification.InboxStyle()
         .addLine(str1)
         .addLine(str2)
         .setContentTitle("")
         .setSummaryText("+3 more"))
     .build();
还有可以显示很多文字的 BigTextStyle,和比较复杂的 MediaStyle。
Android 4.4 以下的通知


Android 5.0 及以上的通知
reference
- https://developer.android.com/reference/android/support/v4/app/NotificationCompat.Builder.html
- http://www.androidpolice.com/2014/11/14/lollipop-feature-spotlight-the-status-bar-notification-ticker-is-gone-and-thats-kind-of-dumb/
- http://stackoverflow.com/questions/16168553/create-custom-notification-android
- http://dj-android.blogspot.in/2013/04/android-notifications-3-applying-big.html
Android monkey test
Android UI monkey 测试
伪随机用户事件,发送到模拟器或者设备,用来对应用程序进行压力测试。
功能:
- 设定事件数
- 操作限定到某一个特定 package
- 事件类型和频率
- 调试选项
报错:
- 如果应用 crash 或者遇到 unhandled exception , monkey 会停止并上报错误
- 如果应用产生 not responding error , monkey 也会停止并上报
基本使用
基本语法:
adb shell monkey [options] <event-count>
下面的例子是测试在特定包上,发送500随机事件
adb shell monkey -p your.package.name -v 500
一些有用的选项:
| Option | 描述 |
|---|---|
| -v -vv -vvv | 三档等级,越来越详细 |
| --throttle |
事件和事件之间延迟 |
| --pct-touch |
点击事件,单个点按下抬起,后接百分比 |
| --pct-motion |
滑动事件,某一点按下,随机移动距离,抬起 |
| --pct-trackball |
模拟轨迹球,包含随机的移动,可能伴随着点击 |
| --pct-nav |
外部输入,上下左右操作(没有使用过,但似乎游戏可用) |
| --pct-syskeys |
调整系统事件,包括Home,back ,音量键等等 |
| -p |
允许的 package name |
| -c |
指定允许monkey跑的 category,下面有例子 |
| --ignore-crashes | 通常monkey 遇到crash 会停止,此选项忽略crash 直到指定次数跑完 |
| --ignore-timeouts | 忽略 ANR |
| --ignore-security-exceptions | 忽略Permission error 或者其他 unhandled exception |
测试特定Activity
Manifest 文件中定义 category:
<activity android:name="MonkeyActivity">
    <intent-filter>
        <action android:name="android.intent.action.MAIN" />
        <category android:name="android.intent.category.MONKEY" />
    </intent-filter>
</activity>
使用命令:
adb shell monkey -p my.package -c android.intent.category.MONKEY -v 500
防止通知栏下拉
在 Android 5.0 Lollipop 及以上系统中可以使用 screen pinning.
- 在 settings>security>screen pinning
- 点击 程序切换按钮 multitasking
- 点击图标上的绿色图钉, pin icon
此时再运行则不会跳出应用。
停止 MonkeyTest
使用以下命令停止 monkey Test :
adb shell ps | awk '/com\.android\.commands\.monkey/ { system("adb shell kill " $2) }'
monkeyrunner
features 功能:
- 多设备控制,同时在多台设备测试
- 功能测试
- 回归测试
- 可扩展自动化
monkeyrunner 使用 Jython
reference
文章分类
最近文章
- Dinox 又一款 AI 语音实时转录工具 前两天介绍过 [[Voicenotes]],也是一款 AI 转录文字的笔记软件,之前在调查 Voicenotes 的时候就留意到了 Dinox,因为是在小红书留意到的,所以猜测应该是国内的某位独立开发者的作品,整个应用使用起来也比较舒服,但相较于 Voicenotes,Dinox 更偏向于一个手机端的笔记软件,因为他整体的设计中没有将语音作为首选,用户也可以添加文字的笔记,反而在 Voicenotes 中,语音作为了所有笔记的首选,当然 Voicenotes 也可以自己编辑笔记,但是语音是它的核心。
- 音流:一款支持 Navidrom 兼容 Subsonic 的跨平台音乐播放器 之前一篇文章介绍了Navidrome,搭建了一个自己在线音乐流媒体库,把我本地通过 [[Syncthing]] 同步的 80 G 音乐导入了。自己也尝试了 Navidrome 官网列出的 Subsonic 兼容客户端 [[substreamer]],以及 macOS 上面的 [[Sonixd]],体验都还不错。但是在了解的过程中又发现了一款中文名叫做「音流」(英文 Stream Music)的应用,初步体验了一下感觉还不错,所以分享出来。
- 泰国 DTV 数字游民签证 泰国一直是 [[Digital Nomad]] 数字游民青睐的选择地,尤其是清迈以其优美的自然环境、低廉的生活成本和友好的社区氛围而闻名。许多数字游民选择在泰国清迈定居,可以在清迈租用廉价的公寓或民宿,享受美食和文化,并与其他数字游民分享经验和资源。
- VoceChat 一款可以自托管的在线聊天室 VoceChat 是一款使用 Rust(后端),React(前端),Flutter(移动端)开发的,开源,支持独立部署的在线聊天服务。VoceChat 非常轻量,后端服务只有 15MB 的大小,打包的 Docker 镜像文件也只有 61 MB,VoceChat 可部署在任何的服务器上。
- 结合了 Google 和 AI 的对话搜索引擎:Perplexity AI 在日本,因为 SoftBank 和 Perplexity AI 开展了合作 ,所以最近大量的使用 Perplexity ,这一篇文章就总结一下 Perplexity 的优势和使用技巧。