英语搭配语字典整理
最近用 [[GoldenDict]] 查词非常频繁且非常有效的提高了阅读的效率,但是在日常有的时候听一些英语口语的广播节目的时候,经常会有一些短语搭配,而我们平时如果写作的话,其实短语较于单词更为重要,口语亦然。所以产生了一个念头,如果有一本英语搭配语字典就能够提高不少效率,没想到都不用去刻意搜索,就出来了好几个推荐。
- Oxford Collocation Dictionary 牛津英语搭配语词典
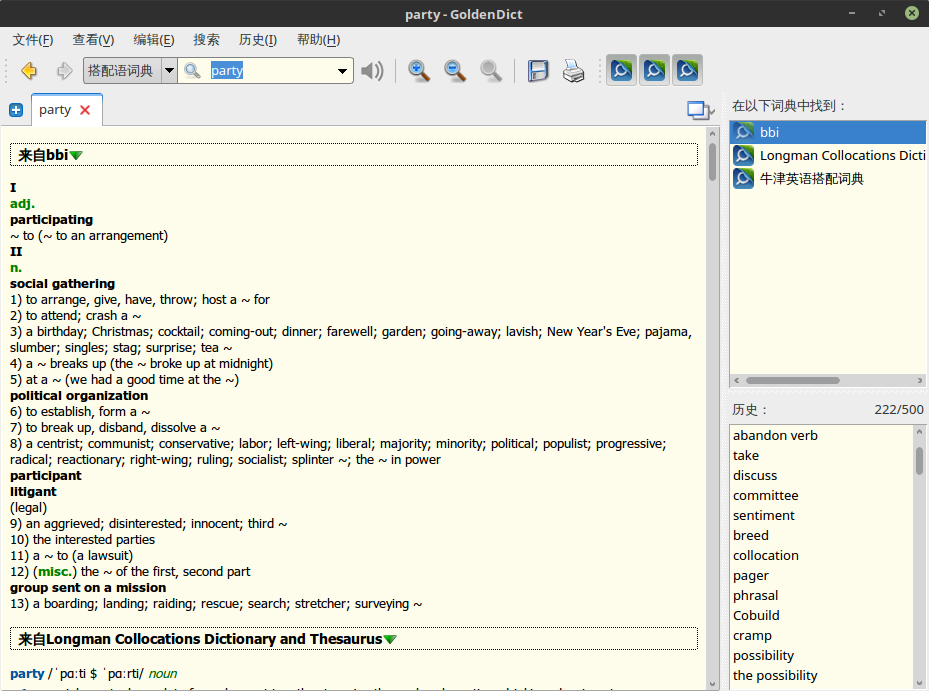
- The BBI dictionary of English word combinations BBI 英语搭配词典
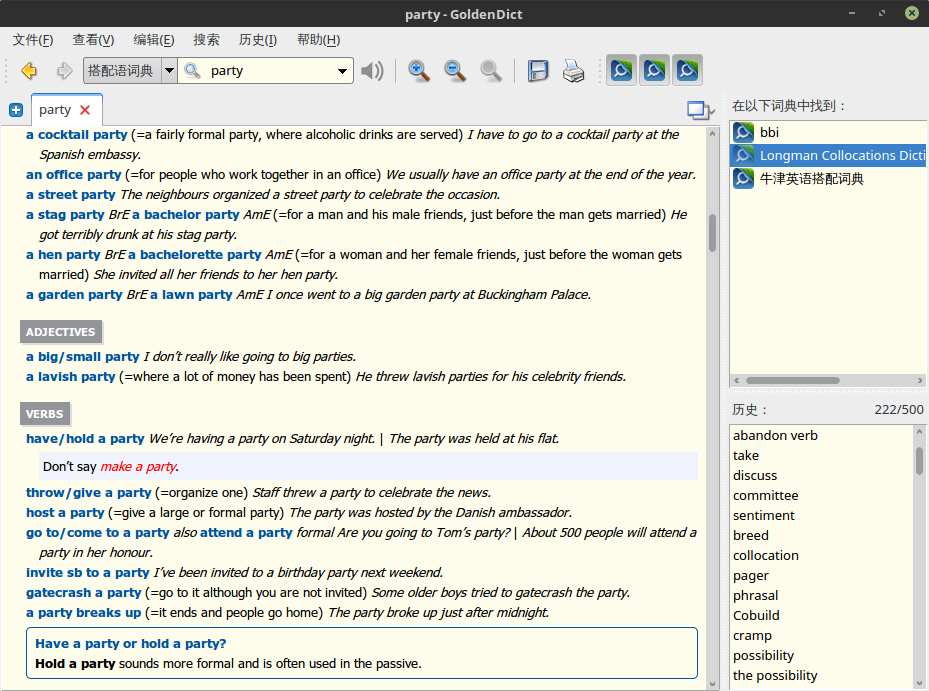
- Longman Collocations Dictionary and Thesaurus 朗文搭配
- Longman Language Activator 朗文英语联想活用词典,更准确来说这一本更像是一部同义词解析词典,但也有涉及短语搭配
- Oxford Learner’s Thesaurus
比如在查阅 dictionary 时,将查阅字典这一类的词组 look up the dictionary 也能够显示出来。在别人分享的一篇文章中,作者举了一个例子 open up the possibility ,开启了什么的可能性,possibility 这个单词非常常见,但是却少有人意识到它可以和 open up 一起用。搭配字典在英语学习中,尤其是非母语人士的英语写作中起着很大的帮助作用。越普通,越常见的单词就越应该了解其常用的搭配。
牛津英语搭配语词典 Oxford Collocation Dictionary
一种全新的英文词典,提供词于词见常用并且地道搭配用法。可以有效帮组英语学生或成人 学习,写作和说地道的英文。 该词典对准备雅思、托福等英语考试也非常有益。
级别:Upper-Intermediate to Advanced
主要特点:
《牛津英语搭配词典》(英汉双解版)从崭新的角度探究了英语中词与词之间的组合关系,如 ‘bright idea’ or ‘talk freely’。这种组合不是任意的,而是受到语义、语法、语体和文化的制约。只有熟悉和掌握了英语搭配,才能真正做到让英语单词“为我所用”,地道自然地传达思想,与人高效沟通。本词典收录搭配丰富,逾 9,000 个常用英语词条, 达 150,000 个搭配词组;例句真实自然,50,000 条示例全部选自语料库;专辟 25 个不同主题的用法说明,加深对搭配词应用的理解;

The BBI Dictionary of English Word Combinations
是一本非常轻薄的搭配语字典,词条详细,内容丰富,编排紧凑,同样也带来了一定阅读的不便。
Longman Collocations Dictionary and Thesaurus
朗文搭配语词典,虽然没有牛津搭配语词典有名,但一样是一本非常地道的搭配语词典,排版甚至较牛津的更加清晰易读。
Longman Language Activator
朗文英语写作活用词典,这是一本如何活用英语的词典,不仅会告诉你单词的意思,还会告诉你这个单词的使用情景。比如查询 future,它会告诉你 future 有这么多含义:
- the time after now
- 在表示现在之后的时间时,有
the car of the future may run on solar-powered batteries.等等这样的搭配 - 也会告诉你,future 相同含义的表达也可以是
lie ahead,ahead of
- 在表示现在之后的时间时,有
- at some time in the future
- 同样你也可以看到词典里面会有
in the future,some time,one day等等的组合
- 同样你也可以看到词典里面会有
- likely to happen in the future
- 表达相似的意思可以使用
be on the horizon,be in store等等
- 表达相似的意思可以使用
Oxford Learner’s Thesaurus
更加准确来说这是一本 Thesaurus 词典,也就是同义词词典,会给出查阅单词的相近含义的单词,以便于联想学习。
总结
前三本字典是真正的搭配语词典,有着非常丰富的搭配语用法和解释,所以推荐可以日常对比使用。而后两本更加偏向于同义词活用,有时间再整理一下同义词词典吧。
reference
Bash Script
Shell Syntax - what is your input means to the shell
Shell Operations - what can shell do
- read input from file
- breaks the input into words and operations
- parse the token into simple and compound commands
- performs the various shell expansions
- redirections
- execute the commands
- wait for command to complete and collect the exit status
Quoting - remove the special meaning from characters
Escape Character
A non-quoted backslash \ is the Base escape character. It preserves the literal value of the next character that follows.
除了 \newline 有特殊意义。其他都表示转义。
Single Quotes
Enclosing characters in single quotes(') perserves the literal value of each character within the quotes. A single quote may not occur between single quotes, even when proceded by a backslash.
Double Quotes
Enclosing characters in double quotes (") perserves the literal value of all characters within the quotes, with the exception of $, ```, \.
ANSI-C Quoting
\a      alert
\e \E   an escape character
\n      newline
$(command) is the modern synonym for command , $() will evaluate this command result and then evaluate the reset of line.
echo $(pwd)/file
with be
echo /path/to/file
Curly braces (${}) are also unconditionally required when
- expanding array elements, as in
${array[2]}
Shell Commands - the types of commands you can use
Shell Functions - the way you group commands by name
Two ways to define a function:
function functname {

}
or
functionName() {

}
Shell Parameters - how shell stores values
Shell Expansions - how bash expands parameters and the various expansions available
Redirections - a way to control where input and output go
Executing Commands - what happens when you run a command
Shell Scripts - executing files of shell commands
Double parentheses
Double parentheses are used for arithmetic operations:
((a++))

((meaning = 42))

for ((i=0; i<10; i++))

echo $((a + b + (14 * c)))
Bash built-in variables
if we have file test.sh
#! /bin/sh
echo '$#' $#
echo '$@' $@
echo '$?' $?
then run:
> ./test.sh 1 2 3
We will get:
$#  3
$@  1 2 3
$?  0
Explain:
$# = number of arguments. Answer is 3
$@ = what parameters were passed. Answer is 1 2 3
$? = was last command successful. Answer is 0 which means 'yes'
Tips
看一些 shell 脚本的时候发现了如下的写法
VAR1=${VAR1:-VAR2}
这个语句允许当 VAR1 为空时用 VAR2 来赋值。
${parameter:-word}
    If parameter is unset or null, the expansion of word is substituted.
    Otherwise, the value of parameter is substituted.
这个在 Bash 中叫做 parameter expansion ,更多的内容可以参考 Bash Hacker’s Wiki
使用举例
当 variable 不存在时,会默认使用后者
$ echo "$VAR1"

$ VAR1="${VAR1:-default value}"
$ echo "$VAR1"
default value
当 variable 存在时,则使用前者
$ VAR1="has value"
$ echo "$VAR1"
has value

$ VAR1="${VAR1:-default value}"
$ echo "$VAR1"
has value
reference
Linux 下安装 openssh server
一般服务器中会默认已经安装 SSH server,而个人版本的发行版,比如桌面版的 Ubuntu 或者我用的 Mint 可能默认没有安装,那么就需要自己安装配置。
SSH is program and protocol for securely logging into remote machines across a network. It allows you to run programs, and do a variety of tasks as if you were sitting at the machine. SSH is very similar to telnet except for it is with encryption to protect the transferred information and authentication.
安装
可以通过下面命令查看安装包
sudo apt search ssh
或者
sudo apt search openssh
通过下面命令安装
sudo apt install openssh-server
配置
sudo vim /etc/ssh/sshd_config
来修改 ssh 默认的配置,可以通过修改 Port 来指定 ssh 默认监听端口 22
然后使用如下命令重启 ssh 服务
sudo /etc/init.d/ssh restart
在其他电脑上可以使用 ssh name@address -p port 来连接。
openssh 和 ssh 包的区别
使用 apt search 的时候会发现,有 openssh 和 ssh 两个不同的 package
i A openssh-client                  - secure shell (SSH) client, for secure acce
p   openssh-server                  - secure shell (SSH) server, for secure acce
p   ssh                             - secure shell client and server (metapackag
v   ssh-client                      -
v   ssh-server                      -
openssh 的包中又分为 server 和 client ,对于只需要安装 server 的机器来说只需要安装 server,客户端也单独安装就可以。而如果直接安装 ssh 的话,client 和 server 都会安装。使用 aptitude show ssh 可以查看 package 的具体信息。
reference
每天学习一个命令:gzip 压缩文件
gunzip 是个使用广泛的解压缩程序,它用于解开被 gzip 压缩过的文件,这些压缩文件预设最后的扩展名为”.gz”。 事实上 gunzip 就是 gzip 的硬连接,因此不论是压缩或解压缩,都可通过 gzip 指令单独完成。
命令格式
unzip  [-Z]  [-cflptTuvz[abjnoqsCDKLMUVWX$/:^]]  file[.zip] [file(s) ...]
   [-x xfile(s) ...] [-d exdir]
常用参数:
-c将输出写到标准输出上,并保留原有文件-d把 .gz 文件解压出来-l查看当前压缩文件的信息。-r递归式地查找指定目录并压缩其中的所有文件或者是解压缩-t测试,检查压缩文件是否完整-num用指定的数字 num 调整压缩的速度,-1 或 –fast 表示最快压缩方法(低压缩比),-9 或 –best 表示最慢压缩方法(高压缩比)系统缺省值为 6-v对每一个压缩和解压的文件,显示文件名和压缩比。
使用实例
压缩
gzip file1
压缩直接使用 gzip 加上文件名,还可以指定压缩率默认是 6 ,最高是 9 最低是 1。
解压缩
-d 表示解压缩, 等同于 --decompress。-v 表示 verbose,打印更多的日志:
gzip -dv file.gz
显示压缩包内容
gzip -l file.gz
可以显示压缩之后的大小 解压缩之后的大小 压缩率是多少,大概像下图这样。
compressed       uncompressed         ratio          uncompressed_name
  23124234          110229            60.4%          file.gz
合并多个 gzip 文件
可以使用 cat 来合并多个 gzip :
cat 1.gz 2.gz 3.gz > total.gz
Set up Drools Workbench with tomcat
在本机使用 Tomcat 启动 Drools Workbench,通常情况下直接使用 Docker 起就行了,但是为了学习 KIE Drools Workbench,这边就补习一下 Tomcat 启动方式。
基本的准备工作包括:
- JDK, JAVA_HOME
- Tomcat
- Drools 相关工具
- sudo 使用权限
installation
Make sure you have Tomcat installed.
Follow this link to download the drools workbench. And choose the Tomcat version to download.
You will get kie-drools-wb-7.11.0.Final-tomcat8.war file. And you can just rename it to kie-drools-wb.war .
And copy(deploy) the .war to TOMCAT/webapps directory. 这个名字决定了在 URL 中的路径,需要注意下。
dependency jars
Download following related jars and copy them to TOMCAT/lib:
- btm-2.1.4.jar
- btm-tomcat55-lifecycle-2.1.4.jar
- h2-1.4.193.jar
- jta-1.1.jar
- slf4j-api-1.7.2.jar
- slf4j-jdk14-1.7.2.jar
- kie-tomcat-integration-7.11.0.Final.jar kie-tomcat-integration
- javax.security.jacc-api-1.6.jar JACC (javax.security.jacc:artifactId=javax.security.jacc-api)
These jars can be found at https://mvnrepository.com/
conf
Firstly, modify the vim tomcat\conf\tomcat_user.xml file, and add following between <tomcat-users></tomcat-users>. This file control the privilege of tomcat which is used by KIE:
<role rolename="admin"/>
<role rolename="analyst"/>
<role rolename="user"/>
<role rolename="kie-server"/>
<role rolename="manager"/>
<role rolename="manager-gui"/>
<role rolename="manager-status"/>
<user username="workbench" password="workbench" roles="admin,kie-server"/>
<user username="kieserver" password="kieserver" roles="kie-server"/>
<user username="admin" password="admin" roles="admin,manager-gui,manager-status,manager, user"/>
Note, analyst or admin roles is required to be authorized to use kie-wb.
Secondly, create setenv.sh (or setenv.bat) under tomcat/bin/
TOMCAT_HOME="/opt/tomcat/"
DATA_PATH="/home/einverne/data/kie-wb"
CATALINA_OPTS="-Xmx512M  \
            -XX:MaxPermSize=512m  \
            -Dbtm.root=$TOMCAT_HOME \
            -Dbitronix.tm.configuration=$TOMCAT_HOME\conf\btm-config.properties \
            -Djbpm.tsr.jndi.lookup=java:comp/env/TransactionSynchronizationRegistry \
            -Djava.security.auth.login.config=$TOMCAT_HOME\webapps\kie-drools-wb\WEB-INF\classes\login.config \
            -Dorg.jboss.logging.provider=jdk \
            -Dorg.uberfire.nio.git.dir=$DATA_PATH \
            -Dorg.uberfire.nio.git.ssh.cert.dir=$DATA_PATH \
            -Dorg.guvnor.m2repo.dir=$DATA_PATH/repo \
            -Dorg.uberfire.metadata.index.dir=$DATA_PATH"
NOTE: On Debian based systems $CATALINA_HOME needs to be replaced with $CATALINA_BASE. ($CATALINA_HOME defaults to /usr/share/tomcat8 and $CATALINA_BASE defaults to /var/lib/tomcat8/)
NOTE: this is an example for unix like systems for Windows $CATALINA_HOME needs to be replaced with windows env variable or absolute path
NOTE: java.security.auth.login.config value includes name of the folder in which application is deployed by default it assumes kie-drools-wb so ensure that matches real installation. login.config file can be externalized as well meaning be placed outside of war file.
还有一个需要注意的是,如果想要在 Drools Workbench 中使用 git clone ssh://admin@localhost:8001/ 这样的工具,有两点需要特别注意,一个就是这个配种中的
-Djava.security.auth.login.config=$TOMCAT_HOME\webapps\kie-drools-wb\WEB-INF\classes\login.config \
这个 login.config 地址一定要配置正确,尤其是 webapps 后面的路径,不同的环境可能配置的路径不一样。第二点就是在上面的角色配置中需要启用一个叫做 user 的角色,并且将自己的用户名配置到 user 角色下。1 2
Then add valve configuration into TOMCAT_HOME/conf/server.xml inside Host element as last valve definition:
<Valve className="org.kie.integration.tomcat.JACCValve" />
Create btm-config.properties file under tomcat/conf and add this:
bitronix.tm.serverId=tomcat-btm-node0
bitronix.tm.journal.disk.logPart1Filename=%{btm.root}%\work\btm1.tlog
bitronix.tm.journal.disk.logPart2Filename=%{btm.root}%\work\btm2.tlog
bitronix.tm.resource.configuration=%{btm.root}%\conf\resources.properties
Create resources.properties file under tomcat/conf:
resource.ds1.className=bitronix.tm.resource.jdbc.lrc.LrcXADataSource
resource.ds1.uniqueName=jdbc/jbpm
resource.ds1.minPoolSize=10
resource.ds1.maxPoolSize=20
resource.ds1.driverProperties.driverClassName=org.h2.Driver
resource.ds1.driverProperties.url=jdbc:h2:mem:jbpm
resource.ds1.driverProperties.user=sa
resource.ds1.driverProperties.password=
resource.ds1.allowLocalTransactions=true
打开 KIE
打开 http://localhost:8080 端口应该能看到 Tomcat 页面,在 Tomcat 管理 app 页面中 (http://localhost:8080/manager/html) 启动 KIE
在列表中会看到 kie-wb 这个项目,初始状态应该是 stop 状态,点击启动,观察 Tomcat 下 logs/catalina.out 应该能够看到启动日志,如果出现错误,需要处理一下。通常情况下可能会出现创建目录失败的问题,手动创建目录并给予写入权限即可。
等待启动后,点击左边的 path 进入应用,使用 Tomcat 中配置的权限登录。
reference
Tomcat 安装及使用
DescriptionApache Tomcat implements several Java EE specifications including Java Servlet, JavaServer Pages, Java EL, and WebSocket, and provides a “pure Java” HTTP web server environment in which Java code can run.
Apache License 2.0
installation
Firstly, make sure jdk is installed.
Download the latest binary release of Tomcat from the official site
wget http://apache.website-solution.net/tomcat/tomcat-8/v8.5.41/bin/apache-tomcat-8.5.41.tar.gz
sudo tar zxvf apache-tomcat-8.5.41.tar.gz -C /opt/
sudo ln -s /opt/apache-tomcat-8.5.41 /opt/tomcat
Then, for security purposes, Tomcat should be run as an unprivileged user( not root), so we have to create necessary group and users.
sudo groupadd tomcat
And create a tomcat user. And we make this user a member of tomcat group, with a shell of /bin/false( so nobody can log into the account ), and with a home directory of /opt/tomcat (where we install Tomcat)
sudo useradd -s /bin/false -g tomcat -d /opt/tomcat tomcat
Now, tomcat user is set up.
Give the tomcat group ownership over the entire installation directory:
sudo chgrp -R tomcat /opt/tomcat
And give the tomcat group read access to the conf directory and all of its contents.
sudo chmod -R g+r conf
sudo chmod g+x conf
sudo chown -R tomcat webapps/ work/ temp/ logs/
Create a systemd Service file
sudo vim /etc/systemd/system/tomcat.service
And paste this:
[Unit]
Description=Apache Tomcat Web Application Container
After=network.target

[Service]
Type=forking

Environment=JAVA_HOME=/usr/lib/jvm/java-1.8.0-openjdk-amd64/jre
Environment=CATALINA_PID=/opt/tomcat/temp/tomcat.pid
Environment=CATALINA_HOME=/opt/tomcat
Environment=CATALINA_BASE=/opt/tomcat
Environment='CATALINA_OPTS=-Xms512M -Xmx1024M -server -XX:+UseParallelGC'
Environment='JAVA_OPTS=-Djava.awt.headless=true -Djava.security.egd=file:/dev/./urandom'

ExecStart=/opt/tomcat/bin/startup.sh
ExecStop=/opt/tomcat/bin/shutdown.sh

User=tomcat
Group=tomcat
UMask=0007
RestartSec=10
Restart=always

[Install]
WantedBy=multi-user.target
And remember to replace your own java home.
Next, reload the systemd daemon
sudo systemctl daemon-reload
sudo systemctl start tomcat
sudo systemctl status tomcat
How you can visit http://localhost:8080 to check Tomcat page. Oh if you have ufw installed, don’t forget to allow traffic by:
sudo ufw allow 8080
And finally, if you want to go with Tomcat when start up, you can enable Tomcat automatically starts at boot:
sudo systemctl enable tomcat
management
In order to use the manager web app that comes with Tomcat, we must add a login to our Tomcat server.
sudo vim /opt/tomcat/conf/tomcat-users.xml
and edit:
<tomcat-users . . .>
  <user username="admin" password="password" roles="manager-gui,admin-gui"/>
</tomcat-users>
Restart your server
sudo systemctl restart tomcat
you can get what you want:
http://localhost:8080/manager/html
http://localhost:8080/host-manager/html
questions
修改 Tomcat 端口
修改 conf 目录下 server.xml 文件,修改 http 访问端口,默认为 8080
<Connector port="8080" protocol="HTTP/1.1"
           connectionTimeout="20000"
           redirectPort="8443" />
搜索 Connector port 修改这里的端口号。
reference
MySQL 中的日志配置和管理
MySQL 中默认是没有开启日志记录的,所以需要手动修改配置文件开启日志。而在 MySQL 中我们需要关心的有三类日志:
The error log错误日志,这一类日志包括了服务器运行时,包括启动和停止时的错误等信息The General Query Log查询日志,通常是 mysqld 进行连接,断开连接,查询等等操作的日志The Slow Query Log慢查询日志,包含了慢查询的 SQL 语句
在配置中没有开启任何日志记录时,MySQL 相关的日志在 /var/log/syslog 中。之所以关注到 MySQL 的日志是因为发现服务器上 MySQL 间隔一定时间就自动重启,想要找出原因,开启日志之后观察了一段时间,初步排查可能是 clamav 执行时占用内存导致 MySQL 内存不足挂掉。现在把所有的日志都开启观察一段时间再看看。
开启日志
修改 /etc/mysql/my.cnf 中的配置,开启 MySQL 服务器日志,不同发行版的配置地址可能不相同:
[mysqld_safe]
log_error=/var/log/mysql/error.log

[mysqld]
log_error=/var/log/mysql/error.log
开启查询日志
general_log_file        = /var/log/mysql/mysql.log
general_log             = 1
开启慢查询日志
log_slow_queries       = /var/log/mysql/mysql-slow.log
long_query_time = 2
log-queries-not-using-indexes
修改保存配置之后需要重新启动 mysql
sudo service mysql restart
在运行时开启日志
如果不想重启服务器,可以在运行时,通过 mysql client 登录之后 mysql -u root -p 然后执行命令来开启:
SET GLOBAL general_log = 'ON';
SET GLOBAL slow_query_log = 'ON';
reference
Java 查漏补缺之:ThreadLocal 使用
ThreadLocal 线程本地变量,变量为线程独有,每个线程保存变量的副本,对副本的改动,对其他的线程而言是透明的。
特性
- The object is not shared between threads, so it can be used without the need for synchronization
- it is available throughout the life of the thread, meaning you don’t have to pass it all over the place through method calls
适用场景
- 每个线程都需要自己的数据存储对象
- 实例被多个方法共享,但是不希望多线程共享
- 空间换时间的场景
一个典型的例子就是用 ThreadLocal 来保存一次请求的 Session 数据,程序的不同地方可能需要读取 Session 的内容,也要往 Session 中写入数据。
construct an instance
Create instance with new:
ThreadLocal<Integer> threadLocalValue = new ThreadLocal<>();
Or using the withInitial() static method:
ThreadLocal<Integer> threadLocal = Threadlocal.withInitial(() -> 1);
常用方法
// 设置当前线程的线程局部变量的值
void set(Object value);

// 该方法返回当前线程所对应的线程局部变量
public Object get();

// 将当前线程局部变量的值删除
public void remove();
ThreadLocal 类允许我们创建只能被同一个线程读写的变量,通常的用法是当有一些 Object 不是线程安全,但是又想避免使用同步 访问机制时。比如 SimpleDateFormat,因此可以使用 ThreadLocal 来给每一个线程提供一个线程自己的对象。
public class Foo
{
    // SimpleDateFormat is not thread-safe, so give one to each thread
    private static final ThreadLocal<SimpleDateFormat> formatter = new ThreadLocal<SimpleDateFormat>(){
        @Override
        protected SimpleDateFormat initialValue()
        {
            return new SimpleDateFormat("yyyy-MM-dd HH:mm:ss");
        }
    };

    public String formatIt(Date date)
    {
        return formatter.get().format(date);
    }
}
ThreadLocal 对象是给定线程中对象的引用,因此在服务端使用线程池时极有可能造成 classloading leaks 内存泄露 ,在使用时需要特别注意清理。ThreadLocal 持有的任何对象空间在 Java 永久堆上,即使重新部署 webapp 也不回收这部分内存,可能造成 java.lang.OutOfMemoryError 异常。
原理
利用 HashMap,在 map 中保存了 Thread 名 -> 线程变量的关系,因此在多线程之间是隔离的,但同时也耗费了内存空间。
reference
为知笔记导出和备份
WizNote 已经用了好几年,虽然也一直在续费,但总感觉将死不死,基于整理这几年近 4000 条的笔记的目的,也一方面为迁移出 WizNote 的目的,研究一下 WizNote 笔记导出和备份的方法。
文中有些具体分析,基于 WizNote for Linux Version 2.5.8 版本,不同版本之间可能有些差异,务必要注意。
在 Linux 下 WizNote 笔记本地缓存放在~/.wiznote/{your-account-email-addr}/data/notes目录下面,都是{GUID}的方式存放,这些文件都是 zip 文件,每个文件里面包含 html , 图片以及元数据。元数据meta.xml 包含了每个 note 的相关信息,比如标题描述等等
如果需要更详细的信息,可以通过读 SQLite 的工具打开 ~/.wiznote/{your-account-email-addr}/data/index.db 文件
准备工作
在导出数据之前有一些准备工作,先同步所有数据,在 Preference 中,Sync 同步选项下
- Personal sync method 选 Download all data
- Group sync method 选择 Download all data when sync
- Download attachment 选择 Download all attachments
否则可能导致本地缓存不是全部的笔记而造成一定程度数据丢失。
解决方法
在 index.db 数据库中有两张很重要的表,WIZ_DOCUMENT 其中包括了所有笔记的信息,包括笔记的 GUID,标题等等信息,具体的表结构可以查看后文附录中内容。另外一张很重要的表是 WIZ_DOCUMENT_ATTACHMENT 其中存储了笔记附件信息。
表中重要的几列
DOCUMENT_GUID看名字就能够猜出来这是笔记的全局唯一 ID,对应着 data 目录中存储的笔记 IDDOCUMENT_TITLE,DOCUMENT_LOCATION等等顾名思义就不多说- 上面提及的两张表通过
DOCUMENT_GUID形成关联,一个笔记可能会对应一个或者多个附件,这些信息都包含在附件表中
所以对应的解决方案就是中 db 中读取笔记的 meta 信息,从磁盘 data 目录中找到对应的笔记,解压缩,然后将对应的附件拷贝到对应的笔记目录。
源码地址:https://github.com/einverne/ExptWizNote
附录
表结构 WIZ_DOCUMENT
create table WIZ_DOCUMENT
(
  DOCUMENT_GUID              char(36)     not null
    primary key,
  DOCUMENT_TITLE             varchar(768) not null,
  DOCUMENT_LOCATION          varchar(768),
  DOCUMENT_NAME              varchar(300),
  DOCUMENT_SEO               varchar(300),
  DOCUMENT_URL               varchar(2048),
  DOCUMENT_AUTHOR            varchar(150),
  DOCUMENT_KEYWORDS          varchar(300),
  DOCUMENT_TYPE              varchar(20),
  DOCUMENT_OWNER             varchar(150),
  DOCUMENT_FILE_TYPE         varchar(20),
  STYLE_GUID                 char(38),
  DT_CREATED                 char(19),
  DT_MODIFIED                char(19),
  DT_ACCESSED                char(19),
  DOCUMENT_ICON_INDEX        int,
  DOCUMENT_SYNC              int,
  DOCUMENT_PROTECT           int,
  DOCUMENT_READ_COUNT        int,
  DOCUMENT_ATTACHEMENT_COUNT int,
  DOCUMENT_INDEXED           int,
  DT_INFO_MODIFIED           char(19),
  DOCUMENT_INFO_MD5          char(32),
  DT_DATA_MODIFIED           char(19),
  DOCUMENT_DATA_MD5          char(32),
  DT_PARAM_MODIFIED          char(19),
  DOCUMENT_PARAM_MD5         char(32),
  WIZ_VERSION                int64,
  INFO_CHANGED               int default 1,
  DATA_CHANGED               int default 1
);
表 WIZ_DOCUMENT_ATTACHMENT 结构
create table WIZ_DOCUMENT_ATTACHMENT
(
  ATTACHMENT_GUID        char(36)     not null
    primary key,
  DOCUMENT_GUID          varchar(36)  not null,
  ATTACHMENT_NAME        varchar(768) not null,
  ATTACHMENT_URL         varchar(2048),
  ATTACHMENT_DESCRIPTION varchar(600),
  DT_INFO_MODIFIED       char(19),
  ATTACHMENT_INFO_MD5    char(32),
  DT_DATA_MODIFIED       char(19),
  ATTACHMENT_DATA_MD5    char(32),
  WIZ_VERSION            int64
);
Nginx location 匹配规则
之前的关于 Nginx Config 的文章是当时看 Nginx 书记录下来的笔记,很大略,没有实际操作,等终究用到 location 的时候发现还是有很多需要注意的问题,比如匹配的优先顺序,比如 root 和 alias 的区别等等,所以单独拿一篇文章来记录一下目前遇到的问题,并来解决一下。
location 匹配顺序
之前的文章 也简单的提到了 Nginx 配置中 location 块,这个配置能够是的针对 URL 中不同的路径分别可以配置不同的处理路径。
我当前遇到的问题就是提供 API 接口的项目和静态文件的项目是两个单独的项目,我需要 / 处理 proxy_pass 到本地一个端口,而 /resources 到本地另外一个静态资源文件的路径。
location 的语法在很多的文档教程中都被描述为:
location [ = | ~ | ~* | ^~ ] uri { ... }
=用于非正则精确匹配 uri ,要求字符串与 uri 严格匹配,如果匹配成功,则停止向下搜索,并立即处理此请求^~用于非正则 uri 前,Nginx 服务器找到标示 uri 和请求字符串匹配程度最高的 location 后立即使用该 location 处理请求,不再匹配 location 块的正则 url~表示该 uri 包含正则,并且区分大小写~*表示 uri 包含正则,不区分大小写
从四个类别中就能看出来,location 使用两种表示方法,一种为不带 ~ 的前缀字符,一种是带有 ~ 的正则。
需要注意的是:
- 如果使用正则,那么 location 定义的顺序很重要,第一个匹配的正则就立即执行
- 使用精确匹配可以提高查询速度,比如经常请求的路径可以精确匹配
=
一个具体的请求 path 过来之后,Nginx 的具体匹配过程可以分为这么几步:
- 检查前缀字符定义的 location,记录最长的匹配项
- 如果找到了精确匹配
=的 location,结束查找,只用该配置 - 按顺序查找正则定义的 location,如果匹配则停止查找
- 如果没有匹配的正则,则使用之前记录的最长匹配 location
那么针对特定的问题:
location ^~ /resources {
    alias /home/einverne/project/static/;
    # autoindex on;
}
location ~ / {
    proxy_pass http://localhost:9000;
}
首先对于静态文件,我们要让匹配到的第一时间就命中,所以使用了 ^~
关于 location 匹配结尾的斜杠
在 location 后面接的表达式中的 slash 斜杠,可有可无,并没有影响。而对于 URL 中的尾部 / 则是,当有 / 时表示目录,没有时表示文件。当有 / 是服务器会自动去对应目录下找默认文件,而如果没有/ 则会优先去匹配文件,如果找不到文件才会重定向到目录,查默认文件。
root 和 alias 的区别
在 Location 或者其他 Nginx 配置中会经常看到 root 和 alias ,开始我以为这两者是能够混用的,但其实两者有着很大的区别。root 指令会将 location 中的部分附加到 root 定义的末尾形成一个完整的路径;而 alias 则不会包含 location 中定义的部分。
比如:
location /static {
    root /var/www/app/static/;
    autoindex off;
}
那么当 Nginx 寻找路径时会是:
/var/www/app/static/static/
如果这个在 static 目录的 static 目录不存在则显而易见会产生 404 错误。这是因为 location 中的 static 部分被附加到了 root 指定的路径后面,因此正确的做法是:
location /static {
    root /var/www/app/;
    autoindex off;
}
而对于 alias 正确的做法则是:
location /static {
    alias /var/www/app/static/;
    autoindex off;
}
reference
- https://segmentfault.com/a/1190000013267839
- https://stackoverflow.com/a/10647080/1820217
文章分类
最近文章
- AI Shell 让 AI 在命令行下提供 Shell 命令 AI Shell 是一款在命令行下的 AI 自动补全工具,当你想要实现一个功能,敲一大段命令又记不住的时候,使用自然语言让 AI 给你生成一个可执行的命令,然后确认之后执行。
- 最棒的 Navidrome 音乐客户端 Sonixd(Feishin) Sonixd 是一款跨平台的音乐播放器,可以使用 [[Subsonic API]],兼容 Jellyfin,[[Navidrome]],Airsonic,Airsonic-Advanced,Gonic,Astiga 等等服务端。 Sonixd 是一款跨平台的音乐播放器,可以使用 [[Subsonic API]],兼容 Jellyfin,[[Navidrome]],Airsonic,Airsonic-Advanced,Gonic,Astiga 等等服务端。
- 中心化加密货币交易所 Gate 注册以及认证 Gate.io 是一个中心化的加密货币交易所。Gate 中文通常被称为「芝麻开门」,Gate 创立于 2013 年,前身是比特儿,是一家致力于安全、稳定的数字货币交易所,支持超过 1600 种数字货币的交易,提供超过 2700 个交易对。
- 不重启的情况下重新加载 rTorrent 配置文件 因为我在 Screen 下使用 rTorrent,最近经常调试修改 rtorrent.rc 配置文件,所以想要找一个方法可以在不重启 rTorrent 的情况重新加载配置文件,网上调查了一下之后发现原来挺简单的。
- Go 语言编写的网络穿透工具 chisel chisel 是一个在 HTTP 协议上的 TCP/UDP 隧道,使用 Go 语言编写,10.9 K 星星。